We know others phone number as we use it , but its too less about we using our own phone number . So if you are one such person who doesn’t know your own phone number , Here is the way to Find Phone Number on Android. That is to know What’s my phone number .
If you ever wondered like me – what is my phone number , then read this for sure .
What’s my phone number – Find Phone Number on Android
Here we will discuss the way to give answer to your question ” What’s my phone number ? ” .
Let’s get acquainted with the different methods to Find Phone Number on Android device . It is very easy thing as your device itself has a way for helping you to show me my phone number from android settings .
This method works absolutely fine for most of the android versions . So you can follow the below steps if you are someone who forgot your own phone number and now sad with the question What’s my phone number –
Go to the settings option.
Now when you scroll down you can find either of these options ” About device ” or “ About phone “
Now mostly you can find your Android device phone number here .
Haven’t find your phone number yet ? Okay no worries now follow the further steps .
4. Select “Phone identity ” / “Status “.
There you go , i guess you found your phone number by this .
Most of the Android device shows the phone number of the device under the list as ” SIM Card Status / Voice MSISDN Line 1 ” .
Here is the second method to find your device phone number if you don’t know your own mobile number .
Go to “messages” applications and select “settings”
Now scroll down and see “Phone number“
Method three to find your Phone Number
You can get phone number android code easily to know what’s my phone number of the device you are using .
Just Dial 1-800-444-4444 , that’s it this will read the phone number you are calling from .
If your phone number is shown as unknown or anonymous , you may be worrying why my phone number is showing unknown / anonymous . Then the reason can be you must remove your SIM card from the slot and again insert it .
That is all about the methods on finding your own phone number on Android device .
Soon we will update What’s my phone number finding methods for iPhone users .
You may all know that its too much annoying to find that many features of Facebook Desktop version is missing on Facebook for Android Application . So here is the ways to tackle this problem by clearly explaining how to View Facebook Full site – Facebook Desktop Version on Android .
That is all about how to view Full version of Facebook on Android or Facebook full site view on Desktop.
View Facebook Full site – Facebook Desktop Version on Android
There are three different ways to View Facebook Full site version on mobile .
Direct Link Method to View Facebook Full site on Android
Here is the first method to access Facebook full site version via direct link ( www.facebook.com full site ).
Login to Facebook account first by means of Facebook mobile version site .
Step two is to type out the direct link on your browser . The link is ” https://www.facebook.com/home.php “.
That’s it now you can View Facebook Full site on Mobile . This will help you to access Facebook desktop version on your mobile itself .
Browser Setting Method to View Facebook Full site on Android
Now moving on to the next method to View Facebook Full site version on Android , follow these steps .
You know almost all mobile browsers have the desktop view feature .
Open your mobile browser that you are using .
Now you can find three dots on top just tap on it.
From menu you have to select the option Request Desktop Site .
Else follow the below steps in case the above three steps didn’t give you access to Facebook full website on Android.
Go to browser Settings
Select Debug
Change the UA string / UA Agent
This steps will make you access facebook desktop version on mobile itself .
This will help all to Create Virtual Desktop without Upgrading to Latest Windows OS . If you use Windows 7 or Windows 8 but need Windows 10 Virtual desktop Feature on Windows 7/8 then you can get the multiple desktop feature without upgrading to Latest Windows OS .
Its a known fact that Mac & Linux had the virtual desktop feature from long . Microsoft has launched this officially through Windows 10 .
Create Virtual Desktop without Upgrading to Latest Windows OS
But do you guys know that Windows already has this Virtual desktop feature but its not enabled in our PC by default.
So In this article we will guide you to Create Virtual Desktop on Windows 7 & Windows 8 without updating to latest Windows OS.
These days multi tasking has become the need of the hour . So when you are not having multiple monitor then this feature of multiple desktop function is really helpful . This helps you to use multiple virtual desktops on one PC.
Go to Microsoft TechNet site – ( Find link here – https://technet.microsoft.com/en-in ) .
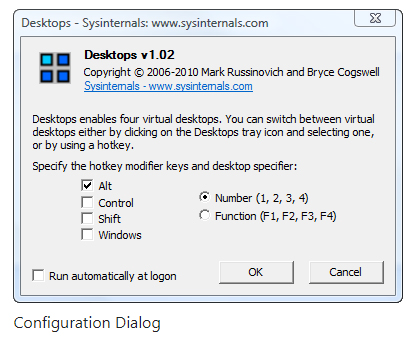
Now from Download you have to download a freeware : Desktops v2.0 Windows Sysinternals.
You can get it downloaded into your PC as a ZIP File.
Now extract the EXE file by opening the ZIP folder.
Now somewhere in your PC on a accessible location like in document stash the EXE file
Now fire up program by double clicking it.
Now run the installation on your Windows.
At program startup set hotkeys.
That’s it , the process of installation is done. You can use this on Windows XP higher versions to use virtual desktops.
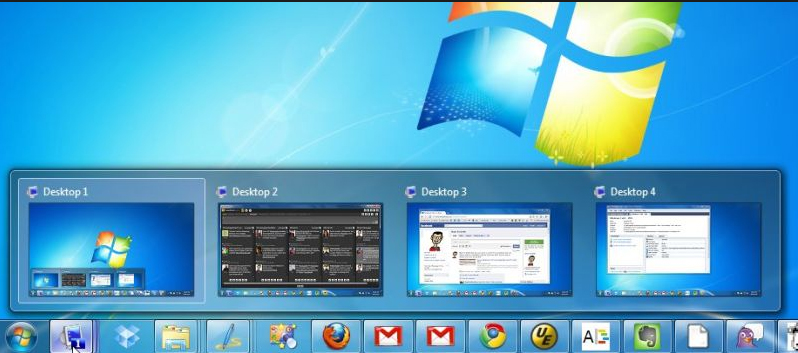
Now you can use virtual desktops in Windows without upgrading to new OS. The entire process of switching between the virtual desktops seems to be slow . But this gives you provision for creating four virtual desktops.
If you look for some other alternative to Desktops v2.0 Windows Sysinternals then the recommendation is Dexpot . Because Dexpot allows to use multiple desktop function with more added features than Desktops v2.0 .
Note – Windows Sysinternals is from Microsoft while Dexpot is just a third party app . If you are not using the licensed Windows OS then don’t try to use these methods to use virtual desktops .
So this will help all the Windows XP higher version users to Create Virtual Desktop without upgrading to latest Windows OS.
Microsoft Windows 10 new feature multiple desktop or Virtual Desktop feature is drawing more attention . Earlier we have given the ways to enable Virtual desktop feature with Alt + Tab . Here we will discuss about how to Use Multiple Desktops in Windows ( Virtual Desktop Feature ) . We will discuss three things under this head like – how to add a virtual desktop in Windows , how to switch between multiple desktops in Windows and finally how you can move windows between multiple desktops.
Use Multiple Desktops in Windows ( Virtual Desktop Feature )
In Latest Windows OS you can enjoy the privilege to use as many as Virtual desktops you want to use . The Task View Pane makes it more easy and swift for the Windows 10 users.
How to Add a Virtual desktop in Windows
So if you want to add new virtual desktop in Windows then follow the instructions given below –
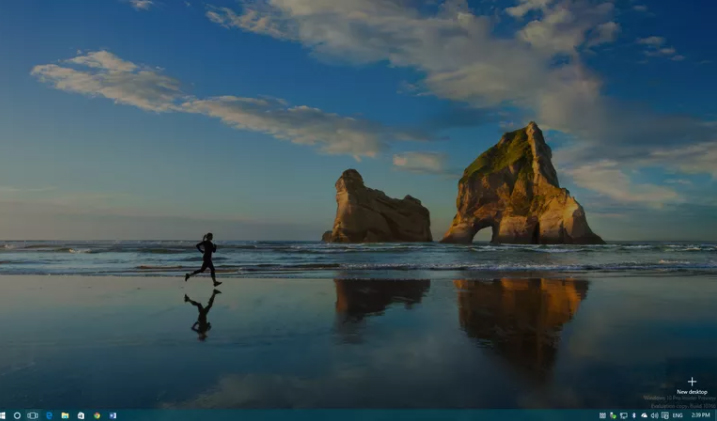
From Taskbar , click on the Task view button to open new Task View Pane.
Keyboard shortcut to open new Task View Pane – ” Windows Key + Tab “.
2. Now Click – New Desktop in the Task View Pane . This will Add a Virtual desktop in Windows
Keyboard shortcut to add new desktop – ” Windows Key + Ctrl +D “.
If there are already opened desktop then each new desktop will come up with a plus sign and as a grey tile .
You can follow the above steps to Use Multiple Desktops in Windows by adding a new virtual desktop on windows.
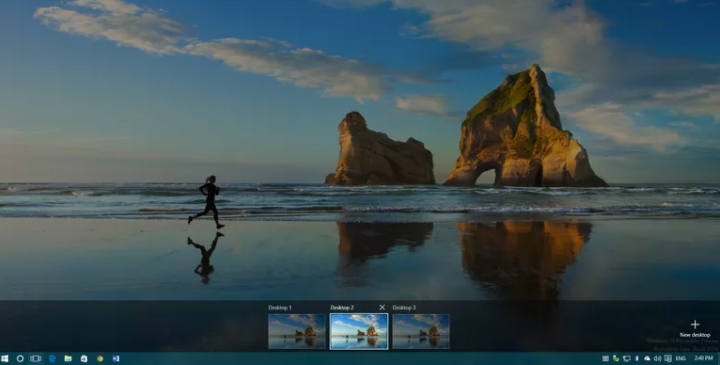
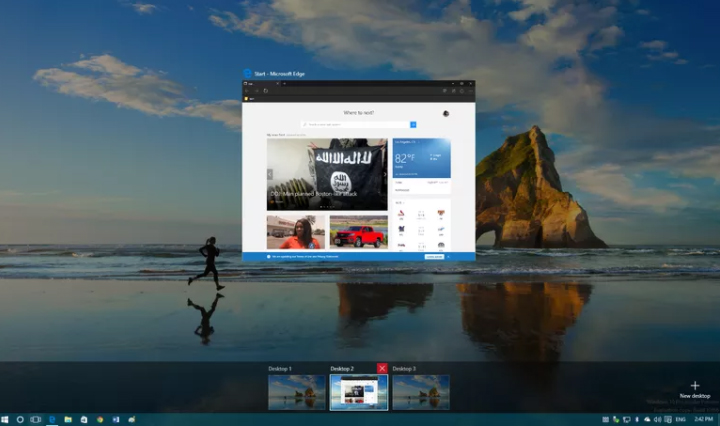
How to Switch between multiple desktops in Windows
So if you want to switch between multiple desktops in Windows then follow the instructions given below –
Open Task View Pane.
Point your cursor to the desktop you want to switch to and click it once.
Keyboard shortcut to switch between virtual desktops – ” Windows Key + Ctrl +Left Arrow ” & ” Windows Key + Ctrl + Right Arrow “
Switching from one desktop to another doesn’t happens as rapidly . It takes time of cycling between all opened virtual desktops to switch to the particular one you want . Lack of scrolling function makes it more time consuming to switch between virtual desktops .
Though you can add infinite number of virtual desktop in Windows 10 , you can see only 9 virtual desktop at a time .
Hopefully upcoming windows 10 version will fix these kind of issues to make multi window user function more hassle free .
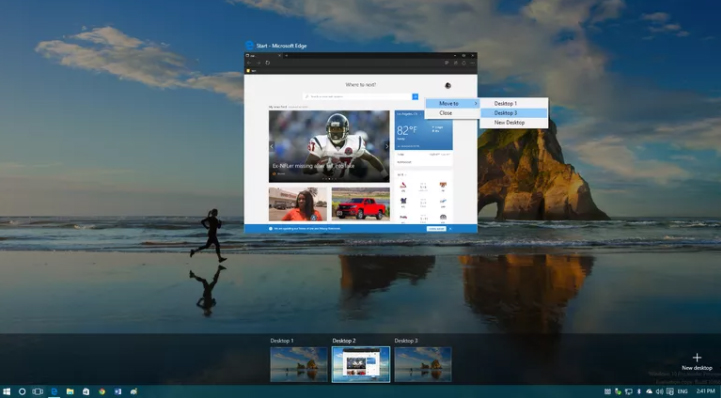
How to close a Virtual Desktop on Windows multiple desktop
So if you close a new virtual desktop in Windows then follow the instructions given below –
Open Task View Pane
Hover on the desktop you want to close
Wait till a small X sign appears on top ride side.
Click X
That’s it you have closed the virtual desktop .
Keyboard shortcut to close between virtual desktops – ” Windows Key + Ctrl + F4 ”
Limitations of Windows Multiple Desktop Function ( Virtual desktop feature )
Though its an amazing thing to Use Multiple Desktops in Windows . There are some drawbacks /limitations of Windows Multiple Desktop Function. They are given as below –
No provision to drag or drop programs between multiple screens.
Individual desktops wallpaper cannot be changed
Jumping to particular desktop window is not possible immediately .
Though this feature has some kind of limitations , it stands out as best features of Windows latest OS . Hope this will help you all to Use Multiple Desktops in Windows . Our next guideline will be how to use virtual desktops on Windows 7 and Windows 8 without updating to Windows 10 .
This article is the perfect guide to help you with steps to enable Alt + Tab Windows Virtual Desktops / Multiple Desktop Function. Microsoft has given Windows , a new user experience with the launch of Windows 10 . Know what is the reason behind this new Windows 10 user experience enhancement ? It is because of Windows Virtual Desktops or Windows Multiple Desktop Function in Windows 10 . Using keyboard you can switch between desktops using Alt + Tab Windows Virtual Desktops .
Alt + Tab Windows Virtual Desktops / Multiple Desktop Function
Alt+Tab is a popular keyboard shortcut function on Windows . Though earlier it was used in the previous versions to switch between full size windows to desktop . But now on Windows 10 “Alt + Tab” is the shortcut for multiple desktop function or Virtual desktops.
Windows Virtual Desktops / Multiple Desktop Function
Do you guys remember about PowerToy ?
If anyone remembers then they would have indirectly got my point by now . Yes the latest Windows 10 feature Multiple desktop function was implicitly introduced on PowerToy much before .
Now on Windows 10 its an important mainstream feature to enable Alt + Tab Windows Virtual Desktops .
In simple words we can say that Virtual Desktop means expanding physical area of the virtual screen by which covering the limitations of the physical desktop screen.
For Windows XP , PowerToy Virtual Desktop was created by the great Microsoft.
Windows 10 Multiple Desktop Function / Virtual Assistant
If you didn’t understood the concept of virtual assistant then let’s make it more precise and simple by clearing Windows 10 Multiple Desktop Function / Virtual Assistant feature.
Multiple Desktop Function / Virtual Assistant feature on Windows 10 is going to create more space to open new windows where you can toggle between them and do works more effectively.
How to use /enable the Multiple Desktop Function / Virtual Assistant feature in Windows 10
As the option to use the Multiple Desktop Function / Virtual Assistant feature in windows 10 is now enabled by default you have to turn it on to use that particular Windows feature .
Alt+Tab Windows Virtual Desktops / Multiple Desktop Enabled
Here is the short and sweet keyboard shortcuts Alt + Tab between Multiple Desktop on Windows 10.
Here is the steps to enable /turn on Alt + Tab Windows Virtual Desktops .
Go to the start menu < Select the ” Settings “
Select “System ” When “Settings” gets opened.
Here find an option called ” Multitasking”
You can find “Virtual Desktops” beneath that there is a drop down ” Pressing Alt+ Tab shows the windows that are opened ” . Click on that and you have to finally select ” All desktops ” option.
These simple steps helps to enable Virtual desktops on Windows 10 and thus you can use use Alt+tab to switch between multiple desktops that are opened up.
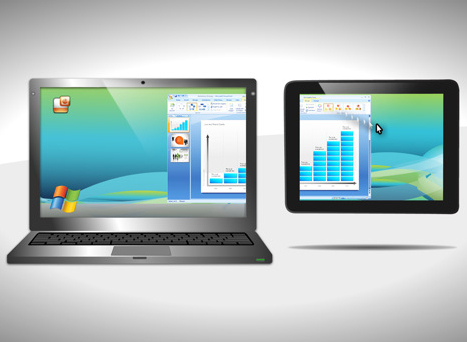
Kindle Fire is voted as one of the top e-reader which is even considered better than iPad . Kindle Fire is actually a Google Android Operating System based tablet from Amazon . Kindle Fire has 7 inch display screen that is really idle for using it for reading e-books as well as to watch movies . Today we will give guide on how to Use Kindle Fire as Second PC Screen / Display .
Ever wondered that the use of an Android tablet is beyond the means you have used till date . Then it is for those wondered folks that you can turn your Android tablet as second PC Screen / Monitor . I mean Android tablet can be converted as Second PC Monitor Easily .
Today Particularly we will deal about the methods to Convert Kindle Fire as Second PC Monitor . Also a short hack to Use Kindle Paperwhite as Second PC Screen / Display .
Use Kindle Fire as Second PC Screen / Display Ultimate Guide
In your Kindle Fire you can find a socket for HDMI connecting by just plugging into it you cannot Use Kindle Fire as Second PC Screen . This HDMI socket is only for output not for Input configuration . To make Amazon Kindle Fire as Second PC Monitor you have to do just install good fire applications . This helps in sending data via WiFi by using Fire tablet as second PC screen.
Method 1 – Use Kindle Fire as Second PC Screen / Display Using : iDisplay
iDisplay is actually a paid application that is available for both Android and iOS to mirror any android or iOS device to Windows or Mac PC . The app connects the android /iOS device to your PC ( Mac / Windows) via WiFi. So you can make use of the resources of the PC on the device you connected . You can Use Kindle Fire as Second PC Screen using iDisplay app .
Step 1 – Go to Android store .
Step 2 – Now you have to download the iDisplay application for Android as you know Kindle Fire operates on Android OS. Also ensure to install associated softwares from the website.
Step 3 – Now on your PC whether it be Windows or Mac , open the downloaded software and run it .
Step 4 – Ensure both Kindle and your PC is running on same network .
Step 5 – Open iDisplay application on Kindle Fire Tablet .
Step 6 – From the given option find Computer and select in the iDisplay app .
Step 7 – Now you can see that your Kindle Fire screen acts as a second monitor to your PC . Now you can control the resources using the software in PC . This helps really good in dragging and dropping certain windows which you want to work on Kindle Fire instead of PC .
This has got some minimal time lag but works absolutely fine . This is ideal to Use Kindle Fire as Second PC Screen .
Method 2 – Use Kindle Fire as Second PC Screen / Display Using : AirDisplay
Same as that of iDisplay application only this AirDisplay app also works with WiFi to make your Android /iOS device as the second monitor to Windows / Mac PC. AirDisplay is also a paid application . You can Use Kindle Fire as Second PC Screen using AirDisplay app.
Step 1 – Download the AirDisplay application from the application store .
Step 2 – Also install the related supporting software for AirDisplay app .
Step 3 – Same like for iDisplay , you have to run the software on your Computer . Also ensure the same local network prevails on both Kindle as well as the Computer System.
Step 4 – Choose Computer option in the app .
Step 5 – You can try to drag one window from the PC and that window will be visible on the connected Kindle Fire screen thus it will act as the second monitor to PC .
The other apps that makes tablet as second PC screen includes two more as best in the prevailing industry – Splashtot app , TwomonUSB .
You can use a Remote desktop software and connect the Kindle Fire to Raspberry Pi then make an adhoc network set up with Pi to make it function like as router . This helps to use Kindle Fire as second screen display to Raspbery Pi .
The same you can Use Kindle Paperwhite as Second PC Screen . So this is all about the simple and easily structured steps to help you to Use Kindle Fire as Second PC Screen.
Credit cards, when used correctly, can help build your credit score.Many people strive to be debt-free, but some debt can actually be your friend. Keeping a manageable amount of debt helps you receive financing for large purchases, such as a house. But when your debt becomes unmanageable, it can scar your credit report for years, keeping you from finding necessary financing.So you have to consider certain things before Credit Card Debt Pay Off.
Credit Card Debt Pay Off- 5 Things to Consider About Debt Pay Off
We have to consider certain things before Credit Card Debt Pay Off which are discussed here.
Debt as a Friend
Our credit-reporting system is set up to reward people who pay consistently on existing debt. That means that people who prefer a cash-only lifestyle are penalized when they decide to get a loan or a credit card. A lack of debt history often makes securing financing as difficult as bad debt history. If you keep your debt under control and pay on time each month, you can build a high credit score.
Credit cards are one of the fastest ways to build or ruin your credit scores. It’s best to have more than one credit card so you don’t charge too much on any one card. Credit bureaus lower your score if you use too much of your available credit, so keep your card utilization below 30 percent on each card. For example, if your card has a $1,000 limit, don’t maintain a balance of more than $300 on that card at any one time. More than that charged on your card leads the credit bureaus to think you’re living beyond your means and are, therefore, a credit risk.
Although having several cards keeps you from overcharging one card, keep the number of cards you keep reasonable to make sure you can keep up with the monthly payment dates without paying any late. Keep a close eye on your interest rates because credit card companies tend to change the rates often. They may also lower your available credit if you keep a low balance, resulting in a higher utilization percentage. Instead of closing these cards, stop using them but keep the accounts open to lower your overall utilization percentage of outstanding debt vs. available credit.
Revolving debt, such as personal loans or home and auto financing, helps show stability to potential creditors if the payments are always made on time. But too many loans can hurt your credit score, even if payments are made on time. Creditors often look at your debt-to-income ratio, which compares your income to the amount of your debt and the monthly payments required to maintain it. If the ratio is too high, you won’t be able to secure more loans. However, a debt consolidation loan may help by tying other debt into a single loan payment. This is sometimes possible through a home equity loan, although this raises the amount you owe on your home, making it harder to sell when you’re ready to move.
Credit cards are usually considered unsecured debt, which means there’s no collateral required to use the credit lines. Many loans, however, require collateral before the banks give you financing. The collateral may be your house, your car or a cash investment, such as a certificate of deposit. Before agreeing to post collateral, make sure you can pay the loan even in a financial emergency. If you use your house as collateral for a business loan, for example, can you afford to personally pay that loan if you go out of business? If not, you could lose your house as well as your business.
Savings
There’s much debate on whether to invest in savings or pay off existing debt. Having some money in savings is a key to your financial stability. It’s best to have enough in savings to pay all your bills – including your debt payments.If you don’t have income for several months, such as if you lose your job. In a booming economy where jobs are plentiful, three months’ worth of savings may be enough. In a depressed economy, shoot for eight to 12 months’ worth of savings. Instead of using extra money to pay down your credit cards each month, pay the minimum payments and put the rest in savings until you have a comfortable amount saved. This won’t hurt your credit score, and it gives you a cushion to prepare you for emergencies. If the worst happens and you lose your income, you won’t have to lose your credit score because you’ll have saved the necessary money to continue your payments.
With some oriented strategies it is really easy for any person to pay off credit card debt quickly . I mean to eliminate credit card debt is not as hard as you might think. Just a lack of proper plan and understanding it would be. Follow this four golden rules to Credit Card Debt Pay Off.
Request to lower your credit card debt interest rate this would ease your burden.
You may have more than one credit card and it is likely to happen that you may have to pay off cards in full . But in that case it is recommended to focus on one card at a time. It doesn’t mean to neglect the other card.But focus more to reduce credit card debt than to rush to pay off debt fully.
Make a budget that includes the priority and plans to pay off debt.
In case of how to pay off debt when you have no money look for grants provided by government .
Use a credit card debt calculator and stay alert about your debt.
This is guideline on Credit Card Debt Pay Off in easiest way .
Now find the top myths on credit card which would help you to get a clear ide about the use of credit card in best way.
Google Pixel by Google is a range of mobile devices that work with Chrome OS, Android OS. It’s the first official step into phones by the mighty search giant. They are the finest of phones and available on Google and retail stores. Pixel range of electronic devices includes pixel tablets, pixel laptops, and pixel smart phones. They are the best Android devices from Google in the year. Today we will see the ways by which we can Connect Google Pixel to TV Easily with these Exclusive Guide.
How to Connect Google Pixel to TV
The Google pixel can be connected to the TV to watch Netflix, YouTube or any screen of your phone on the TV. Unlike the usual phones, Google pixel can mirror the phone screen on the TV. When the Google Pixel is connected to the TV all that’s available on the phone is visible on the TV screen. This is called Screen mirroring . You can Screen mirror Android devices on TV .
It is nothing so much technical and confusing . Screen mirroring device just means you are viewing the same screen on your device on some large size device . Here Screen mirroring Android to TV is to watch/view same screen on Android on your TV screen.
Connect Google Pixel/ Pixel XL to TV means to Screen mirror Google Pixel/ Pixel XL to TV .
Now let’s see how to Connect Google Pixel to TV using a wired and a wireless method.
Non Rooted devices – Connect Google Pixel to TV (Pixel XL )
In non rooted devices, the only way to mirror the screen is by using Chromecast.
Step 1: Purchase Chromecast hardware and connect to the HDMI port of the TV.
Step 2: The Chromecast should be connected to the same Wi-Fi network. Connect the TV with a USB plug and download the cast application.
Step 3: Open the Chromecast app, go to ‘Menu’ and select Cast screen/audio. Chromecast icon will appear in the apps click on it and the data will transfer to the TV.
This is the way you can connect Google Pixel or Pixel XL or any Android device to TV in non rooted device.
Rooted Devices – Connect Google Pixel to TV (Pixel XL )
For Rooted devices, Miracast can be used for mirroring the screen. It is possible only if it’s rooted. Miracast is a wireless HDMI that connects the two devices; hence it doesn’t require an internet connection. If the TV doesn’t support Miracast you will need a setup box that supports like Amazon Fire TV, Roku, or even Miracast video adapter.
Step 1: Install the Build.Prop editor.
Step 2: In the upper right corner there’ll be an ‘i’ icon click on it and select ‘Add’ and then ‘New’.
Step 3: Set the property name to ‘persist.debug.wfd.enable’ and set the value to 1.
Step 4: Restart/Reboot the device.
Step 5: To cast the screen go to Settings > Display > Cast > Menu > Enable Wireless Display.
This is the way to connect Google Pixel or Pixel XL rooted device to TV.
Google Pixel is the best buy for a smart phone. With elegant features and specifications, this phone has captured the hearts of many Android users. It’s not just another android; it’s amazing with a number of advantages.
Here are some of its unique features:
Superior Quality builds and feel.
Operational with a 4GB RAM and internal storage of 32GB/128GB and expandable memory of 256GB
Excellent Camera (great in low light). 13Megapixel Full HD camera rear camera and 8Megapixel FHD front camera.
Fast charging with battery life of 2770mAh
Google Assistant that puts even Siri behind in its function.
Receive updates as soon as it is available.
24/7 customer service with an added feature of ‘screen share’ for expert guidance during support calls.
Fast and super sensitive touch response
Unlocking the phone made quick and secure with a smart fingerprint sensor.
Pair it with a daydream headset and get high-quality VR experience of games and videos in your personal space.
Unlimited storage of original photos and videos with full resolution on Google photos. The updating is done automatically.
Easy to switch from iPhone to Google Pixel. It comes with an adapter that you can help plug the iPhone directly to the Pixel and transfer all the photos, videos, contacts, music with just a click.
Conclusion
With so many superior features Google pixel is an android one shouldn’t miss. It has brought a new meaning to the android world. Make it yours and enjoy the luxury brought to your feet.
One popular cosmetic treatment that exist is Botox Treatment , but we all know Botox injection only for treating different cosmetic issues . Especially the dermatologists favourite Wrinkle removal treatment is Botox . But what about the astonishing Botox Uses To treat different medical conditions. Ever wondered that Botox Uses is beyond the cosmetology treatments.
If so now you going to wonder about the different uses of Botox .
Astonishing Botox Uses To treat different medical conditions
Here is some Magical Botox Uses which are way beyond the wrinkle treatment using Botox .
Botox Effective Treatment On Migraine
People with chronic Migraine are treated with 20- 30 Botox injection for migraine treatment even by famous medical universities. These injections help to have a good relief from migraine for 2-3 months period minimum . Botox injections are taken at different points around neck , back neck , side , head etc . This shown a very good improvement in patients with migraine .
There is a medical condition called Hyperhidrosis which the excessive abnormal way of sweaty hands and feet and underarms over even the whole body . If you are one who always smells sweaty and excessive underarm sweating is a problem for you then Botox is a solution for that . Botox controls excessive underarm sweating in people .
Botox for Overactive bladder or bladder dysfunction treatment
The feeling to pee so often is seen in most of the women its mainly because of overactive bladder . So treat this problem of incontinence , nocturia & overactive bladder Botox is a ideal remedy. You have to repeat the process in every six months .
Botox to relax Muscle spasm ( Multiple Scelorosis )
If you feel irritated with the frequent twitching of muscle spasm due to multiple sceloris or any neural issues this can be treated with Botox injection as they reduce the muscle spasm. This really works to solve the muscle spasm .
Taking Botox injection in 3-4 month interval will help to relax the eye muscles thus twitching as well as crossed eye problems can be solved easily. Thus Botox treats Squint problems and help your eyes to focus properly.
Botox treats Tennis elbow
Tennis elbow is a condition of muscle problem so this an be cured by Botox injection . Other methods will give you just temporary relaxation from the pain of tennis elbow.
Smile not revealing Gum
Your smile may not be so perfect and confident when t reveals so much of your teeth gum outside . To solve this injecting Botox to upper lip can help in giving you smile hiding gums.
Because of some nerve issues we can see that drooping on face to one side happens thus the skin looses its firmness . To avoid the unnecessary movements and twitching of the muscle Botox injection is used . Thus it tightens the skin.
Head & Vocal tremors Cured with Botox
Tremors due to nerve problems can be cured with Botox injection which shows high effectiveness in treating vocal as well as head tremors.
Botox Uses also varies to many other areas of medical treatments which are still on the research . As of now it is believed that Botox can be used for some other treatments more where Botox Uses is not FDA approved –
Botox Uses for Depression and it is believed that Botox can greatly influence one’s mood .
Painful sex can be avoided with Botox injection . This Botox Uses is not clinically approved but still considered working due to researches.
Premature ejaculation problem resolution with Botox Uses is on the research which is also not approved by FDA.
Parkinson’s Disease Drooling can be cured with Botox which is on the research process.
Botox Uses and Abnormal heartbeat is also on the study .
These are the various Botox Uses which are approved by FDA as well as yet to approve .
Android O / Android Oreo the latest in the technology world . Don’t mistake that we are talking about our favourite biscuit Oreo . We are here discussing about the Tech Giant Google’s latest launched Android Operating System . Android Oreo is going to be game changer in the smartphone industry soon with the exciting Android Oreo Features.
12 Android Oreo Features to fall in love with Android mobiles often
May be a good battle with Apple iOS latest version OS . We think Android Oreo Features will definitely make many people to fall in love with Android mobiles often. Latest Android OS updated feature is here.
# Background Limits – High Battery Life of Android Device
Android mobile Battery drain quickly is one of the great problem faced by all Android users . Finally with the latest Android Oreo battery life is improved with background limits. Now there’s a control on the apps that are running on your background like what can the background running apps do and what not . Thus Android battery life is increased . This is one of the best Android Oreo Features.
# Picture in Picture Mode as Android Oreo Features
You can do check your social media feeds , message someone and watch video simultaneously thus your technology boost your multi tasking skill now with Android Oreo Picture in Picture mode . This was available to Android TV earlier now to your mobile also .
You can do it by watching a video and toggle it on by touch home screen so that the video will be shrinked and played in minimized size or floating player.
# Autofill API
Remembering passwords for every favourite website you visit is a difficult task and using apps that remembers the password for all the website is on one hand less secure and on other hand this will make your phone to work slow. Now latest Android Oreo Features has put an end to this issue . Now in Android Oreo it will auto-fill the passwords and thus makes it easy for you.
Now Android becomes safer than ever before . Isn’t it a great thing to feel secure with your Phone . Android Oreo features has taken a deep look into security also . Google play protect ensures that your Android device is completely secured . It scans out the apps that are installed as well as prevent any suspicious malware or virus.
# Notification Grouped to Channels – Notification dots on Android Oreo
Notification on android mobile like all notification clubber together can be now customized by the android user . User can make notifications to channels and control it and snooze or even block it individually. Notification dots that was in iPhone is now available for android users also . So you get important notifications to get your quick attention.
You can snooze Android Oreo notification rather than missing it out forever by dismissing it . Now you can set time and snooze it for 15 mins to hours you want . It depends on your preference to have it looked back .
# New Android Oreo Emoji
A completely freshly designed way of emoji is what you have with Android Oreo features. Now you can enjoy the wizard , fairy , dinosaur and even one more favourite emoji to indicate one true emotion tat its the ” bursting head emoji” .
# Adaptive icons
Depending on the choice f the manufacturers the developed now get the chance to use any shape of app icon. So cool feature in Latest Android OS update.
# New Android Camera Shortcuts
Tap between camera o video instead of boring swipe . Zoom out and Zoom in photo or video easily The latest Android camera feature of double tapping to 50% zoom is really awesome for your perfect click .
You can find the Octopus on the Android Oreo by Settings -System – About phone – Android version till you find a large Android O . Now click on the O repeatedly to get an Octopus that floats all over . Cool Isn’t it ?
# Easy Text Selection
Just a matter of tap there Android plays more intelligently highlighting the text for you without so much constraint . Thus selecting text has now became more easier than ever before with Android OS Latest version.
The auto fill feature as well as installed apps on Android Oreo makes it performance more good thus the time consumed to do each task is now falling less . This makes the speed and easiness of this update more visible t the world as better than ever before.
Here we have listed out the top 12 exciting Android Oreo Features to fall in love with Android mobiles often.