This article guides you with the perfect guide to Disable / Enable USB Debugging on Google Pixel .
Disable / Enable USB Debugging on Google Pixel
The product of Google, the Google Pixel is a rage in the smart phone range. Its unique features stand out just as its creator. The first phones by Google the internet giant has carved a niche for itself and secured a place much above others with the same features. Pixel supports both Chrome OS and Android OS. The Google pixel range of devices includes laptops, smart phones, and tablets.
Before going on to the steps to Disable / Enable USB Debugging , we will take a brief look on google pixel’s features.
Features of Google Pixel
Here is the list of Google Pixel features you must know .
- 5inch display screen
- 6Ghz Qualcomm processor
- 4GB of RAM
- 32GB internal storage that is not expandable
- 3 megapixel back camera and 8megapixel front camera
- Single SIM option
- 2770mAh non removable battery
Now to understand Disable / Enable USB Debugging , you must be aware about what exactly is debugging , precisely what is USB debugging .
What is USB debugging ?
This is one of the many in built features of android phones. It is a simple feature unknown to few. USB debugging creates a connection between the android phone and computer. Previously it was created mainly for developers to transfer data between the phones and computers, however there are times when we people also make use of this function when some apps require USB debugging mode to function well. Disable / Enable USB Debugging function is a boon to debug an android phone
Need of USB debugging
Even though the debugging mode is highly used by technical guys and programmers, the non – technical members too can make use of this feature. While transferring huge files from the smart phone to the computer or vice versa this feature comes in handy. Some apps request to enable the debugging option for proper functioning. If the device is rooted one can recover data even when the hardware has a problem thanks to USB debugging. Have you tried using a phone with the screen locked? Yes, it is possible through the debugging option we can use a locked screen phone. A phone can be rebooted, install apps and many more with a locked screen by using the Disable / Enable USB Debugging .
Read Also : Connect Google Pixel to TV Easily with these Exclusive Guide
Another useful trick for the absent minded ones is being able get entry into the phone’s system if you have forgotten the lock screen password, pin or pattern. Isn’t it wonderful!! But it can be a bane if got into the wrong hands. Security breech can happen within seconds without the person’s knowledge and sensitive information will be spread like wildfire. Like every other function even Disable / Enable USB Debugging has this flaw.
Issues with USB debugging
Those times when we have tried exploring our smart phones we would have come across the debugging option. Though it is mainly used by developers at time we have unknowingly switched it ‘on’ or enabled it automatically when the message popped up during file transfer. But is it safe to leave it turned ‘on’?
Read Also : Google Pixel Dictionary – Add words / Phrases to Dictionary
For security reasons: NO. If the phone is connected to your personal computer while the debugging button is enabled it is ok, but if connected to a public computer there are chances of private information being transferred to that computer or even worse virus entering your phone if the debugging button is enabled.
While Google has in built safety measures like a message pops up asking for permission to allow USB debugging not all phones have this feature and it can be risky since most of the time people are in such a hurry that they do not read the message properly or don’t understand and click ok which later many lead to problems.
Read Also : Google Pixel Haptic Feedback / Vibration Mode Enable or Disable
Other problems can arise if the phone is stolen or missed placed with the debugging option enabled. The individual can easily retrieve data even with a locked screen. A safer option in any case would be to install the android device manager which will help you to delete all data from a remote computer if ever the phone gets stolen or lost.
In some cases the phones have trouble while accessing the SD card in mass storage mode while the USB debugging is on. Hence you should use Disable / Enable USB Debugging function carefully.
Read Also : Google Pixel WiFi Calling Enable and Disable
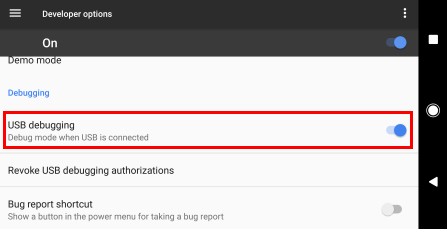
How to enable USB Debugging
- In the main screen Go to <settings
- Select <about phone
- Here you will find build number <tap on it 7 times
- A message will pop up that says “you are now a developer”.
- Click the <back button
- You will find a “developer option” select it.
- Scroll down and you will find USB debugging under debugging section <select ‘on
How to disable USB Debugging
- In the main screen Go to <settings
- Select <about phone
- Here you will find build number <tap on it 7 times
- A message will pop up that says “you are now a developer”.
- Click the <back button
- You will find a “developer option” select it.
- Scroll down and you will find USB Debugging under debugging section <select ‘off’
Follow these steps and you will now have successfully debugged your Google pixel.
Read Also : How to change ringtones in Google Pixel
There are many features in our phone that is unknown to us. It is always good to learn new things and keep oneself up to date with the working and using of our smart phones. We can never except when the need will arise. By knowing and understand the usage of Disable/Enable USB debugging, you need not have to wait for a developer to fix your phone when there is a minor issue!
Leave a Reply