Category: Tech

  • Exciting free Photoshop Alternatives for high quality photo edits

    Exciting free Photoshop Alternatives for high quality photo edits

    As we all love to look picture perfect in social medias, all the Groupies, selfies, there is a strong demand for best photo editing software and applications. When it comes to photo editing the popular tool we all remember is Adobe Photoshop but we feel to see alternatives to everything that’s the genetic generation trend so here is some stuff for those who are in search of Free Photoshop Alternatives.

    Technology is revamping day by day & amid that electronic devices are upgrading & becoming better more increasingly, likewise, phone cameras are refining increasingly & passionate level DSLRs or professional cameras are furnished with brilliant sensors.

    But do you know that the best photos can benefit from a compact accommodation in post production?

    Adobe Photoshop is the pro photographer’s tool of choice, but it’s not certainly the only option, there are eminently influential photo editors available completely free of cost if you know where to look for.

    Why do you need a Photoshop & who?

    Are you a selfie fanatic or looks possessive person or an audacious, who wants to make his best-captured shots more captivating, then you might simply need a perfect photo editor, who can purely make your photo remarkably alluring & eye catchy.

    Usually,the best free photo editors offers all the key tools that you need to make your pictures look astonishing ,including curves,contrast & exposure intensification to strain colours,clone stamps & healing brushes to erase flaws,if any ,masks for isolating & editing areas & layers to help you mingle elements to combine effects.

    In this digital era, it isn’t anomalous to know that most people have been conditional to think about Adobe Photoshop whenever they hear about Photo editing. This full fledged photo editing suite from Adobe Inc has been an article of an admirable helping tool for many professionals from every possible diversion.

    If you’re looking for such analogous tools, you’re at the appropriate place, where we have introduced a checklist of best free photo editing tools, both from online & offline, so that you can resume working, even when you are not in contrast of your own PC or MAC. We have stipulated these told based on diverse factors, such as lucidity of the user interface, productivity as in terms of features & other user’s opinion. 

    Here we will have a look at the most popular Free Photoshop Alternatives.

    Exciting free Photoshop Alternatives for high-quality photo edits

    We hope this article will be helpful for those who need a free at the same time efficacious photo editor. Here is the list of Free Photoshop Alternatives

    • GIMP:

    An unprecedented free photo editor, GIMP is a virtuous rival to premier software.

    The elder opponent of free photo editing, GIMP, also known as GMP image manipulation program, is the most robust photo editor around. It’s packed with astounding tools that superbly match those that we usually get in premier software & is upgraded with more features timely.

    The photo editing toolkit is astonishing & includes layers, masks, curves & levels. You can obliterate flaws with the eminent clone stamp & healing tools, create custom brushes, apply perspective changes & apply changes to solitary areas with intelligent selection tools.

    GIMP is an open source project & its section of users & manufacturers has created a huge collection of plugins to amplify its potential even further to Photo Pos Pro:

    Well designed & easy to use -a novice photo editor with a few drawbacks.

    Photo POS Pro

    Photo POS Pro isn’t as popular as GIMP, but it’s another crest caliber free photo editor that’s packed with further image enhancing tools. Its interface is clever & more shrewd than GIMP’s array of menus & toolbars with everything arrayed in a logical & steady way. If it’s still too menace, there’s also an optional ‘novice’ layout that resembles ‘fotor’s’ filter based approach.

    This image editor is a Free Photoshop Alternatives which offers best to the beginners as well as professional photo editors. For the beginners, this software has one click filters and automatic adjustments of the photos. Both the options are well-designed and are more intuitive than the GIMP’s endless features.

    Just like Photoshop, this software provides layers and layer marks both and also offer superb clone and healing brushes. In this software, you can find all color refining tools. Also, you can get complete support for the batch editing and scripts such that you can save your time to do the routine tasks. This online photo editor allows you to directly images from a scanner or camera.

    This software also offers you with some extra frames as well as filters which can help you to create or just save your own filters to use in future.

    One of the main disadvantages of this software is that it has a limit on the size of saving the files. The size limit is 1024 x 2014 pixels. But, if you require more size then you can upgrade it to the premium version and will get the world class Photoshop alternative.

    It is one the best Free Photoshop Alternatives which can be used for Windows, Mac, and  Linux.

    Read Also : How to Fix “Cannot Take Photo” Problem on iPhone and iPad

    • Fotor:

    A prodigious anthology of filters for one – click intensification, plus manual controls. Fotor is a photo supplemental first & foremost, more than it is a Free Photoshop Alternatives, if there’s specific area of retouching you need doing with, say the clone brush or healing too,you’re out of luck. But it includes a pyramid of high-end filters that really do shine. There’ s an unerring tilt-shift tool & a raft of vintage & vibrant color tweaks, all easily accessed through Fotor‘s dexterous brighter menu system. You can manually alter your own curves & levels ,too, but without the convolution of high-end tools. 

    Read Also : Unavoidable Parental Control Apps ,Tools to monitor children

    • Pixlr:

    You might have discovered of Pixlr, as an online photo editor, obtainable the online version, Pixlr is now available s an application for desktop & it is indeed a free, reliable photo editor available now. When compared the that of Photoshop, Pixlr is known for its unchallenged installation & simple user interface. Taking some elements from the online version, it permits apply features & does other stuff within a few clicks.

    Paint.Net :

    Do not get confused about the paint that comes in built with the windows , Because we are talking about something that is really different. This is one of the best Photoshop alternatives which is featured with layering editing and a customizable interface with plenty of tools at your disposal with unlimited undo, tons of effects and filters and community of passionate users.

    Paint.NET is a free photo editor tool which can be used by the individuals who are looking to give a touch up a before going to post it on the web, resize or crop an image, or if anybody wants to do basic image editing. But, if you are using any other operating system then you can check out Pinta which is an open source platform modeled after this tool and available for Windows, Mac, and Linux.

    Read Also : The ultimate guide to make Windows run faster (Boost Computer Speed)

    PhotoScape:

    This app offers a lot of usable feature with a minimum user interface so that you do not need to get confused with various toolbars. The PhotoScape can function as a viewer for viewing your photos, for creating the slideshows, and works as an editor with the basic photo with batch editing. Through this tool, you can easily view or edit the images without getting any distracting elements.  
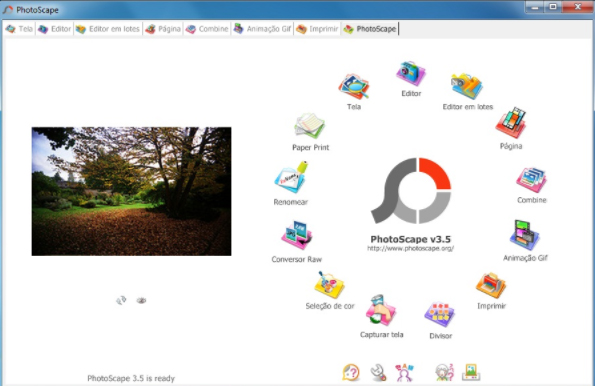
Opening up this tool can make you see various interfaces which are responsible for various roles. Also, there is a Mac version of this tool by the name PhotoScape X which has some advanced features such as collage maker.

    This Photo editor works for Windows and Mac.

    Be Funky :

    Do you love making a collage? Then Be Funky which is an online photo editor will work for you surely. This photo editor is a full-fledged editor available with a simple interface. This editor allows you to get photos from the desktop, capturing the photo from webcam, or some other sources such as Facebook or Dropbox. This editor has various features which are arranged in various categories such as editing, touch up, Effect, Graphics, etc.

    All the features of this tool have a simple interface through which you can select and apply the filter or effect in a minimum time. The graphic section f this tool is really superb and consisted of several graphical elements which can be easily inserted to upload the image. Editing the pic using this tool is really quick and you can easily learn this tool. Simply, you will love this tool.

    The basic drawback of this editor is that it only works for Windows.

    Read Also : Enable / Disable Windows File Protection & Fix Windows File errors

    PhotoCat :

    The PhotoCat offers three options to deal with the images. This tool can help you to edit the image, retouch it using the pre-set filters, or creating the collage using different borders templates. This tool does not require much time to load so uploading on it is very easy.

    This online photo editor is free and has various features available in it such as editing which consists of different kinds of filters and retouch options and other extra elements. This online editor is not much colorful as compared to other editors but this has some standard features which are arranged in an easy access interface. This tool is just superb when you just want to edit the image without any ornamental design or any other kind of features. Thus making it one of the most favoured Free Photoshop Alternatives.

    SumoPaint :

    This online photo editor is a fully functional Photoshop alternative with the editing interface into web browser skin with every of feature you need such as the color picker, info about image, etc. With this tool, you can have multiple windows as you like as managing these windows is much easy. This online photo editor has set up the things altogether. 
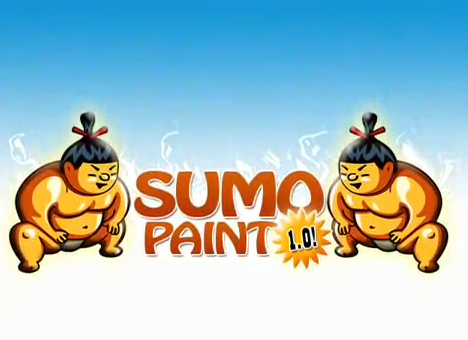
The common interface of this tool only takes a small amount of time to load. This tool is also available in pro version for which you need to pay 4 USD per month, this can unlock various other exciting features of this tool.

    PhotoFiltre :

    PhotoFiltre is an online photo editor and acts a superb image editing software through which you can edit your photo easily and add the filters to make them attractive and professional.  This editor comes up with various features that are easy to be used. The user interface of this software provides complete support to the beginners to create their own masterpiece.

    This is a free photo editor and the best Free Photoshop Alternatives which is available with the image editing and effects package. Not considering the standard editing elements, the PhotoFiltre editor provides a wide range of image effects, photo masks, image adjustments, and thumbnail browser. This tool is worth to try for all the beginners as well as for the professionals.

    VSCO :

    This is one of the best Free Photoshop Alternatives software and camera app for the smartphones. This software has a minimalistic interface which does not look intuitive firstly, but they are a small selection of the professional features. In this tool, you will find a side panel that gives instant access to the grid, journal, store, and library with a button which will take you directly to the camera.

    Also, this software contains various special presets, although they are not very intuitive named the buttons to do feature thumbnail previews for one.

    This Free Photoshop Alternatives works on both Android and OS platform of the mobile.

    How to pick the best photo editors for you :

    All the photo editors we’ve reviewed above are magnificent, but divergent tasks call for different tools. If you’re already happy with the general look of your pictures & just want to augment them a little before sharing them online, a basic editor that permits you to resize, crop & apply filters will be ideal. Many of these have social media sharing built in, saving you the hassle of saving, then uploading them afterward. You are also required to ensure, that your free photo editor lets you work with large files, as having only some online tools won’t let you upload files over a certain size,& others won’t allow you to export high -resolution photos unless you pay for a subscription.

    We just picked the most widely user rated and our personal choice of photo editors as an alternative to Photoshop. But still, there are tons of many other excellent Photoshop alternatives that you can rely upon for high-class photo edits. If anyone got disappointed here due to the reason we failed to include your personal photo editor then we apologize for that with a promise we will give more on this topic some other time.

  • Unavoidable Parental Control Apps ,Tools to monitor children

    Unavoidable Parental Control Apps ,Tools to monitor children

    Are you planning to gift your kid an Android phone or iPhone? Well, you want to have them a smartphone Well if you want them to have a smartphone so that they can stay in touch with you. Then, it is a good idea to make them in control by how they use the device. Making the calls in the smartphone is just one thing but accessing inappropriate content, inappropriate apps, and running up the bills in app purchases is just another. So there is a strong need to have certain Parental Control Apps.

    Trust me the internet is a much scary place and the danger of it can rattle the adult so it can also traumatize the child. On your desktop. you can employ the parental control software to watch the activity of your child, and same is true for the mobiles. Here with this article, I will discuss the apps for the parental control apps for Android and iPhone. Nowadays for the all individuals smartphones are just like toys, they use it for surfing the internet or to download other apps. But these activities can sometimes open up some serious online nastiness.

    What does Parental Control Apps do?

    Well before starting about what does this app do, it is important that you are aware of such software or you are unable to find that you felt was suitable. On the Android smartphones and tablets, if the parental control apps are installed then you can easily watch the activities performed by your child. Remember that using the parental control app software is basically for your offspring safety. This may not be much popular way, depending on the age of your children. Understanding the parenting control app can help you in making more informed decision.

    Read Also : Internet Safety Rules for Kids – Online Safety Tips

    Read Also : Improve The World With Smartphone -Top 10 Hacks

    Some of the Best Parental Control App for Android:

    Here is the list of Parental Control Apps for Android device is listed here.

    1. Kids Place:

    This is one of the best parental control apps which creates the safe environment in which the younger kids can experience the fun of technology. This app protects data as well restricts your kids have which is been approved by you. The kid’s place app prevents the kid from installing any new apps, making phone calls, texting or performing any other action which costs the money. This app allows your kid to have some fun time and also allows you to have some peace.

            Features of this app:

    • Custom home screen display which is authorized by the parents
    • Restrict to download the apps which cost money
    • It has timer feature which locks the app after some specified time
    • Block the incoming call too when it is running
    • Toddler lock gets restart which accidentally stopped by your kid
    • Has custom wallpaper which can customize child experience

    Read Also : Best free calling Apps for all Smartphones

    2. Net Nanny:

    This app gives your kid a freedom to surf the web without any fear of the inappropriate content. This app becomes your child default browser as it is a custom mobile browser. From the web based console, you can easily manage settings if your child device and other tasks such as viewing activity reports or adding the users, Also this app enable s you to receive the notification when a site is a block or a block is been overridden.

            Features of this app:

    • Show the apps being installed
    • See when new apps being install and block unwanted apps
    • offers the appropriate filtering through age
    • The filtering categories allow to allow, block or warm the specific content
    • Set the time controls when kid browse the web

    Read Also : Best Apple Watch Alternatives-Affordable Gadgets

    3. Screen Time:

    This app helps you to manage the time which your kids spend on their tablets and smartphones. This app gets a level of specificity which allows some useful apps such as reading apps certain time but blocks the games. This app also lets you activate a full shut down of child’s device when needed with a push button from your device.

           Features of this app:

    • This app allows kid to earn extra time to complete tasks
    • Get the reports what your kid is looking
    • Block some apps completely
    • Provide an alert when your kid install any new app
    • Manage easily various no of kid through this app

    Read Also : Survive high interest student loans – Amazing Tips

    4.Toddler Lock App:

    This app is just perfect for the parents to download on their device if they occasionally use their device for help distract and engage their toddler. This app provides a colorful screen lock graphics and pleasing sound which keeps your kids entertained without being worry about them to delete any content of your device. This app also helps your kid to learn shapes and colors.

          Features of this app:

    • The airplane mode is optional and ensures no cell radiation
    • Your child can move their finger on the screen to make different shapes and colors
    • The time they touch the screen, they will listen some peaceful sound which varies in the pitch

    5. Norton Family:

    This app is for the teens and helps for safe online browsing as it allows the parents to supervise the activity of their child. This app blocks inappropriate content and teaches good internet browsing. This app offers a range of monitoring features for the parents to connect with kids.

          Features of this app:

    • Track the online activities done by your child
    • Keep whole track of site they visit or what they search
    • Block inappropriate content
    • Gives the alert if kid breaks any rule and thus you can have conversation to stay safe
    • This app provides the location of your child

    These are best apps to monitor kids for any android device.

    Best Parental Control Apps for iPhone/iPad :

    In the iPhone, you can use the restrictions which are also known as the parental control which is been used to block or limit the specific apps ass well as features on your iPhone or iPad.

    To turn on restrictions use:

    Go to settings> General> Restrictions

    After tapping on restrictions enable it

    Then, create a restriction passcode, which you need to change your settings or to turn off the restrictions.

    If you have forgotten your restriction passcode, then you need to erase the device and set up the passcode again. Change your Restrictions passcode and set up the passcode again. Change your Restrictions passcode

    To change the restriction passcode, follow these steps after turning on the restriction:

    • Go to the settings> =Click on General> Restriction
    • Enter the current restriction passcode
    • Click on disable restriction and enter the restriction passcode again
    • Again click on the enable restriction and enter new passcode restriction
    • Turning on the restrictions might make you unable to see some apps, features, and services. Also, check that you have not removed any built in apps.

    Features and Apps you can Restrict in iPhone:

    For seeing the list of the features which you can restrict, click on the settings> General>Restrictions to turn on or off just touch the slider next to app or feature.

    To check which app or feature is enabled, just check the checkmark if it enables the app or feature can be used otherwise not.

    The businesses and schools most often use the profiles, which can turn on restrictions. To check that your device has profile go to settings> general profile. For more information contact your administration who set up a profile.

    Conclusion:

    Now controlling your child is in your hand if he/she is using the smartphone. Also, remember giving the good habits to your child is your responsibility. Download parental control apps and keep the control in your hand.

  • PayPal Vs Venmo : Best Online Money Transfer System Compared

    PayPal Vs Venmo : Best Online Money Transfer System Compared

    PayPal Vs Venmo

    If you got ever confused which online platform of online payment service you should choose between then have a look at the differences between top 2 payment services that is PayPal Vs Venmo.

    If we take a look back at our lives, we notice how far we have come and how much we have grown as an individual and a human being. The world too has had a huge makeover. Hundreds of things have changed, technology has advanced, and by the looks of it, the world is moving into a digital era. Or should I say we have entered into the digital era?

    From shopping to dating everything is online. We sit in the comfort of our homes and enjoy these little luxuries. What about the payment? Yes, that too is online. Thanks to the online payment services who have made life easy for all of us. We don’t have to wait in long ATM queues or with cheques for them to be transferred. Online service is instantaneous and stress-free.

    A number of mobile wallet services have cropped up in the recent years. They compete with each other bringing out new and improved techniques the other doesn’t possess.

    PayPal is often the first choice; at the same, we have many other options like Amazon payments, Google wallets, Venmo etc.

    Here let’s take a look at PayPal and Venmo and their pros and cons.

    PayPal

    PayPal is a mobile payment app that is the fastest and safer way to buy and sell goods. A started online service in 2002 PayPal is an American company that deals with online payment solutions worldwide. They act as the mediator in processing the payments for auction sites, online vendors and other users at a minimal charge. Through PayPal users can donate money or receive donations, buy and sell goods.

    Venmo

    Another mobile payment app started by two friends in 2009 is a subsidiary of PayPal. Generally preferred by youngsters as the website claims it’s made ‘for friends and those who trust each other’.

    Read Also : Venmo User Guide for Safe Transactions – Venmo payment

    Read Also : Cancel / Reverse Venmo payment : When a Venmo payment goes wrong

    PayPal Vs Venmo

    We will now see the comparison between PayPal Vs Venmo.

    • PayPal is used worldwide, whereas Venmo can be used only in the U.S
    • Both have free to download apps from play store and iTunes. Only a data connection or a Wi-Fi is required along with a login.
    • PayPal and Venmo are free if using bank transfers or wallet balance. A 3% fee is charged in Venmo for credit card transaction and 2.9% in PayPal for debit and credit card transactions.
    • Weekly transaction limit for PayPal is nil, while a cut-off of $299.99 per week is seen with Venmo further if you provide ZIP code, link the Facebook account, last four digits of SSN number and birth date the limit is upped to $2999.99.
    • Handling money is the same with PayPal and Venmo. During a transaction, if there’s a wallet balance first that balance is used and then the remaining is retrieved from the primary linked source i.e. bank account, debit or credit card. These transactions are instant. However, if it’s through bank accounts then Venmo takes up to 2 days and PayPal 3-4 days.
    • The main feature that stands out in Venmo is its ability for social connections through news-feed like format. The users can share a transaction they made that can be viewed and commented by other users. This has caused quite uproar with the teens.

    The table gives the comparison between PayPal Vs Venmo based on their compatibility , payment methods , Credit fee , Debit fee , Bank transfer fee , Withdrawal speed , transfer limits , Special features.

    • An important feature in PayPal is their One Touch option. This allows the user to stay logged in for faster and easier log outs with different vendors.
    • And if you prefer to keep it low and simple PayPal is the option. It’s more of a formal way that is preferred by small time business groups and other e-commerce sites.
    • A danger than anyone can face with these mobile wallets is losing your phone and having some stranger access your accounts. Nonetheless, this can be avoided with these 2 apps for you can out a PIN lock for the apps apart from the phone lock. Venmo and PayPal also cater to an authentication process via SMS text message.
    • Speaking of security of Venmo and PayPal has the same standards as that of Visa, MasterCard, and American Express. They have a 24/7 risk protection and fraud service.
    • PayPal has also had an optional security key to strengthen against frauds. Apart from the login ID and password the user is prompted for a six digit security code shared via SMS. The user can change the code and use his/her personal code.
    • Whilst PayPal as secure systems for buyer seller, Venmo doesn’t offer buyer seller protection. Hence should be avoided for goods and services.

    With Venmo you can pay the other person even if they don’t have Venmo. The only drawback is supposed you send the amount to the wrong person it’s not retrievable. The only way to get it back is to ask politely, which again depends on the person on the receiving end.

    Read Also : Safe Online transactions Tips & top 12 safe online transactions methods

    Read Also : Purchase without credit card top hacks

    Conclusion

    Mobile wallets are quite essential for easy and stress-free transactions. We can travel anywhere in the world and not carry cash at all. It’s much lighter and secure. You don’t have the fear of leaving the wallet at home or not having enough cash. People love to travel light and this is the best option and also the best which many are following in the present day.

  • Enable / Disable JavaScript : Mozilla Firefox Hacks

    Enable / Disable JavaScript : Mozilla Firefox Hacks

    Enable / Disable JavaScript : Mozilla Firefox

    Computer, Internet explorer, Google chrome, Opera, Android phones/tablets etc these things have become part of every human life as their basic need. In this advanced (modern) world everyone is connected to internet to get their work done in a jiffy. Also you will see that all Internet browser have JAVA SCRIPT installed for fast execution and safety purpose. It is the kind of web application/technology that helps in making web pages. Many People Enable / Disable JavaScript in their computer as it provides advanced and fast technology to work properly. But there are many people who disable (or don’t use) JavaScript because of some security benefit.

    This article will introduce you in a detail about JavaScript and some aspect of JavaScript(Enable/Disable).

    What is JavaScript ?

    JavaScript is one of the technological system in web browser for script languages and making web pages.. It is the programming language that provide programmatic control over its object or browser. JavaScript also helps in building interactive or dynamic web pages and provides set of instruction to works across any browser in any operating system that support JavaScript. As it is the programming language it has its own expression like syntax, naming, protocol, object oriented scripting language and basic control flow over web browser object. JavaScript also consists a worth library of objects such as Array, Data, Math and some core set of language elements such as Operator, Statements, and control structures. JavaScript is very safe as it can’t automatically write to hard disk and has its own variable data. It is very remarkable and versatile feature in web browser that allows you to create games, Animated 2D & 3D graphics, comprehensive data base-driven apps and much more with more experience. Many developers have been using this to write and build the browser application program, creating HTML, generating 3D graphics and audio samples etc.

    Read Also : uBlock Origin Replaces Adblock plus(Best Adblock Plus Alternative)

     Enable / Disable JavaScript?

    As we all know that JavaScript is programming language that operates web pages and allow web pages to dynamically load and other interactive things. All web browser such as internet explorer, opera, chrome, Firefox and safari have their own JavaScript engines/system. First will talk about Enable / Disable JavaScript : Mozilla Firefox

    Read Also : Kindle Fire Silk Browser Alternatives

    ENABLING (activate) of JavaScript in FIREFOX:-

    JavaScript is widely used programming language that is a part of creating websites. It can help you in many ways like give you instructions for your browser, easy to perusing all the images that are in lined and  full size, helps you to make new website pages(individual websites), and allow things to move on the page such as in games, news feed(regularly updates) and many more.  It is very effective and gives you some interactivity. For instance yahoo mail, the whole mailbox in JavaScript. It can also used for login management, database management, advertising games, and lots of stuff. However it is easy for many us to perform any search on google you just need to keep scrolling without having to reload the page. That is why JavaScript is very helpful for us. And if you disable JavaScript many websites won’t work properly that will be hindrance in your work. JavaScript extremely true for web apps like G mail, Google Docs and other websites as well.

    This will guide you the process of Enabling JavaScript in Firefox.

    1. First open your Firefox browser.
    2. Click into the address bar and type about:config then press Enter.
    3. Accept the warning about the setting changes and click the button ( I accept the risk) on center of the screen.
    4. You will see advanced setting and in search bar type JavaScript.enables.
    5. Now on the line of JavaScript, Right click small menu will appear, on the top click Toggle,and “false” will change to”true”.
    6. JavaScript is enabled now, your can close the tabs.

    You can follow these steps in order to Enable JavaScript

    DISABLING (deactivate) JAVASCRIPT in FIREFOX :-

    Many people don’t use JavaScript because of some security concern and disable JavaScript out of necessity. There have been a few browser that were exploited via JavaScript, malicious JavaScript can be interjected into a page, stealing cookies and forcing users to perform actions. People also disable JavaScript whether out of concern, for privacy or simply because they are fed up with advertising, pop-ups, cooking warnings, scroll jacking and many other dark patterns. JavaScript seen as a security risk by many individual and many exploits using it so it become necessary to disable JavaScript for safety. Most of us disable JavaScript for security reasons, filtering ad, making browser faster and also to stop annoying things like JS road-block ads (marketing people call them interstitial), some types of ads from loading and many more. Here are the few steps (same as enabling JavaScript)  given below that will help you to disabling JavaScript in Firefox.

    1. First type about.config. in the address bar and accept any warning.
    2. Type JavaScript in the search box.
    3. Now double click on JavaScript.enabled to change the value from “true” to “false”.
    4. After closing all the tabs you can now restart the browser.

    These are the ways to Enable / Disable JavaScript in firefox

    Read Also : Enable / Disable Windows File Protection & Fix Windows File errors

    CONCLUSION

    Finally we can say that JavaScript has its own pros and cons as every individual has their own taste some may find it useful and some may not. But probably there are many other issues as well that you will encounter with JavaScript. As you know JavaScript is a programming language. it is not just for the web you can make apps and do serve side logic. The choice is ultimately up to you whether you Enable / Disable JavaScript, but we recommend you to leave JavaScript enabled and keep updating your browser up to date perhaps it will help you in future.

  • Enable / Disable Windows File Protection & Fix Windows File errors

    Enable / Disable Windows File Protection & Fix Windows File errors

    Enable / Disable Windows File Protection & Fix Windows File errors

    Today due to many kind of virus attacks and hacking we all are quite concerned about our data safety so here is the guide to Enable / Disable Windows File Protection  and also to end the frustrating problem associated with the file protection in windows .So here you can also find the ways to fix Windows File Protection errors.

    What is Windows File Protection ?

    The window file protection(WFP)  is a feature in Microsoft window that uses to prevent files that are required for window to run properly. To maintain system stability windows must restore the original version of these files. It is the system that helps you to retain or reserve your computer files, programs and operating system. Windows file protection is the security for Microsoft operating system(computer) to delete the files that has no file lock to prevent it from any defective cause. Windows file protection helps you to cover all files which the operating system installs, protect them   from deletion or from replacement by older or other version. It prevents critical system files and folders that are installed as a part of windows for example:- files, data, extension and some true type fonts.If a program or system  uses a different method to replace protected files, WFP restores the original files.

    Read Also : Top Satellite Car Radio Installation and specification guide

    Read Also : Best iTunes Cleanup Software for better iTunes experience

    Windows File Protection VS Windows Resource Protection

    We have already talked about windows file protection now we will see the work of windows resource protection or how windows resource different from windows file protection?? Windows Resource Protection (WRP) is also a system in Microsoft windows that prevents registered and essential system files, keys, folders as well as critical system files.

    If we see both WFP and WRP  have the same work to do i.e,to protect the files and folders system in the computer or Microsoft operating system. So, it can be said that Windows Resource Protection is the new name for windows file protection.

    Windows Resource Protection Vs. Windows file protection

    Windows Resource Protection is the new version of Windows File Protection but there are many difference between them as you can see given below:-

    1. WRP can also prevents several critical folders or files which includes extended registry values.
    2. WRP copies only those files that are needed to restart windows which is directly located at backup unlike Windows File Protection(WFP).
    3. The third difference between WRP and WFP is that windows resource protection applies strictly measure to protect files by setting.
    4. WRP also protects all its keys and sub-keys that can be used to check the files and folders.

    There are some other difference between them as well that WFP can do and WRP can’t like WFP can scan all the files at the next boot or immediately, can return to default setting and many more unlike WRP.

    Read Also : Connect dual displays / monitors to one computer on Windows & MAC

    Read Also : Factory reset iPhone without password or iTunes with data backup

    How to Enable / Disable Windows File Protection?

    To protect your device from being overwritten or automatic installation you need to Enable / Disable Windows File Protection . Windows file protection can be enabled by default in all version of Microsoft windows, You need to follow just few steps to Enable / Disable Windows File Protection:-

    1. First hold the windows key and press “R” to conduct the Run dialogue box.
    2. Now type “Regedit“, then select “OK” button.
    3. Registry Editor will open, and Navigate to the following registry keys:-                                                                            1)HKEY_LOCAL_MACHINE   2)SOFTWARE   3)MICROSOFT   4)WINDOWS NT   5)CURRENT VERSION   6)WINLOGON
    4. Now search the key “SFCDisable” and double click on it. You can also create it by  right_clicking the “winlogon” folder and choose “new” } D WORD.
    5. After that you can select the value to one of the following:-
    • 1- for Disable first, prompt at boot to enable it.
    • 2- for  Disable next boot, but no prompt to enable
    • 4- for Enabled, with popups disabled
    • ffffff9d- for completely disable
    • 0 – for enable

    6. You will receive a message of restart windows that says-Windows file protection is not active on this system. So would you like to enable your windows file now? And this will enable windows file protection until the next system restarts. Choose “YES’ to restart windows file protection.

    Read Also : The ultimate guide to make Windows run faster (Boost Computer Speed)

    FIX WINDOWS FILE PROTECTION ERROR!

    To maintain the files and windows you need to take care of your computer from any harm or virus. Windows File Protection this message will appear on your screen for those files that are required to run properly but by default replaced by some unorganized version.

    It is simply the Windows File Protection error that disable the windows update and for that Microsoft offers a fix. You can also SCAN your computer or windows. By following given steps you can also fix error:-

    1. First start your computer in safe mode, you can also press F8 repeatedly as you turn it on.
    2. Now turn on or run an anti virus program. Windows comes with a tool known as malicious software removal tool, which you can start } Run and type “MRT”. This will work to fix error.
    3. Finally Restart your computer normally. Go to menu and start Run dialogue. Type “regsvr32 initpki.dll”(*no quote) and press “OK”. This will restart the registry files affected by the  unexpected defect or bug. Now you can restart your computer again.

    Although it is not tough to fix error or prevent your computer from any harm or virus but you only required is to maintain your windows from any misused or misplaced because sometimes it happens that windows automatically install (May be including virus also) any application in your computer that straightly affect your system and can defect it.

  • Enable / Disable Internet Explorer Extensions and Add-ons

    Enable / Disable Internet Explorer Extensions and Add-ons

    Enable/Disable Internet Explorer Extensions and Add-ons

    Sometimes we all need to Enable / Disable Internet Explorer Extensions as well as Add-ons for some annoying reasons. Today we will discuss on three different methods to do it .

    Before we deal the actual , let’s get a rough idea about this Stuffs .

    Add-ons are just like applications that the web-browser Internet Explorer makes use of  in order to make interaction with numerous web contents such as videos & games. The toolbar, extensions these are also kind of Add-ons only . One of the most common Add-on that everyone know is the Adobe Flash. Internet Explorer is basically designed to give users Add-ons free experierence in web browsing as most of the users find irritated with add-ons. You will only be able to use Add-ons in Internet Explorer for the desktop.

    If you are loading a page that requires Add ons then to see it in the desktop: swipe up from the bottom of the screen to bring up the app commands and then select the Page tools button then finally select View in the desktop(Not that efficient but utilitarian).

    Different Ways to Enable / Disable Internet Explorer Extensions and Add-ons

    This easy and simple methods show you exactly how to enable or disable along with the dexterity to run various different extensions and Add-ons in your favorite  Microsoft Internet Explorer. Additionally this will equip you to both enable and disable all/specific system users to have the capability to either enable or disable extensions along with the Add-Ons through the Internet explorer Add-on Manager in Windows(Only if you are using IE which no one in India would do). For all these you are supposed to be logged in as an administrator so you can carry out all the steps in this magnificent methods. The different options are as follows:

    Read Also : Enable / Disable JavaScript : Mozilla Firefox Hacks

    Option 1 – Enable / Disable Internet Explorer Extensions and Add-ons From Internet Explorer Settings

    Step -1) Click on the icon of Internet Explorer.
    Step -2) Select the Settings Gear at the most upper with right corner and choose “Internet Options”.

    Step -3) Choose the “Advanced” tab(Seriously is there anything Advanced in Internet Explorer).
    Step -4) Keep scrolling down until you find the the “Browsing” section.
    Step -5) You can select/deselect the “Enable third party browser extensions” as desired.
    Step -6) You now to restart the Internet Explorer for the setting to take effect.

    Read Also : uBlock Origin Replaces Adblock plus(Best Adblock Plus Alternative)

    Read Also : WannaCry Attack Security Tips- Protect computers from Ransomware

    Option 2 – Enable / Disable Internet Explorer Extensions and Add-ons Group Policy

    Choose this only if you know something about group policy. So from the Group Policy Editor expand the following:

    Step -1) Choose the options in the following set of sequence as Computer Configuration > Administrative > Templates Windows > Components > Internet Explorer > Security Features > Add-on Management

    After properly executing the above steps you have to simply set the “Deny all Add-ons unless specifically allowed in the Add-on List” to one of the following settings.

    Step -2) Enabled – Does not allow Add-Ons unless they are listed in the “Add-on List” policy setting. Though the disabled users might be able to use Add-Ons.

    Read Also : Connect dual displays / monitors to one computer on Windows & MAC

    Read Also : Android: Prevent apps from running at startup(Stop/Disable Apps)

    Option 3 – Enable / Disable Internet Explorer Extensions and Add-ons Registry

    Step -1) Login with the credentials of the user you wish to change the setting for ensuring that the Internet Explorer is closed.
    Step -2) Holding the Windows Key press “R” to bring up the run dialog box.
    Step -3) Type “regedit” and then press “Enter”.
    Step -4) Select “Yes” if you are prompted to allow access by Admin Account Control.
    Step -5) Navigate through the registry(only if you really want to).
    Step -6) Select the HKEY_CURRENT_USER from the left.
    Step -7) Set the value for “Enable Browser Extensions“. If the value does not exist then you can create it by right-clicking “Main” and click “New” > “String Value”. Set it simply to “no” if you wish for your extensions to be disabled. Set it to “yes” if you wish for extensions to be enabled.
    Step -8) Close the Registry Editor and Restart your computer. The next time you launch Internet Explorer the capability to use Add-Ons and extensions could be modified as you desire.

    Note: If you have disabled your extensions the user will still have access to install or enable them under the Manage Add Ons screen but they will not work despite showing.

    So in the end I will conclude by saying that please follow the above instructions with care. Enough information has been provided so digest it at your own pace with the best possible output. So keep reading and sharing.

  • Best iTunes Cleanup Software for better iTunes experience

    Best iTunes Cleanup Software for better iTunes experience

    Best iTunes Cleanup Software for better iTunes experience

    Most of us are iTunes lovers because we can play numerous favourite tracks with iTunes .But its really messy and irritated when you find song duplication in your iTunes library . To fix this and use iTunes hassle free there is a strong demand to use some good softwares for effective use of iTunes. Here we will detail about some of the Best iTunes Cleanup Software

    We need an iTunes Cleaner to Cleanup the identical songs,unnamed tracks & other garbage to release space of hard disk .

    So,that our favourite thing on iPhone doesn’t get dissipated .

    Are you in search of iTunes music cleanup software ?

    Then here’s the right place to find an appropriate iTunes music cleanup software which can help you find cleanup  your iTunes music library by deleting duplicated/identical songs,unwanted tracks & completing music details.

    Why there’s a need of iTunes cleanup software?

    “I  am so frustrated with my phone”, although its an iPhone,but its music library “iTunes” is so messed up.

    There are so many identical songs,unnamed songs,no artist name mentioned nothing at all,its so strenuous to filter the desired track when required,you might have heard this from many.

    If your iTunes library also contains identical songs,unknown tracks,then automatically,it becomes a hub of dissipated data with no record,it will merely fill up your hard disk with junk.And at times disturb your iTunes listening experience also.

    So,to aid you all iPhone admirers,we sorted a list of some popular and professional iTunes cleanup software to help you have the best iTunes experience via managing your iTunes library & music collection.

    1. Wondershare Tidy My Music Review:

    Wondershare Tidy My Music Cleanup software tool is an absolute to help you download albums,artwork,lyrics,fix unlabeled music & identical songs. It allows us to label down songs or unknown  tracks in iTunes library or any local music folder ,where the whole song collection becomes disordered. It is one such tool that can help you to cleanup your iTunes library,customise accordingly and makes it well-organized with advanced acoustic fingerprint search,which can accurately scan & add on the mislaid info.

    Major Attributes:

    1. Systematically fix mislaid & unlabeled music info such as song name,artist .
    2. Group process music collection in large quantity to save time.
    3. Search & add mislaid album to each piece of music easily.
    4. Easily downloads lyrics &adds them to your audio files.
    5. Identify identical songs & delete some unnecessary ones to save disk space.
    6. Dovetail track details ,lyrics with mp3 audio files to devices like iPod,iPad,iPhones etc.

       Pros & cons:

    Pros and Cons of this Best iTunes Cleanup Software is detailed below .

    Pros:

    • Clean up iTines library.
    • Simple to use
    • Instinctive user interface.
    • Rapidly identify correctly.

    Cons:

    • Rarely fails to recognize song correctly.

    Read Also : Factory reset iPhone without password or iTunes with data backup

    Read Also : Connect dual displays / monitors to one computer on Windows & MAC

    2.  Leawo Tunes Cleaner Review:

    Analysis: Effortlessly cleanup iTunes & music library junk.

    Its a smart iTunes cleanup program to filter for mislaid album titles/lyrics/metadata, sing tags & identify identical songs etc & can account all mislaid music tags,album artworks & vanish duplicates as soonest as possible. It cannot only cleanup the largest iTunes library ,but also the local song folders.

    Major Attributes:

    • Search iTunes music library automatically
    • Recognize & delete identical songs easily.
    • Ger album artwork for iTunes & other audio files.
    • Download & increase music tags 
    • Allow editing music tags manually
    • Mend & cleanup iTunes with practical attributes .

      Pros & cons:

    Pros and Cons of this Best iTunes Cleanup Software is detailed below .

    Pros:

    • Elementary operation
    • Detach duplicates/identical precisely
    • Substantial manual editor to edit audios

    Cons:

    • Falsely find artwork for some audios.

       Read Also : Cancel / Reverse Venmo payment : When a Venmo payment goes wrong

    Read Also :  Venmo User Guide for Safe Transactions – Venmo payment

    3. Wondershare Tunes Go Review :

    Analysis: Approriate iTunes guide fir Android & iOS

    It can transfer your iTunes media files (music,playlists,movie,podcasts,TV shows,iTunes U & many more) without limits. TunesGo automatically analyses & cleanup the iTunes song library with one click. It scans the music library & helps you fund out which track needs a fix. You can mend all mislaid & inaccurate music tags.

    Major Attributes:

    • Openly transfers your music & playlists between ios/android devices
    • Download /record music to iTunes from almost all popular sites.
    • Controls iTuneslibrary by music tags & album art,burning music
    • Restore iTunes library from desktop files

    Pros & Cons

    Pros and Cons of this Best iTunes Cleanup Software is detailed below .

    Pros:

    • Audio & video downloads can be done
    • Straightforward yet robust & efficient
    • Cleans up & manage your music collection & any apple device connected to it.

             Cons:

    • It’s little high priced

       Read Also : Factory reset iPhone without password or iTunes with data backup

    4.Neat Music Review:

    Analysis: Most comprehended iTunes housekeeper

    In the era of digital India, with respect to digital music,iTunes is the undisputed champion & is currently used by millions of music fanatics,whether you are using an apple ios enabled mobile device, apple Mac or windows OS enabled computer nothing beats iTunes for wresting downloading & organizing personal audio files . It allows us to extend the playlist to unlimited no. of audio files.

    Even ,with all of its ability ,iTunes is not completely unerring & at times ,it can become disorderly . This is where Neat Music can be most useful .

    Major Attributes :

    • Apply it to find mislead info such as album,titles,tracks etc
    • Gives you the potential to add mislaid album to your iTunes account
    • Aids to reorient dislocated songs into much coherent list
    • Arranges audio lists for all iOS devices including iPhones,iPods,iPads.
    • Automatically corrects any & all mislaid song file metadata.

      Pros & cons:

    Pros and Cons of this Best iTunes Cleanup Software is detailed below .

    Pros:

    • Rapid iTunes music cleanup & organizer
    • Best iTunes music organizer on PC
    • Fetches highest quality album artwork

    Cons:

    • No identical songs cleaner uptil now

    So,if you are an iPhone/iPad/iPod,user download any of the Best iTunes Cleanup Software by today itself, to have the best listening iTunes acquaintance ever.

  • Best Smart Home Gadgets for Home automation- Smart home

    Best Smart Home Gadgets for Home automation- Smart home

    Best Smart Home Gadgets for Home automation- Smart home

    The home automation now is no longer be unavailable in the near future as now they are available in the form of the smart home devices. These products will simply add a bit of the science fiction to your home.There are various Best Smart Home Gadgets for your smart home which you can buy this year. Then whether it is turning your lights on from a smartwatch, unlocking your door automatically, checking your washing machine being stopped suddenly just from your own device. The smart tech gadgets not only just makes the things easier but they also massively improve up the functionality.

    So are looking to make your home smarter? Well, there is an ample number of the Best Smart Home Gadgets which lets you control the lighting, thermostat, crock pot just from your smartphone which is rapidly growing. You can also select and get your favorite home gadgets according to your own needs on your own terms, or you can also opt for the entire smart home gadgets available in the market that does all the work for you with your instructions through your mobile. Here with this article you will get to know some smart home systems and individual gadgets

    With the advancement in the technology, each and every individual is changing up their home automation with the cool gadgets which have changed individual’s lifestyle. These gadgets are not just really fancy, but they also provides you the quick solution to everyday problems. These gadgets have simple designs, as well as improved functionality ,which  has thus reduced human effort and conserves space.

    Best Smart Home Gadgets for Home automation

    Here with this article, you will come across some of the Best Smart Home Gadgets to be used :

    Robot vacuum cleaners:

    The robot vacuum cleaners are a pioneer in the field of engineering and have made floor cleaning and vacuuming much easier with a range of the Deebot from Evoovacs. D77 is one of the latest Deebot which offers 3-dimensional home cleaning solution that has the smart technology to detect as well as navigate the obstacles. This is the smart floor cleaning solution for every smart home .

    This gadget has the tendency to automatically empty its dust bin. this gadget has different modes to clean the floor. Also, you can pre-set this gadget so that you can use it afterward to clean the floors with the intelligent scheduling feature when you are not at home. This is a smart device can easily clean your floor with the application present in mobile.It is one of the Best Smart Home Gadgets.

    Clocky robotic alarm:

    Do you feel that you need an alarm which can outsmart and helps you in waking up instantly? If yes, then the clock robotic alarm is just for you. This clocky robotic alarm will make you run around the room before you get off from your bed. 
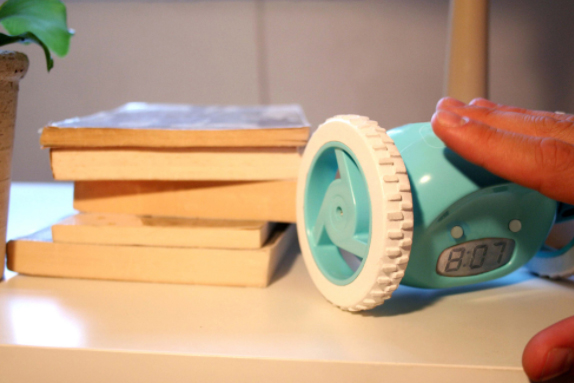
This alarm clock helps an individual to get off from their bed, the main functionality of it this clock is that it roam around the whole room and automatically hide when to try to off the alarm. So with this clock, you will not have an opportunity to snooze and go back to bed. The clocky robotic alarm will ensure that you will not sleep again.Its a smart alarm solution.

    Wireless LED light bulbs

    Now with the wireless LED light bulbs, you can just say goodbye to the conventional on/off wall switch and can experience new age lighting system. This bulb can be controlled easily with the help of your smartphone. This lighting system is controlled with help of mobile app through WiFi Bridge. With this technique, you can easily turn the lights on or off remotely, or you can also schedule to turn on or off from your device. This high quality LED lights are energy saving. They are ideally suited for the home as well as office environments.

    Read Also : Incandescent Vs LED Vs CFL Vs Halogen : Choosing the right bulb guide

    Bediator:

    This uses the room heating technology and offers the ideal room temperature in the bitter winter season. Just as the traditional radiators, Bediator is energy efficient and it helps you in saving the bills. It is a highly stylish radiator which turns in to the bed with just a flip. This LED display is ideal for your room as it can adjust accordingly and provides ideal room temperature. 

    Smart Faucet

    This is an environment-friendly faucet which can usually save up to 15,000 gallons per unit per year. You can actually save the water with this faucet which is an innovative technology and hence conserve water sources.Thus, the faucet is perfect for the children as well as elders. This technology is inexpensive and its main purpose is to conserve the water as well as to preserve the environment. This is really a great deal to consider this as Best Smart Home Gadgets.

    Wireless speakers

    The stand alone WiFi home speakers are best so as to enhance the pleasure of music. These speakers can easily be controlled with a smartphone application and the app provides access to your iTunes library and other streaming services which offers great flexibility. 
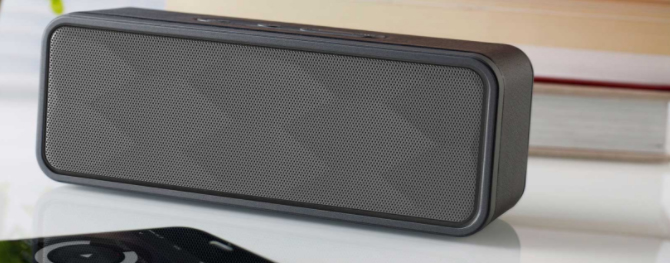
These speakers give the flexibility to play the music from any device if you have the app in it. The speakers have a compact design and make the decor of your home classy. The audio quality of these speakers gives crisp and clear high-frequency response. But, if you enjoy music, then these wireless speakers are ideal for your home.

    Read Also : Best Garage Band Alternatives for Windows and Mac

    Read Also : Best iTunes Cleanup Software for better iTunes experience

    Book Light:

    Getting worried that your reading habit at bed time will disturb your partner? Then, book light is an ideal option for you. It is an integrated LED display encased in a plastic body that offers discreet lighting that suits your needs. 
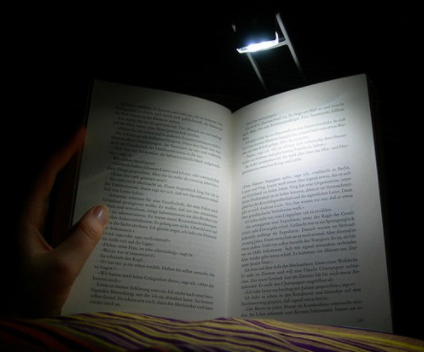
This light has provided you with an option such that you can easily adjust the brightness and viewing angle. This product is highly suitable for the long distance travel such that you can read your favorite book without any hassles.It’s not just a Best Smart Home Gadgets but also ideal for you as a lifestyle gadget .

    Solar-powered path light:

    The solar LED path lights are one of the ideal eco-solution for your garden. This solar powered path light does not require any wiring or electricity. You can easily conserve the energy as well as you can also save the money on the electricity bill with this smart gadget. 
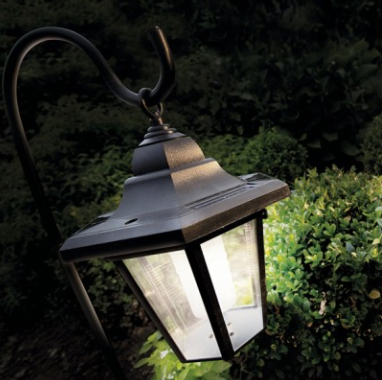
In fact, you did not have to worry about the dark garden when you are away from home and you have installed this energy efficient light.

    Z-Wave Wireless Door/Window Sensor:

    The Z- wave enabled devices are ideal for monitoring your doors as well as windows. They provide the appropriate security for your home as well as to your office. This gadget is highly cost effective security system which can provide you an alert if any intrusive activity happens.

    With the help of your app in the smartphone, you can easily monitor the door. This app will send you the message as well as email you , so as to make you know about your home safety 24 x 7.

    Thermal leak detector:

    This gadget helps you in detecting the leaks present in the home. They are highly efficient to monitor the ducts, windows, and other vulnerable insulation spots. You can easily scan up the area with the detector. This detector if found any leak in the home then it changes the warmer spots in red and colder spots in blue. 
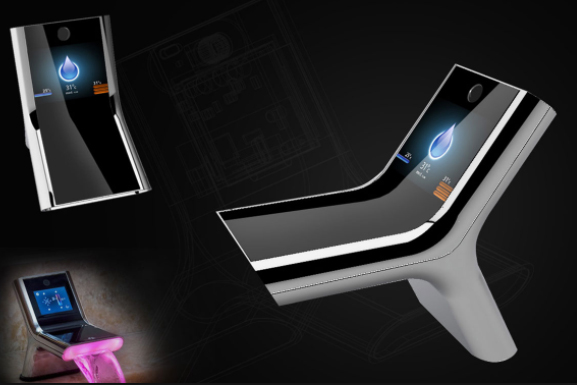
Also, you can use this gadget to check the efficiency of your refrigerators, freezers, and automobile coolant system.If you have installed this detector than you can easily detect the leaks which leave you in surprise as they are not visible.

    Air purifier:

    This is a compact gadget which purifies the air and helps in maintaining appropriate humidity in the room.Also, it removes bad odors from a room and is highly portable. This gadget consumes less power as well as energy efficient.

    Read Also : Go green idea-10 Simple Ways to Go Green in Your Home

    Shower meter:

    This shower meter is a water meter which is used to conserve the resources. This gadget saves up to 440 kWh of energy as well 8500 liters of water each year. The gadget does not require any kind of battery or electricity but can be easily charged up with the water flow. 
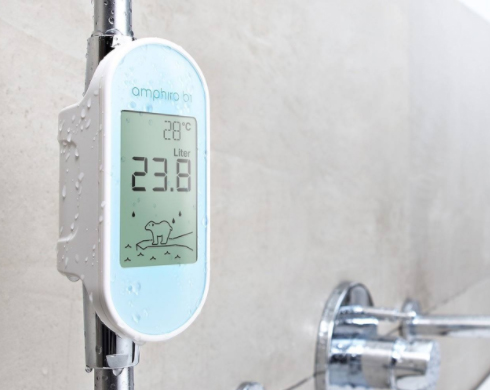
This device displays up to the real time information of the water temperature and for the climate change. You can install this device easily in your home. Installing up the device does not require any tools.

    LG ThinQ Refrigerator:

    This refrigerator is a 3 door LCD with an eight-inch WiFi LCD. This refrigerator has impressive design and thus offers the storage options such as the Glide and Server drawer. The touch screen of this gadget monitors the refrigerator and gets controlled with the help of smartphone app.

    Sony Eclipse:

    This gadget is an innovative media player which gets charged through a photovoltaic cell. Using the Sony eclipse, you can easily save the energy which makes it self-reliant. This gadget is a great companion which you can have when you move out from home for your work.


    Smart Body Analyzer:

    This gadget is a complete health tracking tool which visualizes like a normal weighing scale and offers detailed health data. This gadget measures the fat percentage and room air quality.From the mobile app you can easily monitor the data which can be synced up using the mobile app and you can easily set up the goals and track your progress.

    Read Also : Amazing Fitness Apps To Track Calories & Keep You Motivated

    Read Also : Weight loss booster Foods you should take before & after exercise

    Motion Sensor PowerStrip with 8 Outlets:

    This gadget conserves the energy by detecting the human movement in the surrounding area. The four outlets of this gadget turn off automatically if it does not detect any human movement. This technology can save up the energy by switching off the peripheral devices when they are not in the use. This device is ideal for the networking as well as entertainment.

    Reusable dryer ball:

    This gadget helps in softening the ball and thus reduces the time by 25%. This ball is a natural source for maintaining the softness of your fabric. This reusable dryer ball is made without the use of any chemicals. The gadget allows up the air to move freely and thus provides faster drying. This ball is made up of the plastic as well as some other kinds of materials.


    These are the top trending , must have Best Smart Home Gadgets for every smart home.

  • Top Satellite Car Radio Installation and specification guide

    Top Satellite Car Radio Installation and specification guide

    Top Satellite Car Radio Installation and specification guide

    The satellite radio has been around over the decade, but this technology is not been used widely or be understood as traditional radio. this technology has some similarities with the both satellite television and terrestrial radio. But the formatting of both the radio is same, but most of the stations are presented without the commercial interruptions. However, satellite radio is subscription based like satellite television. Today will discuss on Top Satellite Car Radio Installation.

    The satellite radio services also require some specialized equipment such as the satellite television. The main advantage of the satellite radio is that the signal is being available over the much broader geographical area than anyone terrestrial radio station covers. The handful of the satellites is capable of blanketing an entire continent and every satellite radio just offers the same set of stations and programs to the entire coverage area.

    There are two different kinds of the satellite radio one is XM Satellite and another is Sirius Satellite Radio which started commercial service in 2001 and 2002 respectively. Both the satellite radio uses S-band of 2.3 GHz microwave, but the systems are different. But in 2008 both of the companies get merged to the Sirius XM Radio. Across the U.S. this radio has approx 22.9 million subscribers.

    One of the main driving force behind satellite radio is automotive industry. Both Sirius as well as XM, have pushed automakers to include the satellite radio in their vehicles. Most of the OEMs have one vehicle which offers service to the others. Nowadays the vehicles usually come up with the pre-paid subscription to Sirius and XM.

    Now we will move to our actual topic Top Satellite Car Radio Installation

    Top Satellite Car Radio Installation

    Here we will detail on Top Satellite Car Radio Installation

    If you are being familiar with the Sirius XM Satellite radio, then you really know that it is much joy to listen to it.Although , you need to pay a fee for monthly access and you will definitely get a crystal clear stereo sound. From few days with the trend has allowed Sirius XM technology to be bundled into devices which act like MP3 players. Some list of the satellite radios are:

    SiriusXM XEZ1H1 Onyx EZ

    This is one of the most convenient satellite radio for the vehicle, this is one of the great low price options which comes with a remote control. Other nifty features include: easily browse what’s playing on other channels while listening to the current one, store 10 favorite channels for one-touch access.

    Top Satellite Car Radio Installation of this car satellite radio is much easy in the vehicle. In your vehicle, just connect the antenna, powered cord and auxiliary cord to your vehicle stereo system. The blue LCD light at back shows the basic information such as artists, channel, title, etc. moreover, the hardware is fairly bare bones, Onyx EZ is an easy entry point into XM./Sirius and it is much hard to argue with the price.

    Read Also : Connect dual displays / monitors to one computer on Windows & MAC

    Runner-Up, Best Budget: Sirius XM SSV7V1 Stratus 7:

    This is one of the basic satellite radio which has push button navigation that allows for the easy channels surfing also in this radio you can store 10 favorite channels for one-touch access. Listening to the radio in the multiple vehicles need distinct kits but it extends the use cases of Stratus 7. The overall design of his radio is very basic and there is no wow factor to its factor and feel but in reality, it gets the job be done. In this radio, TuneScan is a feature which allows you to start a song from the beginning on a new channel, is not available. Same applies on the TuneStar this allows the individuals to create their own music channel by blending their favorite music channel. Although this satellite radio may lack some features but offer clear signal and easy installation.

    Read Also : Factory reset iPhone without password or iTunes with data backup

    Best Features: SiriusXM Satellite Radio SXPL1V1 Onyx Plus:

    This satellite radio is the big brother of the Onyx EZ, Sirius XM SXPL1V1 a feature-rich, vehicle ready player. In a package that is 3.4-ounces and 4.55″(W) x 2.4″(H)x.7″(D), there are many features to keep the pickiest Sirius XM listener happy. The addition of both the TuneStart and TuneMixx are the two features which make the price tag worth. This satellite radio allows subscribers to start a song from the beginning on a new station, while it latter allows the creation of a music station based on the favorite channel. Also, the Onyx EZ offers pause, rewind, and replay functionality o your favorite channel for up to 30 minutes.

    Installation of this radio in the vehicle is much easy with the included kit in the vehicle that includes adapter, antenna, etc and thus allows the transfer between cars on a single subscription. The full-color display shows album art, channels, and graphics to add some visual appeal. Some advanced features are also available such as one-touch access to traffic and weather, as well as the one-touch jump back to the previous channel.

    Read Also : Hard and Soft Reset Roku Manual – Fix Frozen Roku Streaming Stick

    Best for Sports Fans: SiriusXM ST4-TK1 Starmate 4:

    This is a simple, sleek, and full of the features that offer easy installation., a five-line graphics display, and 44 minute instant replay function. Seek will save minimum up 30 song titles and alert the individuals whenever one is playing but the game alerts prompt subscribers when their favorite sports team is playing.

    The Starmate 4 decodes the digital signal for more than 130 music sports, sports and news station with the subscription.Its kit offers the easy portability between the vehicles with the single subscription.

    Read Also : Cancel / Reverse Venmo payment : When a Venmo payment goes wrong

    Best Splurge: SiriusXM Lynx Portable Radio:

    It is one of the most expensive and portable satellite radio 3.5 inch multi-touch and it makes the display is much beauty to view as it is used. Approximately it is just same as the 5th generation iPod has the powerful battery with micro SD slot continues to show the difference between other satellite radios. The Lynx runs a heavily modified version of Android.

    The home-screen of this radio has six various options satellite, the Internet, my library, show finder, Bluetooth connect settings. Users can have up to the 25 preset stations along with the alerts that notify your favorite show, song, or artist to next play. All the option of the pause, play and rewind are being present and also the subscribers can play up to 30 minutes of the live content on tuned channel. Also, if you are being connected with the WiFi Hotspots then, you can access over 150 channels.

    Best Screen Display: SirirusXM Commander Touch:

    This satellite radio offers an enticing and beautiful touchscreen display which provides full color 480*180 pixel displays about the album, art, name, song title, channel logo, and information of the program. This advanced portable satellite radio offers the pause, rewind, and replay, for up to 60 minutes of listening. This has a TuneMix feature that creates a mix of the songs from the subscriber’s favorite stations with album art and channel logos. With this, the songs will be automatically gets paused when stop occurs while listening in the vehicle also will get played from where the song has been paused. This will also offer the software update to commander touch via the USB flash that offers the new features and capabilities as they are available.

    The radio installation in the car is a snap and has been simplified with the multiple car attachments just on a single subscription.

    Read Also : Venmo User Guide for Safe Transactions – Venmo payment

    Best App: SiriusXM Smartphone App:

    This is a true portability satellite radio which can be found via Android, Blackberry, and iPhone smartphone application. this radio can help you to gain complete portability, streaming channels, and all subscriber options.

    That’s the detailing about Top Satellite Car Radio Installation.

  • Connect dual displays / monitors to one computer on Windows & MAC

    Connect dual displays / monitors to one computer on Windows & MAC

    Connect dual displays/monitors to one computer

    A much more screen space is provided by dual displays/monitors to one computer and it can be very useful for increasing efficiency and productivity. The two monitors can be easily configured to show either the same image or give you a much larger screen. Follow this article to get your monitors set up right the first time.Here will discuss methods to connect dual displays

    Method One of Two to connect dual displays:Windows

    Here is the first method by which you can connect dual displays or monitor in one computer where here the step by step guide for connecting dual system to one windows computer.

    For Windows Users to connect dual displays

    1)

    First step to connect dual displays is that you need to check your ports and also you will need two video out connections on the back of your computer one for each monitor.

    Basically there are mainly four types of connections which are listed here from oldest to newest: VGA, DVI, HDMI and Display Port. So for the best results we can use two of the same connectors to connect dual displays.

    The monitors are directly connected to the motherboard or the graphics card and most graphic cards support two or more monitor connections. Although most motherboards support one and sometimes two if you have a monitor with a VGA cable and if your port is DVI then you can purchase an adapter that will connect to your VGA connector and allow you to hook it up to a DVI port.

    Though the ability to connect dual displays depends completely on the power of your graphics card and CPU, running a second monitor puts more strain on your system. A more capable graphics card means the display has more pixels which makes a connect to dual displays possible and this ends your first step to connect dual displays on your computer.

    Read Also : The ultimate guide to make Windows run faster (Boost Computer Speed)

    2)

    Now for the second step to connect dual displays you can connect the 2nd monitor to the open port on your computer and in most cases the Windows OS will intrinsically detect the new monitor but if it does not restart the computer then to connect a another monitor there is only one port on your motherboard or graphics card. You will need to install a brand new and latest graphics card in order to attach the secondary monitor. Whatever monitor you wish to choose has no compulsion to be from the same vendor or the same size but for a reasonable viewing both the monitors should be of the same size so that your desktop stays consistent and this ends the second step to connect dual displays on your computer.

    3)

    Now in the third step to connect dual displays you need to follow the monitor setup wizard. In majority of the cases this will automatically start when a new monitor is plugged in and you will be given options to either mirror or extend your desktop depending on your wish. The option of mirroring mirror’s what is shown on your original monitor and this is most useful for giving seminars,presentations etc wherever your machine may be connected either to a projector or a TV.

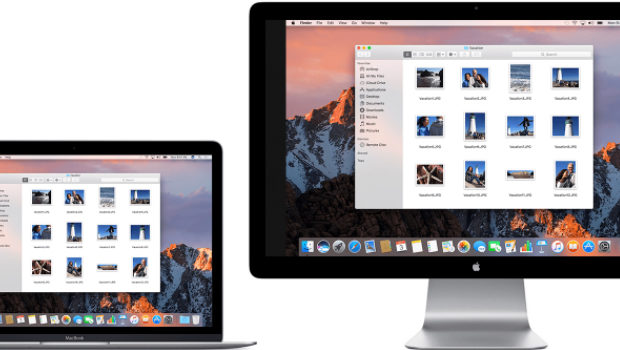
    The protraction makes the secondary monitor another screen for your desktop allowing you to drag and drop different windows and icons onto the other monitor which would give you more space to multitask.You can even set the second monitor as your primary desktop monitor and this is really useful if you attach a monitor to a laptop and want to use it instead of your laptop’s display so this ends your third step to connect dual displays on your computer.

    Read Also : uBlock Origin Replaces Adblock plus(Best Adblock Plus Alternative)

    4)

    This is the last step to connect dual displays manually. If either your monitor wizard does not automatically start or you want to change the settings for yourself you can use the display Settings tool. The procedure is to right-click the desktop and then select Properties or Personalize. You then decide to click on display settings from the list of available options and now you would see icons with various different numbers representing your attached monitors but if by any chance, if one is not working then that would look grayish in color. Now you can select the second monitor and choose to protract your desktop or replicate your desktop. Your options may rely on the graphics card that you have installed and you may need to make these changes from within your nVidia or ATI control panels. If you have these already installed then they can be found in your start up menu and this ends your final step to connect dual displays on windows .

    Method Two of Two to connect dual displays:MAC

    Here is the second method by which you can connect dual monitor in one computer where here the step by step guide for connecting dual system to one MAC computer.

    For Mac OS X Users to connect dual displays

    1)

    The first step to connect dual displays for the Mac users is that your Mac must have available video connectors to attach a second monitor. Since each display will need its own video cable, so to facilitate it there are several types of connectors that you may come across. Depending on the age of your Mac:

    VGA – This is one of the the oldest analog standard and most monitors support being connected via VGA cables and DVI – This is a core step up from VGA in quality. Although it is being replaced by HDMI and display port there are very few MacBooks that use the Mini-DVI which requires an additional adapter to connect to a standard DVI cable.
    Display port or Thunderbolt – This is one of the most common connectors found on newer Macs because Thunderbolt is the newer version of Display port and can carry both audio and video signals . By any chance if your monitor only supports HDMI then you will need a Thunderbolt-to-HDMI adapter.

    HDMI – This is the standard for all digital display devices and majority of every new display manufactured in the last few years supports HDMI connections because HDMI can carry both audio as well as video signal.
    All the above given information was necessary for upcoming steps to connect dual displays on your computer.

    Read Also : Kindle Fire Silk Browser Alternatives

    2)

    The second step to connect dual displays is similar as of windows because most displays will be recognized automatically and you will be prompted to choose your choice of settings and if you choose to mirror then the same image will be shown on both monitors. If you decide to choose extend then your desktop will stretch across both monitors but if the display is not recognized then open the Displays preferences and click Detect Displays and this ends your second step to connect dual displays on MAC.

    Read Also : Record iPhone iPad Screen on Windows & Mac

    3)

    The third step to connect dual displays requires you to adjust your settings manually. If you would like to change the settings yourself then you can do so through the display’s preferences menu. Now get there and click on the the Apple menu and select System Preferences and open the Displays tool. Now to extend the desktop you can click on Arrangement and then follow the simple instructions on the screen. Now to mirror the image you have to set both your displays to the same resolution. Now finally click on Arrangement and then click on Mirror Displays and this ends your final step to connect dual displays on your computer.

    These are the ways to connect dual displays on both Windows and MAC computers.