
Enable/Disable Internet Explorer Extensions and Add-ons
Sometimes we all need to Enable / Disable Internet Explorer Extensions as well as Add-ons for some annoying reasons. Today we will discuss on three different methods to do it .
Before we deal the actual , let’s get a rough idea about this Stuffs .
Add-ons are just like applications that the web-browser Internet Explorer makes use of in order to make interaction with numerous web contents such as videos & games. The toolbar, extensions these are also kind of Add-ons only . One of the most common Add-on that everyone know is the Adobe Flash. Internet Explorer is basically designed to give users Add-ons free experierence in web browsing as most of the users find irritated with add-ons. You will only be able to use Add-ons in Internet Explorer for the desktop.
If you are loading a page that requires Add ons then to see it in the desktop: swipe up from the bottom of the screen to bring up the app commands and then select the Page tools button then finally select View in the desktop(Not that efficient but utilitarian).
Different Ways to Enable / Disable Internet Explorer Extensions and Add-ons
This easy and simple methods show you exactly how to enable or disable along with the dexterity to run various different extensions and Add-ons in your favorite Microsoft Internet Explorer. Additionally this will equip you to both enable and disable all/specific system users to have the capability to either enable or disable extensions along with the Add-Ons through the Internet explorer Add-on Manager in Windows(Only if you are using IE which no one in India would do). For all these you are supposed to be logged in as an administrator so you can carry out all the steps in this magnificent methods. The different options are as follows:
Read Also : Enable / Disable JavaScript : Mozilla Firefox Hacks
Option 1 – Enable / Disable Internet Explorer Extensions and Add-ons From Internet Explorer Settings
Step -1) Click on the icon of Internet Explorer.
Step -2) Select the Settings Gear at the most upper with right corner and choose “Internet Options”.
Step -3) Choose the “Advanced” tab(Seriously is there anything Advanced in Internet Explorer).
Step -4) Keep scrolling down until you find the the “Browsing” section.
Step -5) You can select/deselect the “Enable third party browser extensions” as desired.
Step -6) You now to restart the Internet Explorer for the setting to take effect.
Read Also : uBlock Origin Replaces Adblock plus(Best Adblock Plus Alternative)
Read Also : WannaCry Attack Security Tips- Protect computers from Ransomware
Option 2 – Enable / Disable Internet Explorer Extensions and Add-ons Group Policy
Choose this only if you know something about group policy. So from the Group Policy Editor expand the following:
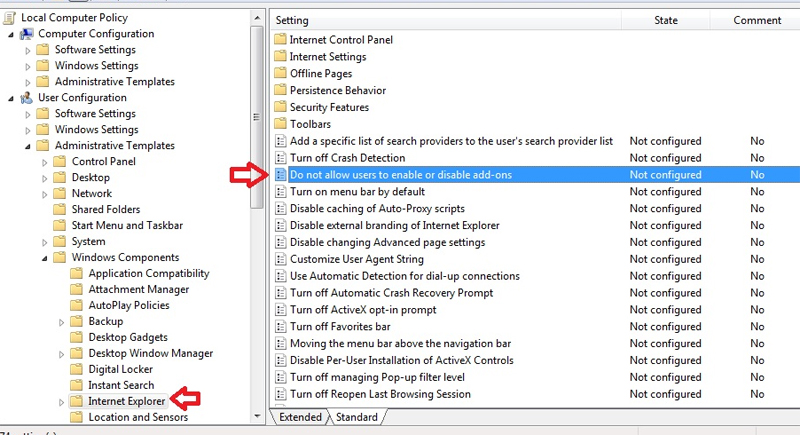
Step -1) Choose the options in the following set of sequence as Computer Configuration > Administrative > Templates Windows > Components > Internet Explorer > Security Features > Add-on Management
After properly executing the above steps you have to simply set the “Deny all Add-ons unless specifically allowed in the Add-on List” to one of the following settings.
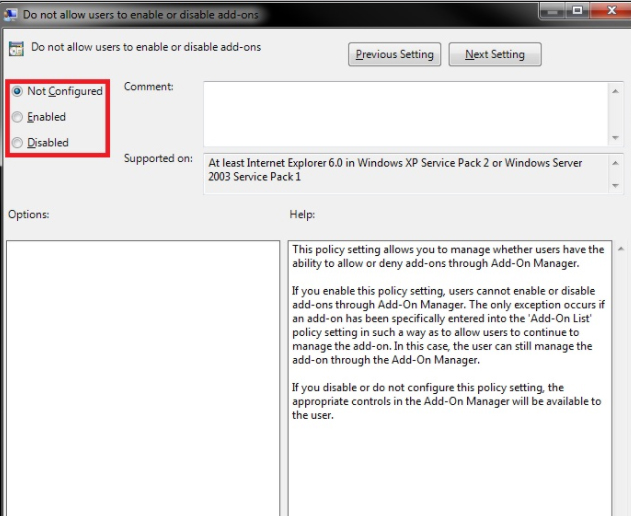
Step -2) Enabled – Does not allow Add-Ons unless they are listed in the “Add-on List” policy setting. Though the disabled users might be able to use Add-Ons.
Read Also : Connect dual displays / monitors to one computer on Windows & MAC
Read Also : Android: Prevent apps from running at startup(Stop/Disable Apps)
Option 3 – Enable / Disable Internet Explorer Extensions and Add-ons Registry
Step -1) Login with the credentials of the user you wish to change the setting for ensuring that the Internet Explorer is closed.
Step -2) Holding the Windows Key press “R” to bring up the run dialog box.
Step -3) Type “regedit” and then press “Enter”.
Step -4) Select “Yes” if you are prompted to allow access by Admin Account Control.
Step -5) Navigate through the registry(only if you really want to).
Step -6) Select the HKEY_CURRENT_USER from the left.
Step -7) Set the value for “Enable Browser Extensions“. If the value does not exist then you can create it by right-clicking “Main” and click “New” > “String Value”. Set it simply to “no” if you wish for your extensions to be disabled. Set it to “yes” if you wish for extensions to be enabled.
Step -8) Close the Registry Editor and Restart your computer. The next time you launch Internet Explorer the capability to use Add-Ons and extensions could be modified as you desire.
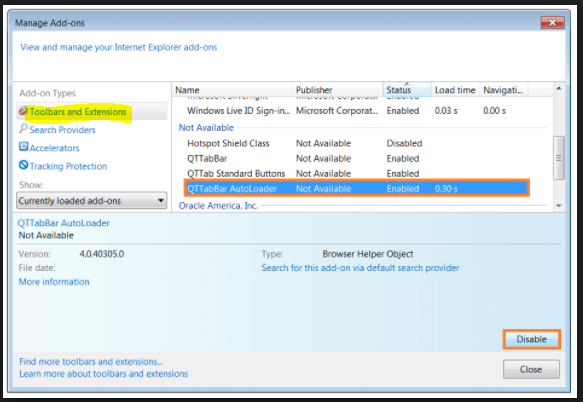
Note: If you have disabled your extensions the user will still have access to install or enable them under the Manage Add Ons screen but they will not work despite showing.
So in the end I will conclude by saying that please follow the above instructions with care. Enough information has been provided so digest it at your own pace with the best possible output. So keep reading and sharing.
Leave a Reply