Author: Azhar Mithani

  • How to Fix “Cannot Take Photo” Problem on iPhone and iPad

    How to Fix “Cannot Take Photo” Problem on iPhone and iPad

    Fix Cannot Take Photo Problem on iPhone and iPad Method 1:

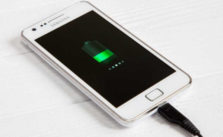
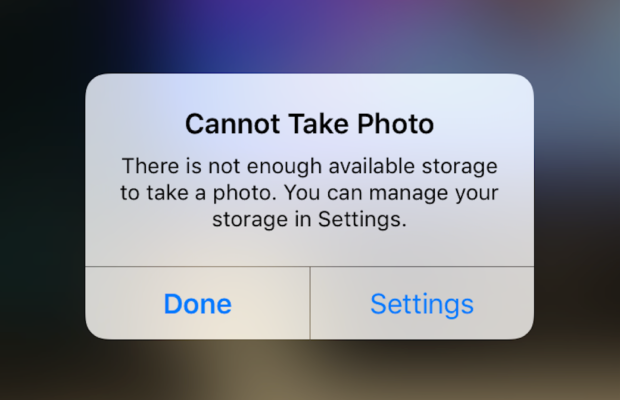
    When you go to take a photo using the Camera or any other app like Instagram, WhatsApp etc on your Apple iPhone or iPad but while doing so if you find an error message which says “Can’t Take Photo – There is not enough available storage to take a photo“.  You can manage your storage in Settings. Now you might get confused about what to do. Don’t worry because your savior(which is me by the way) can help you with this simple steps to Fix Cannot Take Photo.

    Why Can’t I Take Pictures on my iPhone

    I got an issue “my iPhone wont let me take pictures because of storage“. To fix this issue you need to remove some unwanted files and free up the storage. So choosing Settings on this message will provide you with a list of apps and the amount of storage they are using. You can also reach this screen at any other time by going to Settings > General > Usage.

    If you want you could select an app that is taking up a large amount of space(basically browse which apps take up the most space or an app that you can delete (deleting pictures or videos and music also creates extra space)) and then click on Delete app. That could or could not free enough storage to fit photos. Moreover you may not want to do this in case you like and value every single one of your apps.

    Read Also:

    How to Factory reset iPhone without password or iTunes

    Record iPhone iPad Screen on Windows & Mac

    Quick Fix Cannot Take Photo Problem on iPhone and iPad

    In majority of the cases iTunes(your culprit) is loading your device with music and regularly causing this message to appear when you use the Camera or any other app.

    You would free some space while you are out and by deleting some unwanted music from the device. What I to do is locate an entire album that I can live without and delete it using these steps(which is obviously hypothetical in my case ).

      • 1) Open the Music app on your iPhone.
      • 2) Select a particular artist (if you downloaded them legally) that has songs stored on the device you would like to delete.
      • 3)You can also locate a music track that is already stored on the device but if the track has a cloud icon that means it is not stored on the device(probably stored on iCloud). You will have to find tracks that do not have this icon.
      • 4) You then have to swipe left across the name of the song. A button is bound appear that says Delete.
      • 5) You than have to tap delete(putting a stone on your heart) and the song is gone forever. Repeat these steps any number of times unless you have freed enough space.

    Read Also : Best iTunes Cleanup Software for better iTunes experience

    Fix Cannot Take Photo Problem on iPhone and iPad Method 2:

    1) Connect your iPhone to a Mac or Windows PC which has iTunes installed already.
    2) Open iTunes(most complex step of this method so be careful :)).
    3) Select on your device then choose “Music“.
    4) Uncheck the ‘Automatically fill free space with songs‘ button(Though I think it would be a checkbox).
    5) Choose ‘Sync’.

    If these steps do not fix storage error message from regularly appearing then you might need to remove some apps, photos maybe even videos from the device(Unfortunately you have to set your priorities).

    Using iMyFone Umate

    iMyFone Umate is a special memory cleaner for mac and is highly recommended for increasing storage space on the device and cleaning up the unwanted phone memory. All I demand is that you have to follow these few simple steps and your phone will be new:

    • Connect your phone to open the cleaner.
    • iMyFone Umate will do a quick scan.
    • With one click, all the junk files and unwanted files will be removed.
    • It clean many hidden temporary files with a click
    • It clear’s the junk files to improve iPhone performance

    Some other programs are:

    • Photo manager

    It basically compresses the images/photos compressing the size of each photo.

    • App manager

    It has a one click mechanism to mass remove all the unwanted Apps.(If you have any)

    Hopefully the above given methods would serve your purpose but if you want something extra then below are some extra tips.

    To exchange information on one iPhone with other are extremely valuable for you on the high probability that you need to duplicate substance from old iPhone to new purchased iPhone /iPhone Plus. You might want to replicate information. For instance songs, photographs, from your personal iPhone to a new iPhone.

    iCloud goes down your iPhone once every day. Since it is a good idea to reinforcement your old iPhone to iCloud one last time before moving. So nothing is passed up as a major opportunity. In the Settings explore the iCloud storage and Backup opportunities and tap on Back up. This may require significant investment relying upon the measure of information to be replicated.

  • How to reset iPod Nano or steps to unfreeze iPod Nano

    How to reset iPod Nano or steps to unfreeze iPod Nano

    Reset iPod Nano or unfreeze iPod Nano

    A thing you should note is that i am obviously telling you a how to reset iPod Nano or unfreeze iPod Nano and it may work for majority but obviously not for everyone who have an iPod Touch. So I will try to enlist out the guidelines for as many as I can and another thing to note is that if by any chance the resetting procedure does not work. You can also try to connect the device to a power source and then try again(Standard Indian remedy for repairing anything ).

    Hopefully if you follow steps carefully you would be able to reset iPod Nano quickly.

    How to Reset iPod Nano (6th and 7th Generation)

    For the latest editions of the iPod Nano the process is a bit different to reset iPod Nano. So let me start off with the sixth generation iPod Nano at first. So to reset iPod Nano perform the following steps:

    1) To reset the sixth generation of iPod Nano you have to press down the Sleep/Wake button and the Volume Down button simultaneously for minimum time of 8 seconds and for the iPod Nano seventh generation you have to press the Sleep or Wake button simultaneously with the Home button until the screen turns black and this would reset your iPod Nano.

    Read Also : Record iPhone iPad Screen on Windows & Mac

    How to Reset iPod Nano 1st to 5th Generation

    Method of resetting an iPod Nano is just same as it is for an iPod Classic. The procedure to reset iPod Nano are as follows:

    1. First step to reset iPod Nano is to toggle the hold switch to both on and off(You have to slide your hand to the Hold button and then then turn it off again). This finishes your first step to reset iPod Nano successfully.

    2. Now for the second step to reset iPod Nano you have to press and hold the Menu and until the Apple logo appears on the screen which could take time ranging from 6 to 10 seconds. If you don’t do it properly you might have to repeat this step to reset iPod Nano several times. Hopefully this will reset your iPod Nano.

    You can also reset an iPod Mini in the similar manner as the above steps.

    Read Also : Factory reset iPhone without password or iTunes with data backup

    How to unfreeze or reset an iPod classic

    1) The first step includes toggling the hold switch to on and off. (You can slide it to Hold and then turn it off again.)

    2) Now for the second step you have to press and hold the menu and select buttons simultaneously until the Apple logo appears. It may take the time of about 6 to 10 seconds and you might need to repeat this step.

    Take some notes to ameliorate your procedure as follows:

    Now read carefully if you are having any problems resetting the iPod then go ahead and adjust it on a plane flat surface. Then be sure about your finger is pressing the select button is not in contact with any other part of your device. Be sure that you are pressing the menu button in the outside of the click wheel and not near the center.

    Read Also : Best iTunes Cleanup Software for better iTunes experience

    What would you do in case resetting iPod Nano didn’t work

    The steps to restart an iPod nano are simple but what if they did not work. There are two things you should try at that point:

    • 1) First you plug your iPod nano into a reliable power source (just similar to your computer or a wall outlet) and then let it charge for almost 1 hour. There is a probability of the battery running down and maybe it just needs to recharge
    • 2) If you have for sure charged your nano and tried all the above given reset steps and your iPod nano still does not work. Then you may have a larger problem than it may seem and maybe you could not solve it on your own. Feel free to contact apple to get more help.

    This is what you have to do if resetting iPod nano doesn’t work This will help you to unfreeze your iPod nano any versions easily.

  • Android boot Fix – Steps to Try When Your Android Won’t Boot

    Android boot Fix – Steps to Try When Your Android Won’t Boot

    Android boot fix steps to try when your android won’t boot

    This article we will focus on the steps to fix android when it is not able to boot , so you can read step by step to do Android boot Fix

    If your favorite android device decided to take a vacation and  android not boot properly then this condition is not acceptable and the idea of troubleshooting it is in itself haunting. The solution to this puzzle could be related to either an errant app or a corrupted Android OS or in worst case bad hardware.

    Android boot Fix steps

    Here are the steps you can take if your Android won’t boot.

    1) Soft Reset Android boot Fix

    • Your android phone might need a soft reset to boot. On majority of the devices you can press and hold the Power button for about 15 seconds to soft reset/boot. This way you can do Android boot Fix.

    Read Also : Enable / Disable JavaScript : Mozilla Firefox Hacks

    2. Pull out the battery

    • For nearly every problematic issue where an android device would not start I always suggest to pull out the battery (only if it is removable so never go to extreme lengths at start) first and leave it sunlight for time nearly about 20 seconds and then reinstall the battery and see if the issue of boot persists.  

    Read Also : How to Use Google Assistant on Android Devices (Without Root)

    This particular step could seem like it would not work but I know for sure that it has helped numerous android users.

    3. Verify for Stuck Buttons

    •  In certain case it can cause the Volume,power,home buttons to stick which prevents the start up/boot. So try to remove this case of not being able to boot.

    4. Try a Soft Reset

    • On majority android phones you can simultaneously press and hold the “Volume Down” and “Power” buttons. Keep pressing them for a time of nearly 20 seconds to soft reset/boot the phone.

    Read Also : WhatsApp Exclusive Guide – Everything about WhatsApp Features

    5. Remove Connected Hardware

    • By any chance if you have an SD card, otg-cable or any other items plugged into the device then unplug them. A bad/corrupted SD card or headset could cause issues. Though this are on rare occasions it could stop your boot.

    6. Ensure Device Has Enough Power

    • In this case your device would not turn on at all or maybe is stuck in an infinite startup loop/boot. It may not have enough power so attach the power adapter to the your phone and then plug it into a wall outlet. Remember not to use a connection to a computer or any other device because the power you would get is not suffice to power majority of android devices in the right away and could affect the boot.Another issue could be the actual battery(about which we talked earlier). To see if you can borrow a battery from a friend with a similar specification and give that a try for a boot. Though you may want to purchase a new one or maybe try a used battery out. You can also return the battery to the store if it does not help(if it is in the warranty period).

    Read Also : Improve The World With Smartphone -Top 10 Hacks

    7. Start Android in Safe Mode

    • If you have installed a particular app that either is not compatible with your device or malfunctions then it could cause the system to hang at a blank screen or continually force to close items stopping the boot process. In any case you will want to find out how to start your device or boot in Safe Mode. Safe Mode will start the device with only the basic OS required to start the device. This will usually allow you to access the android OS so that you can remove whichever app that may be causing the issue for boot.Since most devices start in safe mode by simultaneously pressing and holding the Menu or Volume Down button while you power to the device is on. If you are not confident on how to start your particular phone in Safe Mode then search the google. You can also check the documentation provided with your Android phone especially for boot.

    8. Factory Hard Reset Android

    • Alas! if you have tried every of the above steps and no option seems to work then you might want to do a factory reset operation on your phone for a boot and mind you doing so will wipe all data from the memory of the phone(usually not SD card data like music or photos).There are many different ways to perform a factory reset with a hardware button combination just before your phone’s android system loads. Look in your manual or search for what the button combination is for your particular device. They are different for almost every different phone. Only if you are not confident on how to factory reset your device. Check the documentation provided with your phone(the manual you probably never read).

    9. Repair

    • After trying everything if none of the above steps work then there may be a hardware issue that you are most likely unable to solve for yourself which is stopping your boot process. At this point I would seek help from the manufacturer or the retail store that sold you the phone. It is

    These are the steps to try when android doesn’t boot and thus will help your android to work well smoothly .

  • Zipped File Extraction Error Fixing “An unexpected error is keeping you from copying file” error

    Zipped File Extraction Error Fixing “An unexpected error is keeping you from copying file” error

    Here we will give the solution on a common problem faced that is Zipped File Extraction Error Fixing “An unexpected error is keeping you from copying file” error .

    How to Fix “An unexpected error is keeping you from copying file” error when extracting a zipped file

    So you might have seen the above error frequently or in some recent times(Obviously since you are reading this) which is an error while copying a zip file. The error though looking simple to solve can be really a big pain sometimes.

    Zipped File Extraction Error Fixing

    This basic error on copying Zip files might arise because the zip file might have errors in them or more likely a virus.

    After some research I found out that it is a system error but to be sure first try to copy the same file to a different computer and if the error persists that simply means there is an error in your zip file. So I propose to ask the sender to resend the file because it is most likely that there is a virus attached to the file but if for some reasons you can not do it then here are your solutions.

    Read also : Connect dual displays / monitors to one computer on Windows & MAC

    I mean if its not an issue with the zip file then here is the exclusive ways that can help with Zipped File Extraction Error Fixing.

    So all you have to do is simply open it in a separate folder and copying the simple EICAR.txt file or a file that has zip recursion level beyond five (5) levels deep results in the following error dialog box or could look like:

    This could practically happen with any file for example:

    Title: Copy File
    Error message:
    An unexpected error is keeping you from copying the file.
    If you continue to receive this error, you can use the error code to search for help with this problem.

    Error 0x80070570: The process cannot access the file because another process has locked a portion of the file.

    or

    Error 0x80010135: The Path is too long.

    So the solution to this problem is as follows:

    All you have to do is to reproduce a file and you have to do that by the below mentioned steps and this problem will disappear from your life like a smoke cloud but do remember that there might be a bit more serious and potential error that is keeping you from copying your zip file since all it says is an unexpected error is keeping you from copying though the error code is really helpful since you can simply call the Microsoft assistance helpline and they will solve it for you. However if you do not have a licensed product or there is another issue then follow the below mentioned steps:

    1) Select a Document Library
    2) Switch the Library ribbon view
    3) Open the Document Library in Explorer View
    4) Drag and Drop the EICAR test file into this view.

    Read more : The ultimate guide to make Windows run faster (Boost Computer Speed)

    You can also Fix “An unexpected error is keeping you from copying the file” Error When Extracting a Zipped File by following the below steps –

    1. Extract Zip file using WinRAR or WinZip by using the password for extracting the particular zip file.
    2. Then try to Copy the Zip file that will be done without an Zip file copy errors as before .

    I am sure that this will definitely be the solution to your problem of Zipped File Extraction Error Fixing, though if these steps or sequence of process does not solve your problem do mention about it in the comments section. These type of errors are generally caused by unnecessary virus signatures which get attached to your file and your system tries to protect you from screwing up. Till then keep sharing.

  • Google Traffic : How to check traffic to work or home

    Google Traffic : How to check traffic to work or home

    Here is the ways to find traffic to work and traffic to home on Google Maps – Google Traffic.

    Google Traffic : How to check traffic to work or home

    Today I will talk about the traffic problems we face in our day to day life. So have you ever thought if you could use some some magic to just know about the traffic on every road and then take the path with the least traffic. That would be a fairly amazing idea wouldn’t it. I am not teaching you how to create apps because our beloved company google has already done that and all we have to do is their service. So let’s get to our favorite yet the most boring part that is the details that is about the google Maps feature Google Traffic to check traffic to work or home .

      • Check traffic on your area using your Cell Phone on Google Traffic

    -> First of all start the google’s application.
    -> After opening the app you have to select the “Menu” Button icon which would be located at the upper left corner.
    -> Then you have to select “Customize” option from the menu.
    -> Then you have to tap the Home icon and then type the address to your home and finally click “ok”.


    -> Now you will find maps Home and Work.
    -> Then you have to open the “Google Maps” app and search for either “Home” or “Work”.
    -> Then you have to select the arrow of navigation to go into the mode of navigation.
    -> Now you have to enter a starting point for your journey.
    -> Now you have to select the “Menu” button which is at the upper right corner and now you can choose the “All traffic” option.

    Read Also : Backup Android Device to PC or Google

    Read Also : Fix “Voice search has been turned off” error for google now

    -> Now you have to go to the areas of the street which will have a color which indicates the traffic level on them which is listed as below:-

    -> Green implies Light traffic.
    -> Orange implies Moderate traffic.
    -> Red implies Congested.

    Read Also : Google Pixel WiFi Calling Enable and Disable

    Read Also : Exciting free Photoshop Alternatives for high quality photo edits

      • Check traffic on your area using your Desktop Browser of Google Map – Google Traffic 

    -> First of all start the Google Maps application.
    -> In the “Search Google Maps” field you have to type or search “work” but if you have not set your work location before then you will be prompted to enter your address for your workplace.

    -> Now you have to go to the “Search Google Maps” field and then type “Home”. If you have not set your home location before then you will be prompted to enter your address of your home.
    -> Now you have to go to the “Menu” > “Traffic” to see traffic on map.
    -> Now you have to go to the areas of the street which will have a color which indicates the traffic level on them which is listed as below:-

    -> Green implies Light traffic.
    -> Orange implies Moderate traffic.
    -> Red implies Congested.

    I would conclude this article by writing that that you can find anything you want provided you look in the right place and know how to use it.

  • Fix “Voice search has been turned off” error for google now

    Fix “Voice search has been turned off” error for google now

    Fix “Voice search has been turned off” error for google now

    I have got an error of “Voice search has been turned off” error from google now which was weird at first and I did not understand how on the earth was that possible.

    The options on official website of Google was good but it did not help me much so finally my brain came to my rescue and I decided to research on it. The research part is quite boring but the results are equally exciting and fruitful so I decided to sit down with my pen and paper and decided to solve this issue with a better approach. My research yielded well and today I will share both the solution and also the approach to solve such various types of problem.

    So after gathering as much information as I could about the issue I started by debugging and I am here sharing my method with you so that you can also solve Voice search has been turned off error .

    What Is Google Now ?

    It is basically an intelligent and a smart personal assistant (or just an artificially intelligent AI software piece) which was developed by google to give better quality service to their customers.

    Google Now has been launched integrated in the Google app for both the Android and also the iOS. This particular service had became available specially for iOS since the 29th of April in 2013 with an exclusion from most of the features available today.

    Google Now Vs Google Assistant ?

    Basically there is a comparison between both that is Google Now Vs Google Assistant .

    Google Now is basically a voice responsive personal assistant. But unlike Siri and Cortana like AI’s Google Now is not a platform specific since this app works on both Android and iOS devices. This amazing app lets you quickly and efficiently search the web and perform a variety of tasks(logically you do not have to type and perform operations) such as scheduling events and alarms or adjusting your volume and even posting to social media all this using your own commands in person (or voice commands). You can do Voice search on Google Now .

    Whereas Google Assistant is technically a next generation of Google Now meaning it does most of the things similar to Now but including a friendlier and more conversational interface which is better. It basically performs all the same tasks as Google Now which are events and alarms or adjusting your volume and even posting to social media using your own commands directly in person (or voice commands).

    Read Also : How to Use Google Assistant on Android Devices (Without Root)

    What To Check When Google Now Voice Search Is Not Working ?

    When you find that Google Now Voice search Is not working then check out certain things .

    There are various methods to check and What I did was basically hook up a microphone and tested it using my favorite operating system windows(do not ask me which version of windows did I use). After a long time I was nearly ready to start yelling out loud like a mad man “OK Google” just so that I could bring up the Google Now screen to perform voice searches but to my surprise it did not work and after that I was pretty sure that the microphone had no issues what so ever and it was something else i was looking for so instead of directly bringing up the search screen I did it manually and the chrome browser threw a message saying that said “Voice search has been turned off”.

    Read Also : Use Kindle Fire as Second PC Screen / Display Ultimate Guide

    At this point of time I was really confused not realizing that the solution was right in front of me. So my view got stuck to details tab and I selected the “Details” link which was not at all useful not really that much, and I was again not able to find the solution of the issue. After banging my head with the floor for quite some time fortunately and finally I was able to fix this problem of Voice search has been turned off with just a few steps and I realized how easy it was to solve this issue.

    After my research I was not only able to find a single solution but I developed two solutions after that I was at the top of the world and really happy. So now my friend I will state not one but two methods on how to solve this issue.

    Easiest Method to ” Fix Google Now Voice search error” is to utilize Address Bar for enabling

    When you are on the same google page where you received this annoying message of “Voice search has been turned off” you can observe a bit closely to check that if you see an icon there that has appeared previously in your address bar just next to the bookmark star. All you have to do is put your mouse over it and if and only if it says “This page has been blocked from accessing your microphone“, then you are in no trouble since from there you have to perform these simple steps:

    • All you have to do is select the icon in your address bar and then you have to choose or tick on “Always allow www.google.com to access your microphone.” and that’s it. This basically gives the access to your microphone which was not given before.
    • After you have to select the microphone you were using from the drop-down menu you see.
    • Finally the most difficult step is here so take note, you have to select ‘Done’ and just remember me for solving your problem.

    The second Method by Chrome Settings are useful for enabling Google Now Voice search

    Here you have to open google chrome and select the Menu button which will be located at the upper-right corner and if you do not find it probably it is time for you to wear glasses.

    • You have to select select Settings.
    • Then you have to open the “Advanced” tab which will be at the bottom and if you do not see it just leave it and screenshot your error in comment section.
    • Then you have to go in the “Privacy and security” section and when you are in it you have to select “Content settings” option to move further and if you do not see this then probably commenting a screenshot in the comment section would be a better choice.
    • Then after you have completed the above mentioned steps successfully you have to select the “Ask when a site requires access to your microphone (recommended)” option(If it is selected then deselect it and then again select it) or you can simply skip this step and directly select the “Allow” option. Then you have to add “https://www.google.com” to this list and then set it so that it allows audio.

    After you have successfully implemented one of the above mentioned methods then you should now be able to use Google Voice commands with Google Chrome without a problem. If there is any error then repeat the above mentioned method once again and refresh your page. At last you have to share this article so that maximum people can read it and comment any suggestions you would like me to include.

  • Skype for Business: Fix “Cannot sign in because the server version is incompatible with Microsoft Lync” error

    Skype for Business: Fix “Cannot sign in because the server version is incompatible with Microsoft Lync” error

    Skype for Business: Fix “Cannot sign in because the server version is

    incompatible with Microsoft Lync” error

    The basic and first question that arises is that: What is Skype for Business

    The idea of using Skype for business is very old and it’s use for business started very soon after it’s inception. There are many cases in which one organization or professionals from very far away want to collaborate with someone else or have a meeting to discuss things out. There is no way that either of those parties want the conversation to be compromised so here Skype comes in picture. It provides live video call with security to it’s users and also allows big companies to have conference meetings and discuss their propaganda through this virtual meetings. Thus Skype has been really a boon for business through which many deals have taken place. So these are the different uses of Skype and it’s variety of features which make Skype so popular.

    Read Also : Fix “Voice search has been turned off” error for google now

    In 2014 Microsoft announced that their product named as Lync could be replaced by Skype for Business in 2015. They claimed that it would combine features of consumer Skype software which was their best feature and in April 15 Microsoft officially launched Skype for Business which gave Skype a bit of a shock. In September-October Skype for Business for Mac client was released which was an initiative by apple to make Skype compatible with their machines.

    If you ever use your Skype for Business you might have noticed that your Lync client will automatically get upgraded to the latest version from itself without any hassle but if you are in a rather older Office Communication Server (OCS) version or an environment. Then this could cause an incompatibility problem and you might have to do it all by yourself but relax since you are at the right place. The error which you might get could be of following type: “Cannot sign in because the server version is incompatible with Microsoft Lync “. Contact your support team with this information. And specifically and fortunately for this most common problem there is a registry hack that will get you working again as smooth as before.

    Read Also : Best free calling Apps for all Smartphones

    Fix “Cannot sign in because the server version is incompatible with Microsoft Lync” error : Skype for Business

    The usual simple and easy steps are as follows:-

    Step 1) Select “Start” > “regedit” > and then press this keyword carefully which is “Enter”.
    Step 2) Now all you have to do is to navigate to this path: HKEY_LOCAL_MACHINE / SOFTWARE / Policies / Microsoft / Office / 16.0 / Lync
    Step 3) Thank me and enjoy since it is done

    Read Also : 10+ Best Alternatives to Whatsapp you will love this year

    So technically you need to add a Registry Key to tell your Microsoft Lync client to ignore the server compatibility check. Another similar but a slightly different approach would be:-

    Step 1) Run regedit and for some mind blowing geniuses. (Open command prompt, type regedit)
    Step 2) You now have to navigate to the path HKEY_CURRENT_USER > Software > Policies > Microsoft > Communicator.
    Step 3) You now have to right-Click, Select New > DWORD (32-bit) Value.
    Step 4) You now have to enter the Name exactly as “DisableServerCheck”.
    Step 5) You now have to right click on the new Registry key you just created and select Modify.
    Step 6) You now have to enter value data of 1 (Base = Hexadecimal).
    Step 7) Click OK(again most difficult step among all the steps mentioned above).
    Now when you attempt to sign in again you should be greeted with success which is completely yours.

    Well there is no conclusion but all I can say is try to keep yourself updated and be safe and secure. Till then good day or night depending on when are you reading this article and keep sharing.

  • Get Celebrities Notice Maximum on Twitter – Popular Tweeter Hacks

    Get Celebrities Notice Maximum on Twitter – Popular Tweeter Hacks

    Get Celebrities Notice Maximum on Twitter – Popular Tweeter Hacks

    Have you ever imagined that you might get a tweet or a re-tweet or a reply from your favorite celebrity and woken up from your dream but what if I say it is not a dream anymore. Yes my dear friends there is a way and let me tell you celebs really love their fans a lot and many of them even reply to their fans occasionally even follow their fans while re-tweeting their fans every once in a while. Your friend here wants to help so that you can Get Celebrities Notice Maximum on Twitter .

    I would like to mention a few things before I start my researched methods. The chance of you being noticed by a celebrity depends on many factors(especially number of their followers on twitter). So if your celeb has some millions of followers and fans and if they only tweet once in a week or so (for example Taylor Swift) then your chances are significantly less but not zero.

    Recently many celebs are utilizing their twitter account to promote projects(Example #asksrk by @iamsrk). You can verify their timeline to see if they ever reply to fans or only tweet about their upcoming films, songs, events etc if the answer is latter one then sorry but you should not waste your time trying to get reply from such a celeb as the odds are really not in your favor.

    At last please be aware about the fact that some celebs twitter accounts are actually run by their managers or publicists. So be extremely careful if you try to talk about personal stuff because when you think you are being funny you actually could get reported or blocked. So here are some tips that will ameliorate your chances significantly.

    Read Also : Battery Health : How to keep your phone or tablet battery healthy

    Get Celebrities Notice Maximum on Twitter – Popular Tweeter Hacks

    Follow the below steps to be noticed by Celebrities on Twitter and become a popular tweeter .

    • Tweet to celebs when they are online or tweeting

    Majority of your celebs would not see a tweet buried deep in their timeline so check the time since some celebs are often online like while some celebs are online late at night after their busy day like Benedict Cumberbatch, Shahrukh khan etc. So get an approximate idea about the tweeting time of your favorite celeb’s schedule and tweet only when they are available. That is the right time to tweet Celebrity to get re-tweet/ reply is at the time they are online.

    •  Check their timeline for clues about what they reply to.

    Some celebs have a habit of RT funny jokes while some reply to the compliments given to them by their fans while some respond to questions about their career and hobby. Note that some stars do not like to brag generally but they like to share some good news for instance if they are nominated for a global award or complete their graduation early like Dove Cameron, Nolan Gould. You have to congratulate them and they might reply to your tweet or RT you or might follow you as well. This is one of the way to Get Celebrities Notice Maximum on Twitter.

    • You can meet them at their tour or concert (this is tough, but if you live in Mumbai or New York your chances are pretty good)

    Some celebs often say if you meet and greet them once then they without a doubt will follow you. So you can meet them and even post a photograph to remind them and after they follow you do not forget to thank them. At least you just might get a response from them.

    Read Also : Record iPhone iPad Screen on Windows & Mac

    •  You got to have patience

    Say the celeb you like have over 10 million followers which are increasing day by day so due to this they just might not see your tweets but true fans do not give up even after a week, month or even a year.

    • You have to have a positive attitude

    Sadly some celebs are the ones who might not reply to a complement but would surely reply to hate against them. Once there has been a really crazy fan war between Bella and Zendays. Though bella did reply to calm things down in which she succeeded to a great extent but you might probably get blocked and keep in mind that the other fans will attack you brutally and not spare you. So again that is simply and clearly not worth it! But still one of the way Celerities notice you on twitter and thus you Get Celebrities Notice Maximum on Twitter

    •  You have to be graceful

    After following my methods when you do get noticed or followed or if you get an RT or tweet like “thank you” do not ever think that now you are their acquaintance and they are going to have a long conversation or they will reply every time you tweet them. You have to be grateful and gracious.

    All I hope and pray for is that these tips work out for you and remember to comment or screen cap your reply or RT when you get one so that you can motivate other people to get them their favorite celeb RT or reply or follow. I will end this by informing all of you that I meet a lot of celebrities and a lot do reply to me. I will also let you know when and where the celebs are meeting their beloved fans so that all of you can take advantage of that. Till then Share this so that maximum people can get to their celebrities

  • Battery Health : How to keep your phone or tablet battery healthy

    Battery Health : How to keep your phone or tablet battery healthy

    Battery Health : How to keep your phone or tablet battery healthy

    You know by now that your smartphone is smarter than you and same goes for the PC / laptop on your desk or the tablet in your backpack(even if your backpack is of different brand than your laptop) and even a simple gadget like a normal watch on your wrist. Since all of them are important irrespective of what each gadget is capable to do. But every smart gadget dies when its battery dies . So it is very important to increase your gadget battery life . So here we will focus on the ways to improve your gadget’s Battery Health .

    There are batteries in almost all of our latest gadgets which ranges from iPhones and laptops(for those who are or like to look rich) to Bluetooth headphones to tablets. Most of them are lithium batteries which are pretty advanced when compared to NiMH and other rechargeable batteries that came earlier. The Li metal ions can pack a good amount of power into a relatively smaller size and additionally they do not drain that energy either to leakage or when they are not not being used.

    So let me first get some facts straight which many people might have misconceptions about. The overcharging is not a significant issue because opposite to what you generally think (or might have been told or have a myth) is that leaving either your phone or laptop plugged in all the time especially during night is not at all bad for its Battery Health. All is possible because your gadgets and the batteries in them including the chargers you use with them to are really smart about the way they operate. So the question arising in the smart minds would be how to take care of my beloved and important Battery Health .

    So let’s see how to improve your Phone Battery life or your laptop / tablet Battery life.

    So if you follow some basic rules I give you can easily avoid it and one advice i’d like to give is that avoid the exposure to heat whenever possible and even if you do expose your to sunlight you would still be fine. I know it is very natural to obsess over battery care and to let those charging myths metastasize into a lunacy.

    Battery Health : How to keep your phone or tablet battery healthy

    So below given are some steps to keep in mind if you want your Android / iPhone / Lithium ion Battery last longer .

    1. Stay Calm

    Most of gadgets which are smart along with their batteries are pre-designed to keep you geniuses from ruining them. So the modern lithium ion batteries now a days are smarter, reliable and more efficient than those nickel metal battery which was in use around centuries ago.

    So when it comes to choosing best Battery for Phone / tablet choose Lithium ion battery on a comparison with Lithium ion battery Vs Nickel metal battery .

    2. Charge in bits and pieces

    Our lithium batteries do not like being fully charged up and then running completely down. The efficiency is maintained much better if you charge in little bits here and there. You are bound to charge your battery around 20% of the time though the percentages may vary from phone to phone the 20% is average which should be done. Make sure that the temperature of case should not be too hot to cause damage to your phone.

    Read Also : Android Oreo Features to fall in love with Android mobiles often

    3. Keep charging as long as you want

    Never worry about overcharging batteries in your gadgets and do not worry ever about overcharging your laptop. The mechanism of batteries in phones is similar to the mechanism of batteries in laptops. Moreover many laptops are smart enough to just stop the battery of being charged entirely once it becomes full.

    5. Batteries like medicines should be kept cool

    Talking of temperature be sure not to leave your phone in a hot car all day or leave it on top of your gaming PC and never go with your battery in a sauna(really in sauna you are …). One important thing to note is that beware of dash/quick chargers and though your phone and charger are smart enough to minimize the damages from high voltage chargers but a lot of power on a super fast speed can generate sometimes an uncontrollable heat. Always store a gadget or its battery or both of them in a cool and dry place.It increases Battery Health and Battery life thus ensuring long life to battery.

    Read Also : Fast Forward , Rewind , Scrub Music in iPhone & iPad Music Player

    6. Go replaceable

    Go with removable batteries whenever you can to avoid the tension you might face and also avoid the lunatic things you might do for charging. The least you can do to avoid these bad battery practices is at least starting with fresh battery whenever you think it is unanimous.

    7. Use Good Quality Chargers

    The simple idea behind using good chargers is that whatever product if you maintain it it is bound to last long. The good quality chargers are smarter than normal chargers since they are able to change their flow if they detect any change in voltage or current of your phone. A good charger will smartly avoid all the excessive amount of voltage which otherwise could cause destruction of your phone.

    Read Also : Connect Google Pixel to TV Easily with these Exclusive Guide

    8. Don’t let your battery rule your life.

    Take it from me that your batteries irrespective of how much you care about them are going to die one day or maybe a night. So there is really no amount of delicate and obsessive care which would save you from having to deal with a less capable battery from now within a few years so it is just a matter of time.

    Like it or not we are all destined for that annoying end of our favorite game that comes when a battery degrades or you are either tethered to all the above mentioned steps. All of have been there before once and we would be there again not immediately but definitely. Do not worry as long as you follow my guidelines. The best you can do is that you can maximize your distance from here to the end of your beloved battery.

  • Fast Forward , Rewind , Scrub Music in iPhone & iPad Music Player

    Fast Forward , Rewind , Scrub Music in iPhone & iPad Music Player

    Fast Forward , Rewind , Scrub Music in iPhone & iPad Music Player

    If you have an iPhone and have listen to music in iPod before you would know that any song playing from the iOS Music app various operations like Fast Forward , Rewind , Scrub Music can be performed easily. In the case where you want to play a song in rewind or fast forward a song you can do either of them right from the lock screen of your iPhone or iPad Music Player or iPod touch as well.

    These are really useful feature but I do not know why some lovely people find it so hard to find the location of the feature that they think there is practically no way to do it but you can do it though and here are my simplified steps to do them for various different versions of iOS.

    Read Also : Factory reset iPhone without password or iTunes with data backup

    Read Also : Connect Google Pixel to TV Easily with these Exclusive Guide

    Fast Forward , Rewind , Scrub Music in iOS 7 & Higher

    •  You have to start the music or simply play the track you wish to listen and then might wish to fast forward to your favorite part and rewind it again to listen it.
    •  You then have to swipe the Control Center above by simply swiping from the bottom of the screen and then upward.
    • You then have to swipe either left or right unless and until the track which you are currently playing is displayed on your screen.
    • Now finally you have to drag the ball on the music timeline bar to your desired spot. Another way is that you have to first tap and then hold the fast forward or rewind buttons as well to skip ahead or backtrack respectively as per your wish.
    • Do speed scrub so that you can Fast Forward , Rewind , Scrub Music in iPhone & iPad precisely .

    This is the way to Control iPhone Music through Control Center.

    Read Also : Best iTunes Cleanup Software for better iTunes experience

    Fast Forward , Rewind , Scrub Music in iOS 6 & Lower

    • You have to hold your device in a proper portrait orientation .
    • Now when your song is playing in the iPod you will notice that the album art will appear somewhere on your screen and if you find that there is no album art then a music note appears instead of album art. Then you have to tap either the album or the art/note whatever you are playing.
    • After completing above two steps successfully you will see a small bunch of features about which you might not be aware of. If you look closely you will find a line of them that indicates where on the music length of track your song is being played. Now as per your requirements you can now drag the ball back or forth to fast forward or rewind whenever you would want.

    You can use these ways to Fast Forward , Rewind , Scrub Music in iPhone , iPad Music Player of all iOS versions .

    Read Also : 38 Best iPhone games you should play

    In the end I will conclude that by using my simple methods you can simply fast forward or rewind any song on an iPad or an iPhone whenever and wherever you want with the exact speed you want and as per your mood you select the speed. So use these techniques yourself and share them with other people so this information can be useful to mas many people as possible.