Tag: Apple

  • How to Fix “Cannot Take Photo” Problem on iPhone and iPad

    How to Fix “Cannot Take Photo” Problem on iPhone and iPad

    Fix Cannot Take Photo Problem on iPhone and iPad Method 1:

    When you go to take a photo using the Camera or any other app like Instagram, WhatsApp etc on your Apple iPhone or iPad but while doing so if you find an error message which says “Can’t Take Photo – There is not enough available storage to take a photo“.  You can manage your storage in Settings. Now you might get confused about what to do. Don’t worry because your savior(which is me by the way) can help you with this simple steps to Fix Cannot Take Photo.

    Why Can’t I Take Pictures on my iPhone

    I got an issue “my iPhone wont let me take pictures because of storage“. To fix this issue you need to remove some unwanted files and free up the storage. So choosing Settings on this message will provide you with a list of apps and the amount of storage they are using. You can also reach this screen at any other time by going to Settings > General > Usage.

    If you want you could select an app that is taking up a large amount of space(basically browse which apps take up the most space or an app that you can delete (deleting pictures or videos and music also creates extra space)) and then click on Delete app. That could or could not free enough storage to fit photos. Moreover you may not want to do this in case you like and value every single one of your apps.

    Read Also:

    How to Factory reset iPhone without password or iTunes

    Record iPhone iPad Screen on Windows & Mac

    Quick Fix Cannot Take Photo Problem on iPhone and iPad

    In majority of the cases iTunes(your culprit) is loading your device with music and regularly causing this message to appear when you use the Camera or any other app.

    You would free some space while you are out and by deleting some unwanted music from the device. What I to do is locate an entire album that I can live without and delete it using these steps(which is obviously hypothetical in my case ).

      • 1) Open the Music app on your iPhone.
      • 2) Select a particular artist (if you downloaded them legally) that has songs stored on the device you would like to delete.
      • 3)You can also locate a music track that is already stored on the device but if the track has a cloud icon that means it is not stored on the device(probably stored on iCloud). You will have to find tracks that do not have this icon.
      • 4) You then have to swipe left across the name of the song. A button is bound appear that says Delete.
      • 5) You than have to tap delete(putting a stone on your heart) and the song is gone forever. Repeat these steps any number of times unless you have freed enough space.

    Read Also : Best iTunes Cleanup Software for better iTunes experience

    Fix Cannot Take Photo Problem on iPhone and iPad Method 2:

    1) Connect your iPhone to a Mac or Windows PC which has iTunes installed already.
    2) Open iTunes(most complex step of this method so be careful :)).
    3) Select on your device then choose “Music“.
    4) Uncheck the ‘Automatically fill free space with songs‘ button(Though I think it would be a checkbox).
    5) Choose ‘Sync’.

    If these steps do not fix storage error message from regularly appearing then you might need to remove some apps, photos maybe even videos from the device(Unfortunately you have to set your priorities).

    Using iMyFone Umate

    iMyFone Umate is a special memory cleaner for mac and is highly recommended for increasing storage space on the device and cleaning up the unwanted phone memory. All I demand is that you have to follow these few simple steps and your phone will be new:

    • Connect your phone to open the cleaner.
    • iMyFone Umate will do a quick scan.
    • With one click, all the junk files and unwanted files will be removed.
    • It clean many hidden temporary files with a click
    • It clear’s the junk files to improve iPhone performance

    Some other programs are:

    • Photo manager

    It basically compresses the images/photos compressing the size of each photo.

    • App manager

    It has a one click mechanism to mass remove all the unwanted Apps.(If you have any)

    Hopefully the above given methods would serve your purpose but if you want something extra then below are some extra tips.

    To exchange information on one iPhone with other are extremely valuable for you on the high probability that you need to duplicate substance from old iPhone to new purchased iPhone /iPhone Plus. You might want to replicate information. For instance songs, photographs, from your personal iPhone to a new iPhone.

    iCloud goes down your iPhone once every day. Since it is a good idea to reinforcement your old iPhone to iCloud one last time before moving. So nothing is passed up as a major opportunity. In the Settings explore the iCloud storage and Backup opportunities and tap on Back up. This may require significant investment relying upon the measure of information to be replicated.

  • Android Vs iOS – Pros & Cons of Buying Android Vs iOS

    Android Vs iOS – Pros & Cons of Buying Android Vs iOS

    Android Vs iOS      

    When we think about buying a mobile , our first consideration is all about to buy whether an Android mobile or iPhone . So there is always a comparison between Android Vs iOS .

    Here we will discuss about ios vs android comparison and thus android vs ios pros and cons which can help you to understand ios vs android which is better .

    Android

    As you all know Android is one of the best operating system from Google which is based on Linux Kernel . Now almost many devices run on this Android OS. Currently 99.6% of new smartphones runs on android and there are 2 billion Android users across the world .The main reason for this popularity is that it is very cheap compared to iOS devices and it is open source .

    There are over 2.8 million apps  in play-store . Android application can be made with java , c and c++ languages . Android has been the best selling OS in tablets since 2013 . Android has given numerous updates to add new features and fix bugs .

    Read Also : Google Pixel WiFi Calling Enable and Disable

    Read Also : Android Oreo Features to fall in love with Android mobiles often

    Android name its versions after the name of dessert in alphabetical order for eg. Cupcake to Android Oreo . Android OS is widely been used in many devices like smartphones , also popular in Android TV , Android Auto and Android wear thus we can see an increase in Android users day by day . One of the catchy things of Android is that one can customize anything according to his/her need , like one can change the OS of the device. These features make Android different and most popular mobile OS in the world.

    Read Also : How to Use Google Assistant on Android Devices (Without Root)

    Now we have discussed about Android before we talk about Android Vs iOS , we will take a rough look on iOS also .

    iOS

    iOS ( iPhone OS) is a mobile operating system developed by Apple Inc. It has been unveiled in 2007 for iPhone and later it has been extended to support other devices such as the iPod touch released on September 2007 .

    Apple has also been praised for its accessibility functions that enable a person with hearing and vision disability to use it’s product properly. ‘Be my eyes’ ,’Dragon dictation’ are some good examples of that. iOS is best in terms of data security . One have to use iTunes desktop app to share media, thus making media transferring very difficult. iOS releases its versions annually .Current version is iOS 10 and It is available on various devices of iPhone like iPhone 5 .

    Read Also : Backup Android Device to PC or Google

    Now on the iOS series latest is iOS 11 which is the latest iOS version .

    Pros & Cons of Buying Android Vs iOS – Which is better Android Vs iOS

    Here is the pros and cons to before you chose between Android Vs iOS when considering to buy your latest smartphone .

    Pros of Android 

    1. Open source and easily customized : It is based on Linux kernel . It is an open source you can get millions of free apps there . It is easy to customize. One can even have access to even boot loader. The more number of apps increase choice and this is one among the top catchy factors of android.

    2. It offers expandable storage with several phones: Normally most of the android phone offers expandable storage so that we can store more and more which iOS don’t offer .

    3. Wider choices of phones are available in the market: There are a huge number of android phone companies are available in the market like SAMSUNG, HTC, MICROMAX and many more  which in-turn offer users more choices while iOS is only available on Apple devices.

    Read Also : Google Traffic : How to check traffic to work or home

    4. Large number of user leads to large number of developers for android: Large number of android user also leads to large number of developers because of increase of android phone demands and their apps.

    5. Very cheap and easily available then iOS: Android phones are very cheap in comparison to iOS phones . One can easily get a good android phone under 10k .

    Cons of Android 

    1. Higher chances of malware:   Android phones allows installation of third party apps which can harm data and increase chances of malware .

    2. Different interface for different phones:  A large number of interfaces is available for a variety of mobiles.

    3. Patchy support :   Support and assistance services are not good as compared to iOS due to huge number of customers . It’s patches are easily available.

    Read Also : Fix “Voice search has been turned off” error for google now

    4. Don’t have any special features for disable persons yet :   Like any other iOS phones no android phones have features for disable persons yet .

    Pros of iOS

    1. Apple itself optimize its both hardware and software: Apple itself optimize its every iPhone hardware and software . It blocks installation of third-party app stores. This leads to its better quality and performance.

    2. Curated app store : Very well curated app store . You can get a lot different choices which you can’t get anywhere else. The iOS phone needs to be jail-broken if we want to download apps from other stores.

    3. Very few chances of malware : Apple optimization decreases the chances of malware.

    4. It has a good user support : Apple provides its user a very good support . It provides icloud support to its user which can store upto 5GB files automatically.

    Read Also : Android boot Fix – Steps to Try When Your Android Won’t Boot

    5. Features for disable persons in iOS makes it more popular: It has some features and apps that can help disable persons to use iPhone conveniently like ‘be my eyes’ and ‘dragon dictation’.

    Cons of iOS

    1. We can’t extend storage in an iOS phone : iOS phones doesn’t support external storage means we cannot expand storage with the help of memory cards.

    2. Walled garden ecosystem: It means that the iOS carrier or service provider has control over the applications and content .

    3. Limited customisation : We can’t change its OS or can’t make more changes unlike android phones.

    4. Most of the apps you have to buy from it’s store as it is not open source like android : Very few apps are available for free most of them you have to buy from it’s store and you can’t share these apps .

    So this will help you to choose between Android or iOS .

  • Mac screenshot Not working – Quick Fix

    Mac screenshot Not working – Quick Fix

    How to take Screenshot of Mac? What if my Mac Screenshot is not working?

    Are you using a MacBook and wondering how to take screenshots on it? Taking screenshots is very common these days. People take screenshots from their laptops and mobiles for personal use or to even share with their friends or for any official purposes. If you are new to a MacBook and if you do not know how to take screenshots in it, then this article will guide you through it. 


    How to take Screenshot of Mac?

    First, you need to choose what screenshot you want to capture from your MacBook. You can take screenshots of the entire screen, a window, or even a portion of the screen of your Mac.


    1. If you want the screenshot of a full screen then follow three steps: all the three keys shift, command, and 3(#) should be pressed together. A thumbnail might pop-up on the corner of your screen which can be used to edit the screenshot taken. If you do not want to edit the screenshot, then wait for the MacBook to save the captured picture.


    1. If you want the screenshot of a portion of the screen, follow these steps: Press and hold the shift, command, and 4($) buttons together. Drag and select the portion using the crosshair that appears on the screen. You can move the selection while dragging it and pressing and holding the space bar at the same time.

    Once the portion of the screen is selected, release the mouse or the trackpad button.

     Esc key can be used to cancel taking the screenshot. You can edit the screenshot by clicking on the thumbnail that appears on the corner of the screen. If editing is not required then simply wait for the Mac to save the screenshot on the desktop.


    1. How to take a screenshot of a window or a menu: First, select the window or the menu you want. Press the Shift, Command, 4($), and space bar keys together. Now you will see the pointer changed to a camera icon. Click on the window or the menu to capture and save. (You can avoid the shadow of the window in the screenshot by simply pressing and holding the option key while you click the window or menu).

    Use the thumbnail that appears on the screen if you want to edit the screenshot taken. The screenshot taken will be saved on the desktop. Remember, you can always use the Esc key to cancel taking the screenshot. The screenshot taken in your MacBook is automatically saved in the desktop as -” Screen shot [date] at [time].png.” You can change the location and select the one you want according to your convenience.

    What if  Mac Screenshot not working?

    If you cannot take a screenshot using the steps stated above then try the following steps:

    1. Restart your MacBook

    Try restarting your Mac – Press the power button and click on the Restart button. You can also restart your Mac by choosing the Apple Key and select the Restart option or press Control, Command, and Eject to restart.


    2.Check if shortcuts are activated

    Go to System Preferences on your Mac, select Keyboard and Mouse – Choose Keyboard Shortcuts and see if the shortcuts are activated.


    3.Make use of Grab

    If you find the above 2 options not working, then go to Application > Utilities > Grab > Capture and choose what screenshot to take. 


    1. Use Preview to take a Screenshot

    You might be familiar with the Preview button. Click on Preview > Click File > choose “Take Screenshot” from the drop-down menu.


    Hope now you can enjoy taking mac screenshots as we believe this helped to fix mac screenshot 


  • App Store Alternatives for iOS Apps & Websites

    App Store Alternatives for iOS Apps & Websites

    App store is familiar to most of the readers who are using Apple devices such as iPhone , iPad , iPod and so on . You may be in need of different sort of Apps in your day to day life to make your Apple device more useful to your needs. May be for entertainment apps , sometimes for exam apps , even sometimes for music apps on iOS app store and mostly for iOS game apps and iPhone camera filter apps . Even for using Facebook for iOS , WhatsApp for iOS you need to visit Apple App store right ? But you can use something else that are best Apple App Store Alternatives for iOS Apps and websites .

    App Store Alternatives for iOS Apps & Websites

    Now we will discuss some of the best iOS App store alternatives that can be used easily .

    Apple App store

    App store is the official mobile app distribution platform by Apple . This work with all iOS devices and thus allows users to search for different apps and download them . Even developers can upload their newly developed iOS apps and monetize it with apple , just like you do with Google play store .

    Read Also : How to update iPhone / iPad to the Latest iOS update

    Cydia

    Cydia is one of the best iOS App Store Alternatives available for the jailbroken Apple iOS devices . This works for the same purpose on iOS devices to search and download softwares and apps .

    There are ways to install Cydia without jailbreaking your iOS device .

    TutuApp

    TutuApp is available for both android and iOS . This will also allow you to download apps just like you do with the Apple iOS store . 

    Read Also : Best iMessage alternatives for Android/ Windows/ Mac/ iOS

    Read Also : Phone Conference Calling Step by step guide

    Apps4iPhone

    This Apps4iPhone is a free alternative to apple iOS app store that allows users to download the apps available on the app store for free .

    There was one more alternative which was one among the popular recommendation that is vShare , you can check out if that is working .

    So try out any of the iOS store alternatives and do let us know if you have any popular alternative to app store that is not included in our list .

  • How to update iPhone / iPad to the Latest iOS update

    How to update iPhone / iPad to the Latest iOS update

    Apple being one of the famous brand always upgrade Operating system for its devices . As you may be very well aware that the operating system Apple make use of is the iOS . Soon after the release of three new flagship iPhones here comes the most awaited latest iOS version . Here we will learn about How to update iPhone / iPad to the Latest iOS update .

    Answering the most awaited question about iOS 12 release date , the new iOS got released for 2018 also on September . Those who wanted to upgrade iOS and update iPhone with Latest iOS . Then read this piece , because its just written for you.

    The history of iOS versions begins from the release of iPhone OS 1 , iPhone OS 2 , iPhone OS 3 , iOS 4 , iOS 5 , iOS 6 , iOS 7 , iOS 8 , iOS 9 , iOS 10 ,  iOS 11 , iOS  12, the latest .

    Read Also : Improve The World With Smartphone -Top 10 Hacks

    iOS 12 Released 

    Finally the most awaited latest Apple OS for iPhone and iPad is released. After iOS 12 beta now iOS is official . It is evident that most of the iOS 11 supported devices will support iOS 12 .

    You can update iPhone to iOS 12 by checking out whether your iPhone OS can be upgraded .

    iOS 12 Supported Device list

    Given below is the devices that use iOS 12 and also list of devices where you can upgrade iOS .Here is the list of Apple devices capable to do iOS 12 download. We will also guide you about how to update iPhone with latest iOS  .

    iPod Touch

    On the series of iPod touch devices the iPod Touch 6 (iPod 6th generation) is compatible for iOS update . You can download iOS 12 for iPod Touch 6 . The iPod touch 6 G that initially was iOS 8 which can be now updated. So you can update iOS 8 to iOS 12 .

    Read Also :  38 Best iPhone games you should play

    iOS 12 for iPod Touch – How to Install iOS 12 On iPod Touch

    In order to update iPod touch with iOS 12 follow the given steps –

    • First take a iTunes Backup / iCloud Backup of your iPod Toch device
    • Install latest iOS (download iOS 12) either by wireless method or by iTunes

    The steps to installation of iOS is same for iphone , ipad and iPod .So read the common section for understanding how to update iPod software .

    iPad iOS update Supported Devices 

    Given is the list of iPad devices that can be upgraded to iOS 12 . So lets see how to update iOS on iPad .

    • iPad Air – Initially used iOS 7 , now this can be updated from iOS 7 to iOS 12

    • iPad Air 2 – Initially used iOS 8 , now this can be updated from iOS 8 to iOS 12

    • iPad 2017 – Initially used iOS 10.2.1 can be upgraded to iOS 12

    • iPad 2018 – Initially used iOS 11.3 can be updated from iOS 11 to iOS 12

    • iPad Mini 2 -Initially used iOS 7.03 can be updated to iOS 12

    • iPad Mini 3 -Initially used iOS 8.1 can be upgraded to iOS 12

    • iPad Mini 4 -Initially used iOS 9 can be now updated from iOS 9 to iOS 12

    • iPad Pro (9.7 inches) , iPad Pro (10.5 inches) , iPad Pro (12.9 inches ) Generation 1 and 2 – Initially used iOS 9.1 can now be upgraded with latest iOS 12 .

    iPhone iOS 12 supported

    Here is the list of iPhone that can be available for iPhone software update to the latest iOS 12 . These devices can be upgraded to iOS 12

    • iPhone 5S – Initially run on iOS 7 can be now upgraded to iOS 12

    • iPhone 6 – iOS 8 to iOS 12 can be updated for iPhone 6 users

    • iPhone 6 Plus – This iPhone 6 Plus users using iOS 8 can update it to iOS 12

    • iPhone 6S & iPhone 6S Plus -Initially run on iOS 9 can be upgraded to iOS 12

    • iPhone SE – updating iOS for iPhone SE is available , here you can upgrade iOS 9.3 to iOS 12

    • iPhone 7 – iOS 10 to iOS 12 software update is available for iPhone 7 series

    • iPhone 7 Plus – iOS 10 to iOS 12 update is possible for even iPhone 7 Plus

    • iPhone 8 – You can update the old iOS in iPhone 8 which was iOS 11 to iOS 12

    • iPhone 8 Plus – iOS 11 is the OS running on iPhone 8 plus hich was available for iOS 11 update earlier . Now you can upgrade iPhone 8 Plus to iOS 12 .

    • iPhone X – iOS 11 was the iPhone X OS , now those who are using iPhone X can update iPhone to iOS 12

    • iPhone XS – iOS 12 is the OS for the new flagship Apple phone

    • iPhone XS Max – This apple flagship phone uses iOS 12

    • iPhone XR – Most modern apple phone , iPhone XR runs on iOS 12

    Why iOS 12 – Best Features of iOS 12 

    The newly released iOS 12 has so many features to make you fall in love with iOS 12 . Let’s take a look at some of the most exciting and best iOS 12 features –

    Navigation Apps is Not Limited Anymore 

    You may be aware that earlier versions of Apple OS has allowed its users to rely upon only the Apple Navigation app , that is the Apple Maps . Those who had voted more for Google Maps on a comparison between Google Maps Vs Apple Maps , can be happy now . Your iOS 12 allows you to use Google Maps and other third party navigation apps with the Apple CarPlay .

    That’s quote a good news , isn’t . Don’t worry we will guide you on how to Google Maps with Apple CarPlay in our upcoming write up.

    Group FaceTime Call is Latest in iMessage Group Chat

    Now , this feature is not live but it will be rolled out soon in iOS 12 . Thus allowing the iPhone , iPad and Mac users to enjoy group Facetime Call with new iOS .

    Read Also : Best Triple Camera Phones to Buy This Year

    iOS with More App updates

    Seriously not a major app updates but yes there are few excellent app updates with the iOS 12 .

    • Apple News App with a scroll option in iPad.
    • Stock Analysis , Performance and top stock related news updates throughout the day.
    • iPad now gets Voice memo apps . Also there is iCloud support to sync your Voice memo with other Apple devices .
    • iBooks turned to be Apple Books . It has got Book store feature and Reading now feature to make it much more easy to use .

    Access Apple TV with Apple Control Center 

    Add Apple TV tile to your iOS 12 Control center , now just swipe and tap to access Apple TV

    Managing Screen Time

    Now iOS 12 lets the Apple iPhone and iPad user to understand the pattern of their device usage time , a clear and detailed summary of how much you have used your device . Also which app you spend more time etc.

    App Limit Feature 

    Along with managing screen time , apple also introduced an efficient and smart feature that allows the users to limit their usage by setting time limit for each apple apps . So that’s how the App Limit feature adds more power to the screen time management feature in iOS 12.

    Downtime Feature in iOS 12

    This is a boon to parents where they can remotely manage their kid’s apple device usage with Family sharing app . The downtime feature in iOS 12 aims at helping parents to limit their kid’s access to apps or websites and even set time to each applications .

    Bye bye to Long list of Notifications

    No more irritating thread by thread notifications to pile up your home screen . Everything is now sent as a grouped notification on a single thread . This single thread notification is one of the best things that happened with iOS 12

    Read Also : iPhone Vs Samsung which is better – iPhone Vs Galaxy Compared

    Do Not Disturb & Critical Alerts

    Set time to enable Do not disturb and toggle on Do not disturb whenever you want to stay away from getting distracted because of mobile. But one better thing is Critical alerts from healthcare persons will work even when your Do not disturb is enabled .

    There are more features like – iOS Photos – For You Tab , Siri shortcuts for iOS 12 , ARKit 2.0 , USDZ format , Add 2 Face Id Profiles , Better password manager , Apple camera app with Improved Portrait mode , better battery health , better QR scanner , Better screenshots on iPhone , New Apple map design , location sharing , Animoji and memoji trends , iOS 12 Siri suggestions improved .

    How to update iPhone / iPad to the Latest iOS update

    Now let us dive into the core topic ,that is how to update iPhone/iPad with latest iOS . Before you do iPhone Sofware update you have to backup iPhone /iPad before you update iOS .

    How to Backup iPhone /iPad /iPod before updating to iOS 12 

    Before you download iOS 12 , You have to backup iPhone /iPad /iPod to prevent loss of data while software upgrade.

    You may be aware that there are two methods to update iPhone –

    1. Update iPhone using iTunes
    2. Update iPhone using iCloud

    Now before that all you need is to learn to back up iPhone / iPad /iPod

    Read Also : Factory reset iPhone without password or iTunes with data backup

    How to Take iTunes Backup of iPhone/iPad/iPod

    To prevent iPhone data loss before you update iPhone or any of your iOS device , take a iTunes backup . Follow the given steps –

    • Ensure that you have updated latest iTunes version , if no install latest iTunes version first .
    • Now open iTunes
    • Connect your iPhone/iPad/iPod to your computer
    • Now you will be asked to verify the computer by entering the passcode .
    • Next you have to enter your Passcode information correctly .
    • Now select your device on iTunes window’s left corner .
    • You have to click on the Summary option that you can see on the left corner of the window
    • At this time yo can see your device information on centre of the window displayed out . Also there you can find an option This Computer
    • Toggle it and below that there is an option Encrypt device backup , Click that and enable tick mark for that to protect it with password
    • Now on Manually backup and restore option click on Backup Now
    • Click done .

    Read Also : Best iTunes Cleanup Software for better iTunes experience

    This is how you can restore iPhone/iPad /iPod using iTunes . Make sure that you do take a back up iphone /ipad before updating to ios 12 .

    How to update iPhone / iPad to the Latest iOS update

    Now let us learn how to download iOS and install latest iOS on your iPhone , iPad and iPod . So i guess you have taken back up of your iPhone . If so proceed on how to download latest iOS ( How to dowload iOS 12 ) –

    • To update iPhone with latest iOS 12 you must either take iClod / iTunes backup of your device first
    • Now to install iOS 12 using iTunes follow the given steps
    1.  Go to iTunes
    2. Plug your Device , that is plug iPhone / iPad / iPod
    3. Now select the device icon that can be found at top left
    4. Go to Summary
    5. Now click on Check for Update
    6. Select Download and update option
    7. Now click Agree button mentioning you agree to all the terms and conditions
    8. Enter your device passcode
    • Now to install iOS 12 using iPad / iPhone software update follow these steps to update iPhone iOS with iOS 12
    1.  Take iCloud Backup
    2. Go to device Settings option
    3. Go to General 
    4. Now click on the Software update 
    5. There you can see and option called Download and Install , just click that
    6. Proceed with entering your device passcode and simple agree to terms and conditions4
    7. Click Agree to confirm

    That’s it , this is how to update iPhone with iOS 12 , hope you are clear with how to download iOS 12 and install iOS 12 .

    Android Vs iOS – Comparing Android P Vs iOS 12

    After Android O (Android Oreo) google has released Android P , that is Android Pie , the very latest Android OS . So with the release of iOS 12 , most of the users have a confusion which is the best Android Vs iOS ( On a cross comparison between Android or iOS) . So here we will take a look at Android P Vs iOS 12 .

    Many of the devices are apt for Android 9 Pie as OS . And we have already discussed iOS 12 supported devices and how to upgrade to iOS 12 . Google Pixel 3 XL will come with Android 9.0 (Android P) . And in many other devices using Android Oreo you can update Android Oreo to Android Pie ( Android O to Android P )

    Read Also : Android Oreo Vs Android Nougat Vs Android Marshmallow Vs Lollipop

    Now lets take a look at iOS 12 Vs Android P –

    • iOS 12 Vs Android 9.0 comparison Google’s Android P is the best with respect to maps and navigation performance when your compare with iPhones. So google maps is best when compared to apple maps .
    • While encountering comparison between the virtual voice assistants in Android P and iOS 12 , Android wins the heart . Even though Apple has brought so much of new updates to Siri , still Google assistant remains favourite for majority .
    • Digital health aspects is taken more carefully by iOS than Android , so in that case iOS is winner

    Read Also : iOS 11 Vs Android Oreo – Who wins gadget lover’s Heart

    Read Also : Update to Latest Android OS : Android Pie -Stay with Nougat / Marshmallow/ Oreo

    Read Also : Backup Android Device to PC or Google

    There are more differences that will be discussed separately and in detail .

    So i guess we have given our users a very detailed idea on iOS 12 and iOS 12 supported devices , a cross comparison between iOS 12 Vs Android P & our core point how to update iPhone / iPad / iPod to latest iOS 12.

  • Apple Homepod Tips, Tricks and Review

    Apple Homepod Tips, Tricks and Review

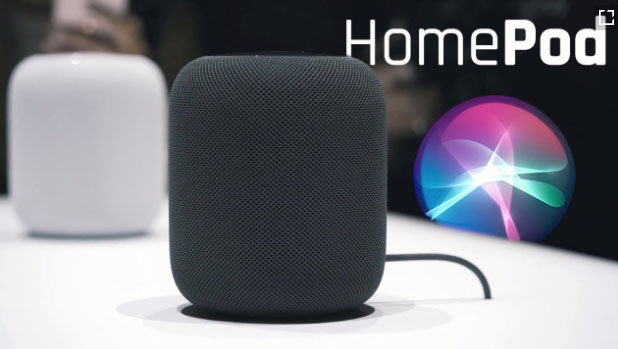
    Apple Homepod is the Apple’s smart speaker. Apple launched it in February this year. Apple finally entered this field after Amazon’s Alexa or Echo and then followed by Google’s Home assistant. Earlier we have discussed out the Amazon Alexa tips and tricks , now here we will discuss the Apple Homepod Tips and Tricks as well as Apple Homepod Review .

    Since its release the Apple Homepod has been most appreciated for which Apple is much famous already i.e. its sound quality that to with 360 degree audio. How can I forget to mention that the Homepod is damn good looking and stylish. But it costs much more as compared to Echo.

    Before we discuss about the Apple Homepod Tips and tricks , lets understand what is Apple Homepod.

    What is Apple Homepod ?

    The question is simple and the answer is very simple . Apple Homepod , popularly known as Homepod is a smart speaker that functions amazingly along with Siri and creates a wonderful music experience with Apple music . This wireless smart speaker is the trend of the generation.

    Apple Homepod Price ?

    You can buy Apple homepod from apple store online or even there are great deals for Apple Homepod this year on different e-commerce site . The price range of Apple Homepod is about $349 .

    There are speculations in the market regarding Apple Homepod which are not yet confirmed .There can a price cut for Homepod , else Apple Homepod 2 or Apple Homepod Mini will be released .

    Read Also : Best Apple Watch Alternatives-Affordable Gadgets

    Apple Homepod Tips, Tricks and Review

    Here’s a guide to all the major Apple Homepod tips and tricks that are going to help you to get you the best out of your Homepod or force you to buy one right now:

    Switch Siri’s voice on Homepod

    The very first Homepod trick is that if you want a completely new refreshing voice and accent for your Homepod so here’s the good news . You can try and experiment the different available option to choose different accent such as American accent / British / Australian accent . Even you can switch between either female / male voice . To change Siri voice , all you have to do is just long press Homepod tile . This will enable so many options from which you can select the Siri language settings , default voice and many more as per your choice of interest . This is one of the excellent Apple Homepod tips to try out .

    Mute Siri on Homepod

    Sometimes you might want Siri to not listen to some of your conversations so here is one more Homepod tip for you. For doing so you can mute Siri. Just say ‘Hey Siri, Stop listening’. For making your Homepod active again just say ‘Hey Siri, Start listening’.

    You can also control these settings from your Home app simply by selecting on/off for the ‘Hey Siri’ option.

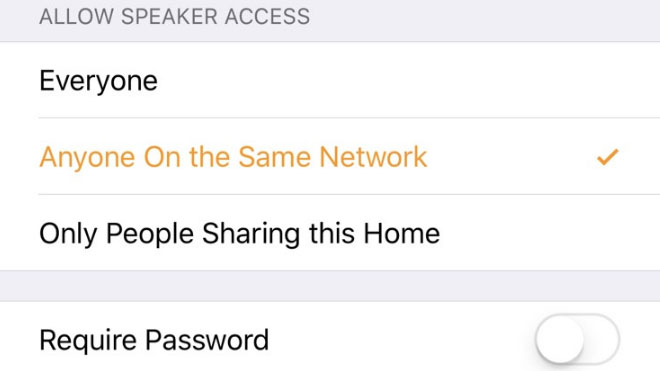
    Homepod Security controls

    Here’s one of the most important Homepod tip for you. None of you might want that anyone who’s near your homepod and can connect to it is able to play songs on it. For this you can limit your homepod access. You can allow access to everyone living in your home or to people connected to the same network. You can even set a password for accessing your homepod. All these settings can be accessed in the home app.

    Translate with Homepod

    Homepod can act as your very own translator. Siri can help you translating English to French, German, Italian, Spanish and Mandarin. Just say ‘Hey Siri, how do you say [word] in [language]’ and there’s your answer.

    Siri Tune

    Whenever you give some command to your Homepod you might keep wondering whether it heard it or not. For this you can switch on Siri tune. It will assure you whether your Homepod heard you or not.

    For turning it on, go to your Homepod’s settings in the Home app and switch on ‘Sound when using Siri option’.

    Latest Gossip and news on Homepod

    You can get all the latest scoop about your favorite celebrity and the latest news from your Homepod. Simply say ‘Hey Siri, give me the latest news about Beyoncé’ and for listening the latest news say ‘Hey Siri, what’s the latest news?’.

    Homepod as Speaker for your Apple TV

    Your TV speaker is a crap? No problem, your Homepod can be the perfect replacement for the speaker of your Apple TV. Just long press the play/pause button and select your Homepod for audio.

    For permanently doing so, in your TV’s settings, there select ‘Video and Audio’ section and then select ‘Audio Output’ and choose your Homepod.

    Homepod Smart Home Controller

    If you use smart lights, fans and smart appliances in your house and they are compatible with the apple Homepod kit you can simply ask your Homepod to switch them on/off for you. Just say ‘Hey Siri, switch on the lights’ and done.

    Read Also : Best Smart Home Gadgets for Home automation- Smart home

    Homepod Nearby Suggestions

    Want to explore your surroundings, no problem. Your Homepod can be of great help here. Just ask your Homepod ‘Hey Siri, what are the great restaurants nearby’ or ‘Hey Siri, tell me some great shops nearby’ and done.

    Send Text Messages to your contacts via Homepod

    Feeling lazy for typing something and sending it to some friend of yours, your Homepod can come to your rescue here. Just say ‘Hey Siri, send a message to john saying I won’t come today’ and done, your message is sent. If the recipient replies then a notification is delivered through a chime. Its definitely a Homepod tip you will love to use a lot, no typing just speaking and the message is sent.

    Read Also : Alexa Tips, Tricks and Commands

    Set Alarms on Homepod

    Just say ‘Hey Siri, set an alarm for 8:00 a.m.’ and done your alarm is set. Similarly you can also set timers and snooze the alarm. Quite a helpful Homepod tip helping you being on time wherever you want to go.

    Scenes

    This is definitely an amazing Homepod tip. Scenes are when you deliver a certain command and a chain of events occur because of that single command. Such as on saying ‘Hey Siri, good morning’ your lights are switched on, some sweet music is switched on and your coffee maker is switched on.

    You can set scenes for your Homepod from the home app in your iPhone.

    Transfer a call on Homepod

    You can very simply convert your Homepod into a loudspeaker while talking on the phone. Just select the audio mode for the phone call as the Homepod. The green light on Homepod shows that an active conversation is going on.

    Family grocery list on Homepod

    If the whole simply add their own demands at their own to the shopping or grocery list that’s the best. Your Homepod can help you in this task helping you by maintaining a family grocery list. This way any family member can add their needs to the list.

    For doing so under your iPhone’s settings go to Reminders. There under iCloud select family option and done. Now any family member can add items to the list. Just say ‘Hey Siri, add soap bars to the grocery list’.

    Spotify Music Streaming on Homepod

    If you have a Spotify premium account then this Homepod tip is definitely for you. You might be wondering whether you can stream music through your spotify account on your Homepod. The answer is why not. Just open your Spotify app, check devices available and select your Homepod. There you can connect the Homepod to your Spotify app and you can now stream music through it.

    Read Also : Spotify Tips and Tricks to Enjoy Spotify Subscription More

    iTune Podcasts on Homepod

    You can listen to the iPhone podcasts whether you have subscribed to it or not. Just say ‘Hey Siri, play podcast [Podcast name]’ and if you want to subscribe to some podcast say ‘Hey Siri, subscribe to [Podcast name]’ and done, siri will itself add that podcast to your library.

    Read Also : Best iTunes Cleanup Software for better iTunes experience

    Discover from Specific artists

    One of the best Homepod tip for all the music lovers out there. For every artist his/her songs are organized under three categories i.e. Essentials, Next Steps and Deep Cuts. Essentials contain all the major hits from that artist, Next Steps consists of some other hits from that artist and even now you want to dig deeper in your favorite artist’s songs play Deep cuts. Just say ‘Hey Siri, play [Artist Name] Essentials/Next Steps /Deep Cuts’.

    Use your voice as your Volume Control

    This is just another simple Homepod tip you will be using a lot while using your Homepod. You can simply command Siri to change the volume level for the Homepod. Simply say ‘Hey Siri, increase the volume’ or ‘Hey Siri, turn up the volume’ or set it to some specific level by saying ‘Hey Siri, set the volume to 50 percent’.

    Musical Trivia on Homepod

    Whenever some song is playing on your Homepod, you might be interested to get some history about that song. Thus simply use this Homepod tip to increase your knowledge. You can simply ask Siri whatever question pops up in your mind like ‘Hey Siri, when was this song released?’ or ‘Hey Siri, How many copies did this album sold?’ or ‘Hey Siri, tell me more about this artist’ anything else. Siri will answer you.

    Let Siri know your tastes

    Let Siri know about your likings and disliking while Siri is playing some song. This will help Siri personalize playing your favorite music even more. Just say ‘Hey Siri, I like/don’t like this song’ or ‘Hey Siri, I love/hate this [band name]/[artist name]’. This Homepod tip helps Siri personalizing you music listening experience.

    Block Explicit Content

    Quite amazing and helpful Homepod tip this is if you are having some kids in your house. Many of the songs might be having some explicit words and if some kids are around you will definitely want them to listen to those. In Homepod you can block the explicit content.

    Go to your homepod’s settings in the home app and there you can block any music with Parent Advisory label.

    Factory Reset

    This is the Homepod tip which is going to prove its worth at the time of crisis. If your Homepod is not responding to your commands properly the simplest way to correct id by resetting it. It can be done from home app. Click on Homepod icon and details will appear, there you can reset.

    The other way is using Homepod itself. Unplug it then wait and plug it in again. Keep your hand over the white light until it turns red. Keep it there only and you will hear from Homepod it is resetting and done and then you can remove your finger.

    Hope you liked all these features for the Apple’s Homepod. You might be thinking that it can a do a lot of stuff and its true as well.

    Now the latest Homepod update in September has come up with new homepod features .

    Latest Homepod Updates Highlights

    The very recent homepod update can make it more powerful rival for the other best smart speakers such as Echo , Sonos One , Google home etc.

    • So many new homepod features
    • Siri can be used to the core now
    • More languages added to Siri
    • Just like Alexa Routines , Google Routines , Siri will also now give users the access to Siri shortcuts
    • Find your iPhone with Homepod , so you don’t have to search the whole messy room to find where you kept your phone
    • Homepod allows you use multiple timer feature
    • Search by lyrics on Homepod
    • You can receive calls and make calls with Homepod

    Firstly the smart speakers were launched by Amazon then Google and then by apple. So the comparisons are ought to happen. More or less you might be thinking that all three of them have similar features. But in the cost of buying one Homepod you can buy about three Alexa. If you are a music lover and just simply want no compromise for the sound quality of your speaker you can straightly for the Homepod without giving it any second thought if you don’t have any budget constraint.