WhatsApp not something unfamiliar to this generation and even the older generation. Today SMS became outdated as everyone of us are in deep love with this instant messaging app because WhatsApp features are really exciting and up-to the generation.
What is WhatsApp ?
Pun on the popular colloquial phrase ‘Whats up’ ,the app got such an easy to remember catchy and trending name of the century “WhatsApp“.
WhatsApp is a messenger application for smartphones ,tablets and Desktop . It replaced SMS with this brilliant free to download application . Using WhatsApp one can send messages, audio , voice call , video call , share attachments and so on. WhatsApp is simply an instant messaging app that works with internet.
Now let us look at latest Whatsapp features , even find the super latest whatsapp features like disappearing messages and how to use it .
WhatsApp features
WhatsApp messenger supports a great lot features than the normal SMS and most of the apps that exist .WhatsApp Features are getting updated day by day as well as the latest features that is rising is not any less .
Exclusive List of 50+ WhatsApp Features
Given below are the super exciting Whatsapp features that are rolled out by the super messenger app .
- Texts
- Group Chats
- Voice Calls
- Video Calls
- Group Video Calls & Group Voice Calls
- Voice Messages
- Share Documents
- Send Images
- Share audio
- Share video
- Update Status
- Find Storage of Each Chat
- Format Text on demand
- Add Star to messages
- Get message details
- Mute conversation
- Most Popular Chat( Whom do you talk often)
- Hide your last seen
- Disable read receipts
- Don’t save photos and videos by default
- Custom notification
- Export a conversation
- Broadcast
- Change Font size
- Reduce data usage for WhatsApp
- Privacy Control for photos,status and last seen
- Add event to Calendar
- Home screen shortcut for individual chats
- Transfer files between phone and PC
- Emoji ,Giant Heart
- GIF
- Quote Particular message and reply for that
- Protect Chats – Disable Notification preview
- Upload WhatsApp Dp / WhatsApp pp ( Display or Profile picture)
- Block unwanted people
- Archive Chats
- Delete Multiple Chats
- Mark as unread
- Reply directly from the notification bar
- Backup to Google drive
- Change wallpaper
- Use different languages
- Search messages
- Get early updates
- Know who has read your messages in a group
- Send your location with maps
- Live Location
- Send and receive money with FreeCharge
- Share contacts
- Send photos from gallery using the camera icon too
- Pull back your accidentally sent messages (Delete for Everyone)
- Multiple Video or Image status for 24 hrs
- Pin Feature
- Delete Messages for all ( delete for everyone in whatsapp)
- Disappearing messages
Now lets see all these WhatsApp features in brief
1.Texts
You can send simple , long text messages for free in WhatsApp with just an active internet connection .WhatsApp text is now quite popular all around for effective communication. There is no limit in the number of text or the limit of each text word count in WhatsApp .It is really easy , simple and reliable messaging service to depend upon.
This is a basic whatsapp features 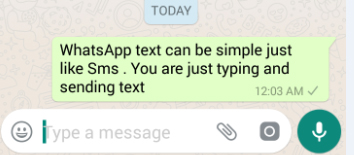
2. Group Chats
Group Chats are really a boon for office people , friends , family members as it helps in sharing one text to convey a message to many people. WhatsApp group is really effective as it helps in sharing text , photos , videos , audio , voice messages to all the people in the group.
- WhatsApp group can hold upto 256 people in one single group.
- You can Give name and image to the group .
- Add single or multiple admin to the group . This helps in keeping the group effective as only the admin can add or do any major changes to the group.
- You can mute and customize notification on WhatsApp group chats.
- You can delete the group when its not required .
- You can add or remove any participant of the WhatsApp group.
Now Whatsapp Group Chat has more added features that help you feel more easy with group chats . May be solution to many annoying group chat miseries –
- Re-adding Whatsapp Group Member Protection – Once you Leave Group Chat & You wont get added sooner as it prevents the group admin from adding you again to the group you left .
- Find anyone in the group easily – You can search participants in the group instead of going through the whole lot of members names .
- @Button for Catch up – No more you miss out if someone quoted you in the group chat or if anyone in group mentioned you .
This whatsapp features is useful for students , peers , family , even for business purposes
2.a ) How to create a WhatsApp Group ?
You can create as many number of groups you want in WhatsApp and each group you can add upto 256 participants. You can easily create a WhatsApp Group by following these simple steps –
ANDROID USERS
If you are an android user then you can follow these steps to create WhatsApp group in Android device .
-
- Open WhatsApp.
-
- Go to Menu button < New Group or find the three dots on top of chat screen.
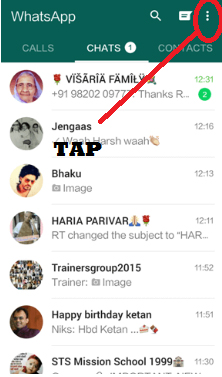
-
- Now click < New Group
-
- Now you can find all our contacts displayed from that < Add participants
-
- Now tap the green arrow
-
- Type Group subject and add group icon
- Click the green tick mark
You have created a WhatsApp group on android device.
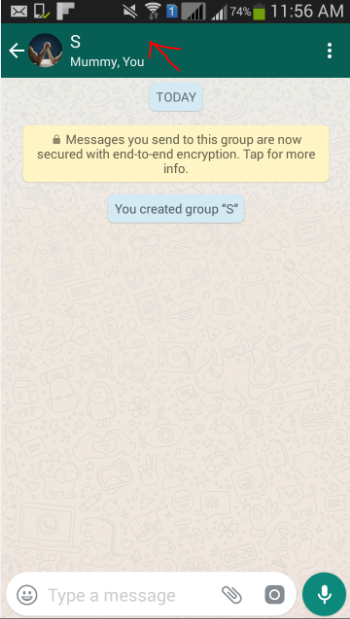
iPhone USERS
- Go to Chat screen on WhatsApp.
- Now look at the top of your Chat screen there you can tap like shown in the image.
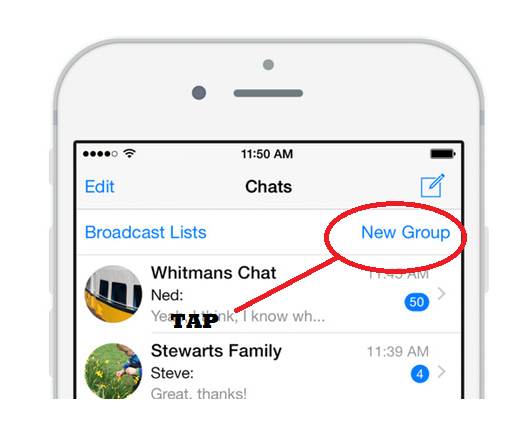
- Now click on the New Group button.
- Add participants for this group.
- Tap Next
- Name it , add an image if you prefer to do it.
- Tap create , you are all done you have created a WhatsApp Group.
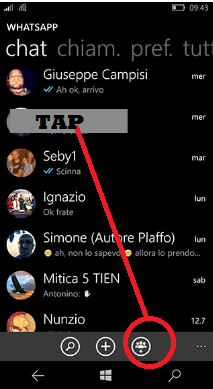
Windows Phone USERS
You can create a WhatsApp group on Windows phone .
-
- Open WhatsApp <chat screen
-
- Click on the people icon on bottom of the screen < New group
-
- Now add group subject and group icon.
-
- Tap next.
-
- Click (+) and add participants to the group or manually type the contact name whom you want to add as group participants.
-
- At the bottom of screen you can find create .
- Click create .
2. b) How to add Participants to the WhatsApp Group ?
In WhatsApp group you can add upto 256 participants in each group and you can create infinite number of groups you want . It is easy to add participants to WhatsApp group .The most essential thing to add participant to the group is to ensure you are an admin to the group.
- Click on the group on which you want to add participants.
- Tap on Add participants.
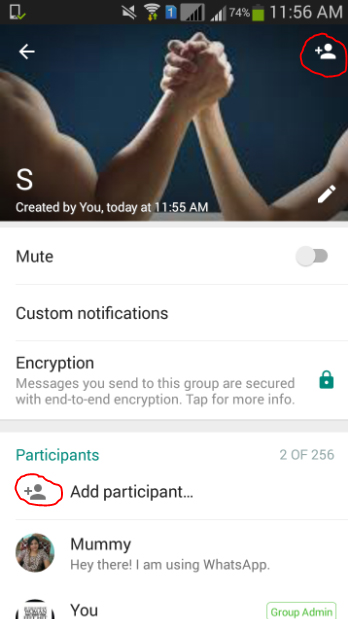
- Select participants to be included from your contact list
- Click on add & Confirm it. That’s it you are done with the process.
2. c) How to invite people to join WhatsApp Group with link ?
- Open Whatsapp.
- Open the WhatsApp group and add subject to the group.
- Click on add participants.
- Click on Invite to group via link and share out the link with other members in group or to some other app.
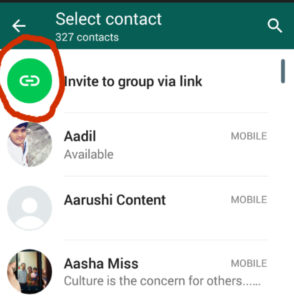
You can invite people to join WhatsApp group with link by following the above procedures. One important thing to do is you must be an admin to the group. The admin can make the link invalid anytime by using revoke link . Remember if the link is forwarded to anyone even without the approval of admin the person can join the group . So please be sure about it when you are inviting people using link.
2. d) How to remove participants from a WhatsApp Group ?
If you are an admin of the WhatsApp group the you can remove participants from WhatsApp group by doing these simple steps.
- Launch WhatsApp
- Go to the group and add subject to the WhatsApp group.
- Click on the participants you want to remove.
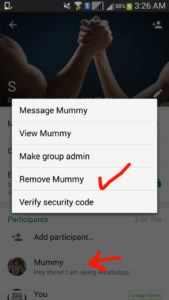
- Click remove.
2. e) How to make someone admin to a WhatsApp Group ?
You can make anyone admin to the WhatsApp group as a group can have any number of admins. Follow the below steps to make anyone admin to WhatsApp group –
- Go to WhatsApp.
- Click on the group where you want to add admin.
- Add the group subject.
- Click on the participant whom you want to assign as an admin.
- Click on the option make group admin.
2. f ) How to change WhatsApp Group subject ?
You can change the subject of WhatsApp group by following the steps.
- Go to WhatsApp
- Go to group chat and group information
- Now you can find a pencil symbol .
- Click on the pencil symbol and type the group name
- So the subject of WhatsApp group is changed.
2. g) How to change the WhatsApp Group icon ?
You can change the group icon in WhatsApp if you want which is easy to do-
- Go to WhatsApp group
- Now on the group information tap on the group subject
- Click on the present group icon and choose from your camera or gallery or other folders to add a new group icon image of your choice.
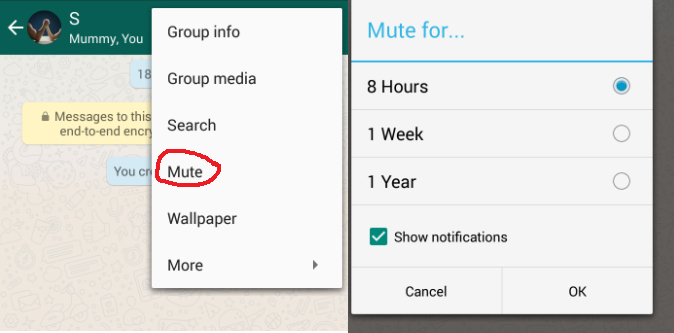
2. h) How to mute WhatsApp Group notifications ?
We get notified when each message arrive in WhatsApp when it is individual message it doesn’t seem annoying but when you are in a active group then you get message over message and a series of notification then one thing is you will pissed off secondly you will find hard to search for the individual notification. So this can be avoided by simply mute WhatsApp group so you can feel ease with the group.To mute the WhatsApp group chat follow these simple steps –
- Open WhatsApp.
- Go to the group you want to mute the notifications.
- Now click on the three dots so you can find Mute.
- Click mute and select the time period up-to which you want to mute the group notification.
- Click OK you are done with the process.
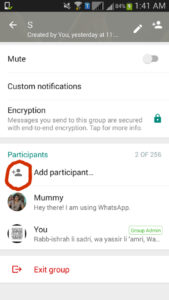
2. i) How to exit or leave from a WhatsApp Group ?
You can leave or exit a WhatsApp group easily if you are not interested to be part of a certain group then you can consider to choose exit/leave WhatsApp group by following some very simple steps.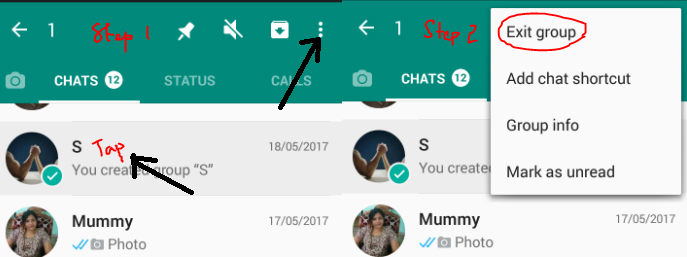
- Go to WhatsApp.
- Now on the Chat screen find the group from which you want to exit.
- Tap on the WhatsApp group you want to exit.
- Once its selected on the top find the option to exit group like given in the image.
Read Also : Improve The World With Smartphone -Top 10 Hacks
3.Voice Calls
WhatsApp Voice call is a great feature which made people to talk for free for hours and hours. There’s no barrier to talk wherever you are , whichever country you want to connect to . No charges for long hours of calling only an active data plan is all that you need . So WhatsApp Call feature has reduced our call cost we pay to our service operators .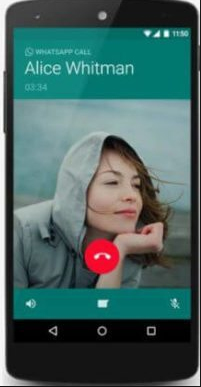
4.Video Calls
You can also make WhatsApp video call which is a new feature in WhatsApp .When you click on the chat screen of the person with whom you want to make video call in WhatsApp then you can find a video button press on it which is on the top near to the call button. Make sure that your internet connectivity is good enough to place call.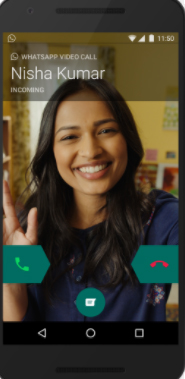
You can attend WhatsApp video call from others by just sliding the green button to take calls.
5. Group Video Calls & Group Voice Calls
Now on Whatsapp you can have voice calls and video calls with a group of people allowing users to add upto 3 person . But if you want to have a group chat with a big group then i would suggest go for Snapchat Voice Group Call / Snapchat Group Video Calling feature .
6.Voice Messages
You can send voice message or audio message in Whatsapp by simply holding the mike button and speak or record any sound and send it to your contacts
Suppose if you are about to make it a mistake by sending voice message then just slide to delete it instead of sending it .
7.Share Documents
You can now send documents among your WhatsApp contacts easily.Using the feature to Share document in WhatsApp you can share 100MB size documents among your contacts in WhatsApp. Also when you try to share a document from your folder in phone it will show you WhatsApp as an optional medium to share files.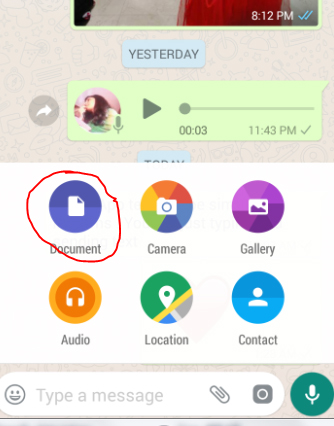
How to send documents via WhatsApp
- Open the chat
- Find the paper clip icon
- Click on that
- Now from the desired folder choose the document you want to share.
- Click to send you are done with sharing document via WhatsApp.
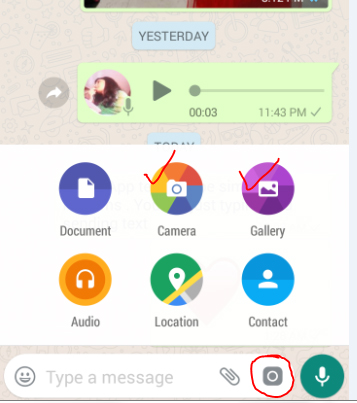
8.Send Images
You can send Images via WhatsApp to your contacts by following these steps –
- You can send images in WhatsApp by opening the chat .
- Now click on the paper clip icon.
- Now you can click on Gallery and choose between the maximum of 10 images you want to share (or)
- You can click on the camera button either near to the document one or the camera icon at the end of the screen to capture a fresh image .
- Click send to share the image on WhatsApp.
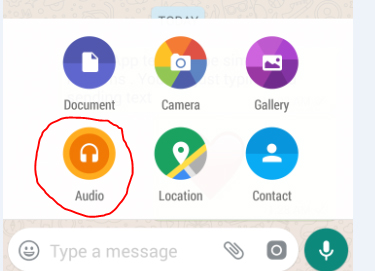
9.Share audio
You can share audio via WhatsApp by following these simple steps . By this you can send recorded music files , songs from your music playlist on phone etc.
- Click on the chat of the person to whom you want to share audio in WhatsApp
- Now click on the paper clip icon .
- Click on audio.
- Select from the numerous folders and audio files you have on your device.
- Click send button .
Read Also : 10+ Best Alternatives to Whatsapp you will love this year
10. Share video
You can share videos of limit 16 MB via WhatsApp which will be of maximum 3 minutes length and you can also forward the videos that you received from someone else.
How to share large Videos exceeding 16 MB via WhatsApp ?
- You can send large videos exceeding 16MB via WhatsApp by trimming the file .
- Use the application called “WhatsApp Video Optimizer” which enables you to send large MB videos on WhatsApp easily.
11. Update Status
The first form Status feature on WhatsApp was 130 character Text Status . You can update a text form status in WhatsApp by following these steps –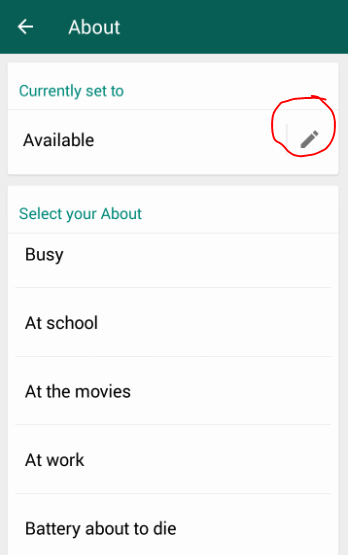
- Go to WhatsApp
- Click on the Settings
- Now tap on your Display picture or profile picture.
- Below your Profile picture there is ” About and phone number ” tap on the status word there.
- Now it will show “currently set to ” with a pencil icon.
- Click the pencil icon to type something new or choose from the existing status .
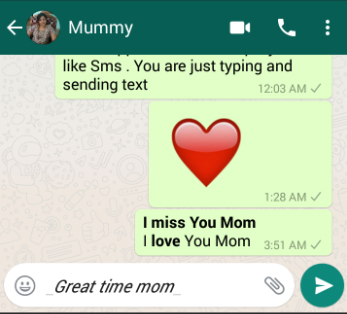
12. Format Text on demand
You can format text on WhatsApp like making the font change , bold , italics , strike-through etc.
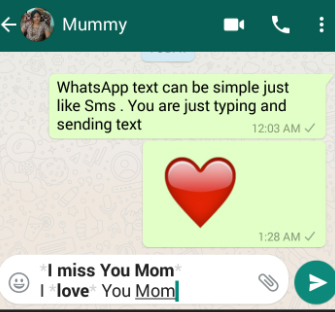
How to bold a text in WhatsApp
- You can type the text you want to bold by using the asterisk symbol before and end of the text .
- To say example *I miss You Mom*
- This will appear as bold on the message.
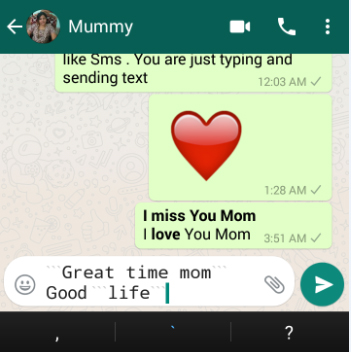
How to change font of a text in WhatsApp
You can Change the font of your WhatsApp text easily, to do that you can follow just a simple steps.
- Go to WhatsApp
- Click on the chat .
- Now type three characters “` in front of the text and at the end of the text .
- You can find that the text font is changed automatically .
- “`Great time mom“` find this example in the image given to understand better.
- This way you can change the font in WhatsApp text.
How to make WhatsApp text in italics
You can make the WhatsApp text in italics easily, to do that you can follow just a simple steps.
- Go to WhatsApp
- Click on the chat .
- Now type an underscore character _ in front of the text and at the end of the text .
- You can find that the text is italicized automatically .
- _Great time mom_ find this example in the image given to understand better.
- This way you can italicize WhatsApp text.
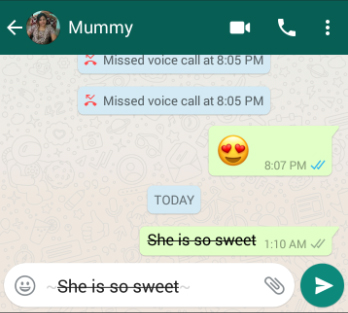
How to strike-through a WhatsApp text
You can even format your WhatsApp text by striking through it if you want to strike-through a WhatsApp text then follow these steps.
- Go to WhatsApp
- Open chat
- Now type a Tilde character ~ both front and at the end of the text which you want strike through.
- ~She is so Sweet~ this is the way you have to type the text you want to strike through in WhatsApp which will look like the image below.
13. Find Chat Storage
Now find out how much each storage is consumed by each of the Whatsapp participants you chat with .Find the chat that eats your phone storage completely by going to Whatsapp Settings -> Then go to Data and storage usage and click on the Storage usage this will show you the details of chat storage usage .
14.Add Star to messages
If you want to make some messages as important which you want to quickly look into then you can add star to WhatsApp messages . By this the starred messages can be accessed quickly thus it saves time of scrolling .
How to add star to a WhatsApp message
You can add star to any WhatsApp message as much as message can be starred in WhatsApp. To do this follow these steps.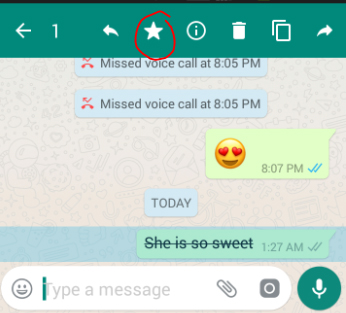
- Go to Chat in WhatsApp.
- Click to select the message inWhatsApp you want to add star .
- Now on the top you can find a star symbol click that.
- Now the message got starred .
- You can assure this by seeing a star symbol near to that message now.
How to unstar a WhatsApp message
Suppose you want to remove a message from starred list then you can unstar that message in WhatsApp without any complicated steps
- To unstar WhatsApp message first go to that chat and click on the message which is starred .
- Select the starred image.
- Now on the top you can find unstar symbol click on that (or)
- Go to the section of all starred messages from that select the one you want to unstar.
- Now on the top you can find the unstar symbol.
- Click that you are done.
How to view the starred messages in WhatsApp
If you have starred so many messages and you want to view that without the pain of scrolling down then to view all starred WhatsApp messages by following these steps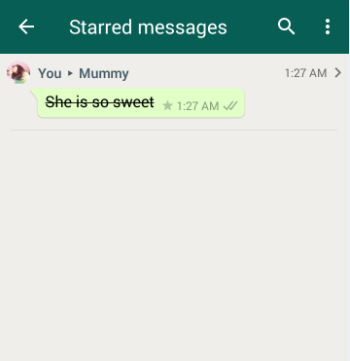
- Go to WhatsApp.
- Go to WhatsApp menu
- Now you can find “Starred messages” option.
- Click on that.
- Now a screen with all starred messages will appear.You can view all the messages which you have marked starred.
How to delete the starred messages in WhatsApp
If you unstar a message in WhatsApp it just means you removed it from your starred list but delete a starred messages is different. If you want to delete starred message in WhatsApp then follow these steps-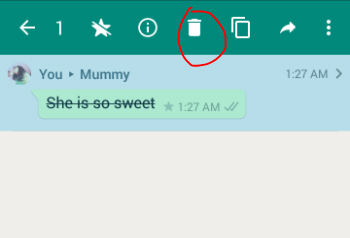
- Go to WhatsApp menu
- Find the ‘Starred messages’ option.
- Click on that .
- Now tap to select the starred image which you want to delete.
- Once the message gets selected you can find a symbol of trash bin.
- Click on the trash bin and confirm to delete it thus your starred message in WhatsApp is deleted.
You can even click on the information symbol to get information on the starred message , if you want to copy or forward the starred message then you cans elect the concerned option in the top.
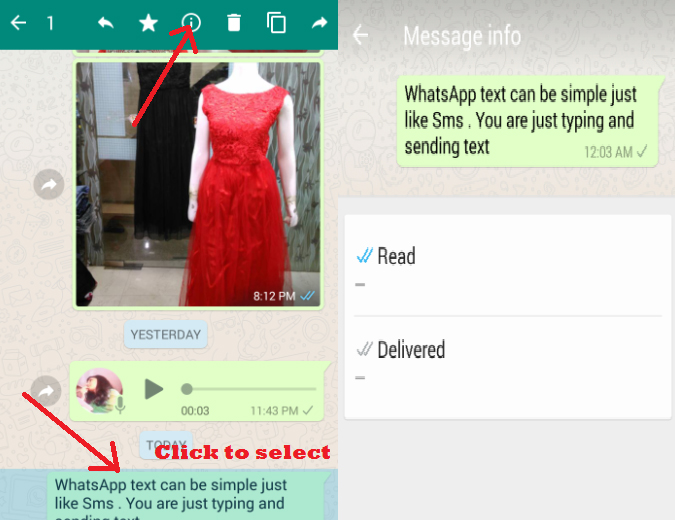
15. Get message details
You can find out message info in WhatsApp like whether the message got delivered , read or unread etc . If you use an iPhone you can know it by simple swiping left on the message you sent so it will show you the message information exactly the status of that message . But if you are an Android user then you can do it by simply selecting the message and press on the information symbol which looks like “i” in a circle and get the message info like shown in the below image.
16. Mute conversation
If you find that some messages are too much annoying then you can choose the option to mute conversation in WhatsApp to do this follow the steps –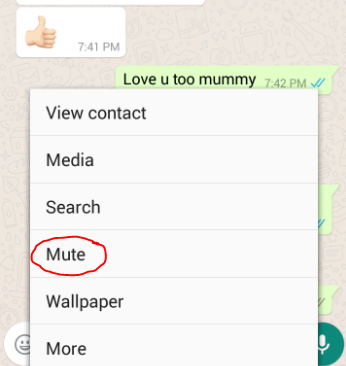
- Go to the chat
- Click on the menu
- It will show you option’ Mute’
- Click on that .
- Now it will ask for the time period to mute it choose it .
- You are done muting a chat in WhatsApp
17. Most Popular Chat( Whom do you talk often)
You can find out that with whom you talk the most if you use WhatsApp in iPhone.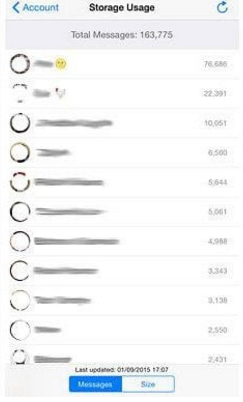
- Go to Settings
- Select Account
- Go to the Storage usage
- Now you can get the details of the total interactions you made in WhatsApp and with whom the most.
18. Hide your last seen
If you think pestered about the raising eyebrows and questions on your last seen is too much or for any personal reason you want to hide last seen in WhatsApp you can do it easily by changing your privacy options like –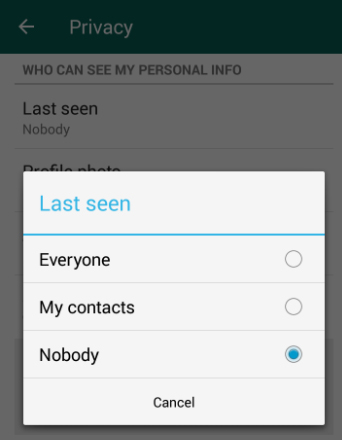
- Go to Settings
- Select Account
- Now go to Privacy
- Click Last seen
- Select it to none to hide last seen from all . If you want to share your last seen only with your contact then you can select My contacts .
19. Disable read receipts
You can disable the Read receipts in WhatsApp so you can read messages without the blue tick .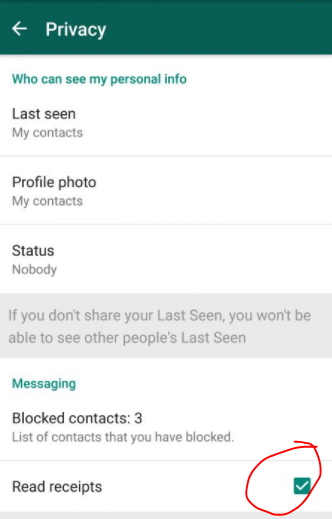
- Go to Settings
- Account < Privacy
- Now scroll down you can see that a green box checked in Read receipts . Click on that to un-check that option.
- Now you can read messages without Blue tick in WhatsApp as your read receipts is toggled off now.
20. Don’t save photos and videos by default
Most people who use limited data pack or having very less space in phone memory will get sick of this automatic download of photos and videos in WhatsApp. You can solve this issue by making it don’t save media automatically . To do this follow these instructions –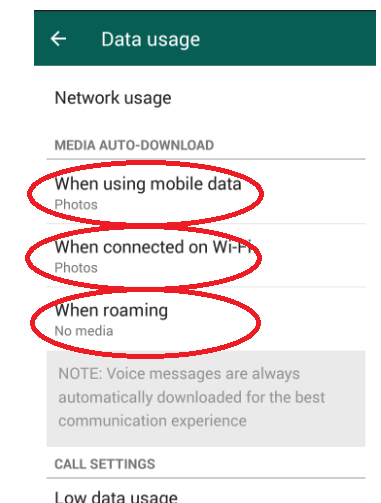
- Go to WhatsApp settings.
- Now select Data usage
- Find Media Auto-Download in that change the settings as you want the media to get downloaded when on mobile data, roaming and when connected to WiFi .
- Thus the audios,videos and photos which you receive will be saved according to your data mode and its customized setting you have chosen.
21. Custom notification
You can custom notification in WhatsApp like whether you need sound for incoming and outgoing messages in WhatsApp or vibrate , pop up notification , light etc. You can choose how you want the notification for individual chat messages , group chats as well for call notifications . To custom notification in WhatsApp you have to –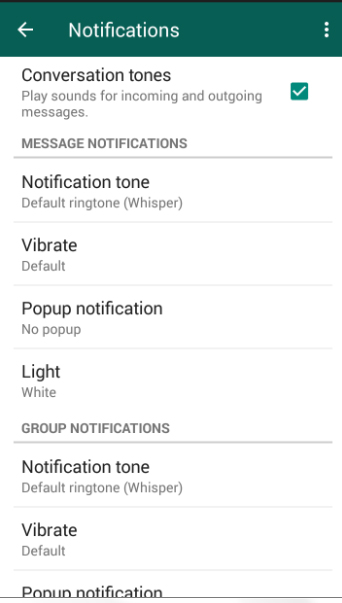
- Go to WhatsApp Settings.
- Now select Notifications.
- Get it customized as you wish for all the sections.
22. Export a conversation
If you want to save any chats for future as record or for any other means you can try to Export conversation in WhatsApp .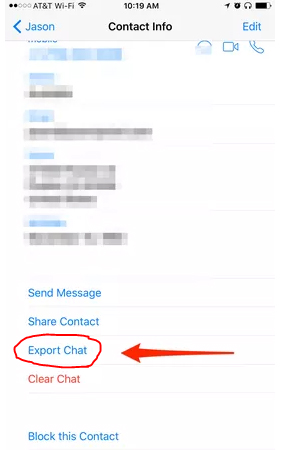
- View a chat thread you want to export.
- Tap on the contact screen
- Scroll down
- Find the contact info page at bottom and now select export chat
- This way you can export WhatsApp chat.
- In this you can select how you want to export the chat with the media or without the shared media.
- This includes both the to and from messages.
23.Broadcast
You can send messages in WhatsApp broadcast which enables you to send your single message to so many people you add to broadcast group. You can broadcast message easily by doing these steps-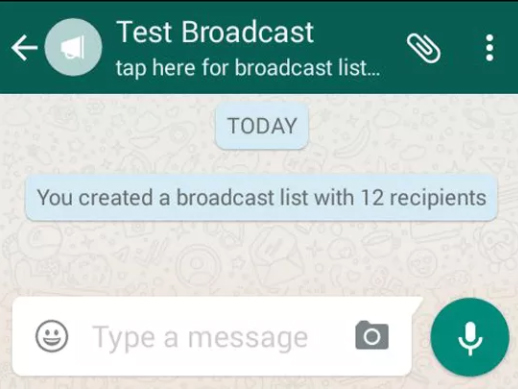
- Go to WhatsApp Chat screen.
- Find the three vertical dots in the top , tap on it.
- Select New broadcast.
- Add the people from your contact list, you have to add a minimum of two people while in WhatsApp group you can run a group with even one member or even you can delete that member and be the only participant of group yourself.But broadcast doesn’t allow this.
- Now your broadcast group is created with the contacts you selected .
- All your message will now be broadcasting to all in the list.
24. Change Font size
You can change the font size for WhatsApp by doing these simple steps –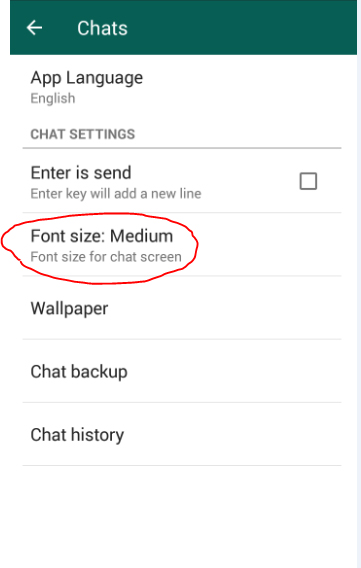
- Go the WhatsApp Settings.
- Click on Chats.
- You can now find Font size , choose between – small , medium and large.
- That’s it you are done changing your WhatsApp font size.
25. Reduce data usage for WhatsApp
You can reduce the data usage for all the applications running on your phone. In this you can really customize WhatsApp by enabling low data usage . 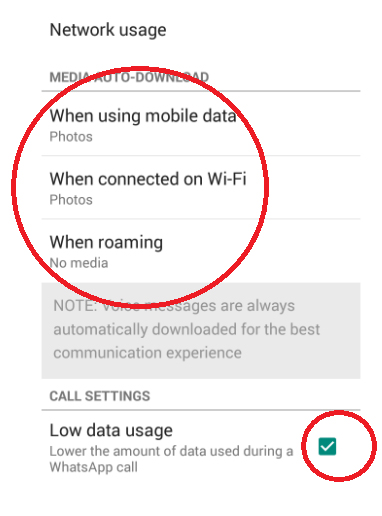
- Go to WhatsApp settings < Data Usage.
- Customize how to use your data for media downloads.
- Check in the Low data usage option.
- You are done now you can enjoy WhatsApp with low data.
26. Privacy Control for photos,status and last seen
You can set privacy control for your photos , status and last seen in WhatsApp . This helps the WhatsApp user to decide what they want to be private and public . To do this you have customize your Privacy settings-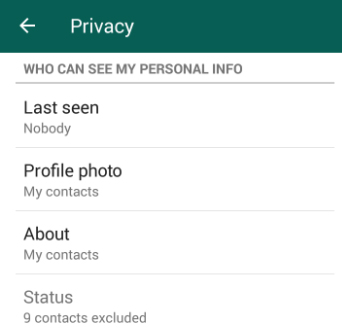
- Go WhatsApp Settings< Account
- Now go to Privacy option
- Now You can Click on Last seen and change the privacy setting for that.
- Below that Profile Photo option click that to change the privacy for who can view your profile picture .
- You can change ‘about’ privacy and also status also.
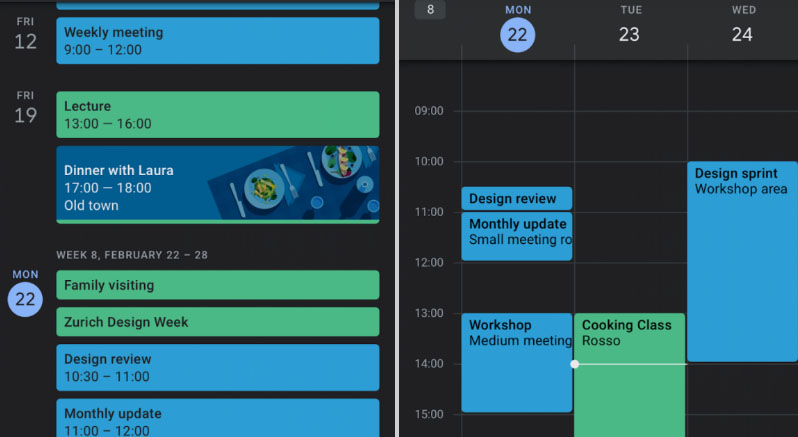
27. Add event to Calendar
You can find that the date or time that you send in WhatsApp chat will be appearing as blue font with underline. If you click on that it will allow you to Create an event for that date or time in your Calendar . So that if someone is inviting you to any meeting , dating or any important celebrations you don’t have to miss it from huge number of chat conversations.
You can add event to WhatsApp Calendar by –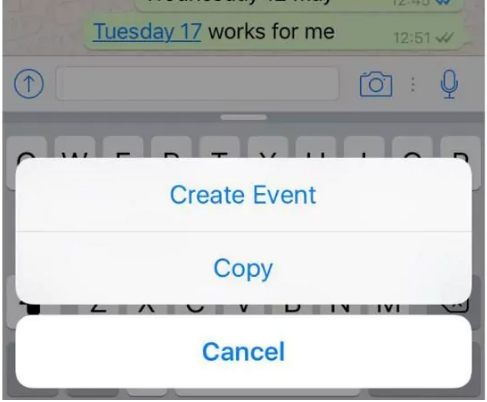
- Click on the date or time that appears in blue colour.
- It will show an option to ‘create event’ Click on that.
- Update Event details .
- Now you can find this event added in your calendar.
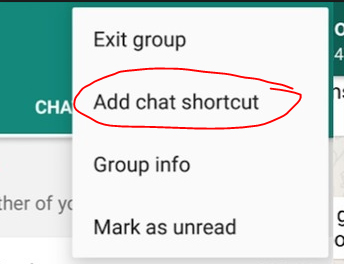
28. Home screen shortcut for individual chats
Sometime we have so many individual chat but some are really very important to us like the contacts in speed dial of our device . So likewise you can create shortcut for individual chat in WhatsApp on the home screen so you need not to go the WhatsApp chat screen with all the individual and group messages to check the message updates from a particular person . Its more convenient to do .
How to add home-screen shortcut to individual chats
- You can add shortcut to individual chat on home-screen by first select that chat on chat screen .
- Now on the top menu find Add chat shortcut .
- Click on that so with the person’s profile there will appear a shortcut on your home screen.
How to give reply on WhatsApp Chat from lockscreen
If you want to reply to WhatsApp message from lock screen without opening the WhatsApp the follow this steps-
- Go to settings.
- Select Notifications
- Select Always show popup option
- You are done now you can reply from lock screen on WhatsApp
29.Transfer files between phone and PC in WhatsApp
You can now transfer your files between PC and phone with WhatsApp Web and your desktop by sending yourself a self message .This will make a smooth file transfer from PC to phone on WhatsApp or vice versa which is free from mind buzzing steps.
- Create a WhatsApp group with just one friend.
- Immediately delete the one friend or participant who is there in the group other than you.Now you are the only one participant in the WhatsApp group.
- Using a QR code on desktop or WhatsApp web you have to connect your phone to the computer system.
- Now send some file from your phone you can get it in your desktop.
- Save the file on your desktop by clicking on the download icon.
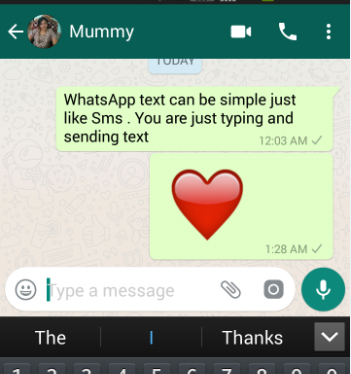
30. Emoji ,Giant Heart
You can send thousands of emoji by clicking on smiley and scrolling among with the heart when you sent it will appear as giant beating heart is favorite of many WhatsApp users.
31. GIF
At the beginning you can send GIF Images in Whatsapp by attaching it but now you can send thousands of GIF which you can find in WhatsApp itself . To send GIF image on WhatsApp click on the smiley then you can find GIF at the end of the screen like shown in the image attached here. So scroll between the GIF and even you can type a subject so endless of related GIFs will appear to choose from.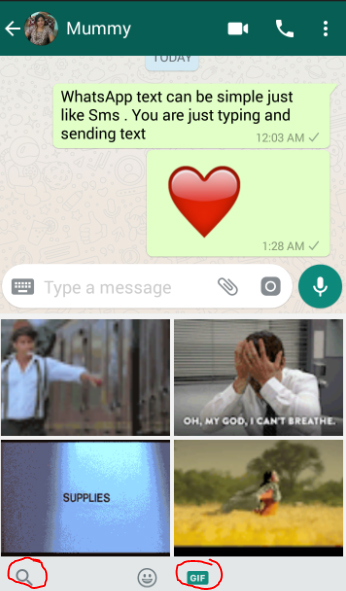
32.Quote Particular message and reply for that
One of the very recent feature of WhatsApp is to give quoted reply WhatsApp message. It allows you to give reply to that particular message within that.
You can quote WhatsApp message by doing these simple steps –
- Go to WhatsApp chat thread.
- Click to select the message which you want to quote to reply.
- On the top find the symbol to reply like shown in the image .
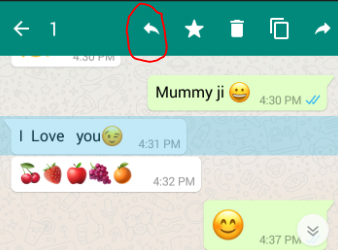
- Now you can type the quoted reply to that message
33. Protect Chats – Disable Notification preview
If you are concerned about privacy where you don’t want your WhatsApp messages to appear on your notification bar which will be peeped by anyone who look at your phone. To protect WhatsApp chats disable notification preview by toggling off the notification preview in WhatsApp which you have to do in changing your general phone settings .
34. Upload WhatsApp Dp / WhatsApp pp ( Display or Profile picture)
The trendy word Dp , PP ( Display picture , Profile picture ) is more popular with WhatsApp. You can upload Display picture on WhatsApp easily –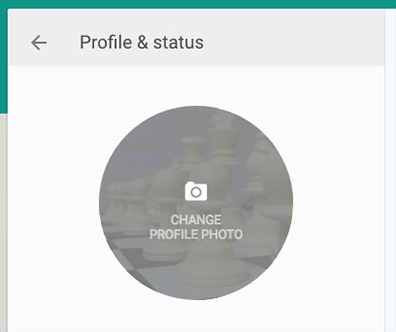
-
- Go to WhatsApp < Click on Appication Menu
-
- Go to Settings.
-
- Tap on your Profile Info.
-
- Click on your profile photo
- Click to set photo from gallery or take one using camera icon.
35. Block unwanted people
You can block the annoying people or unknown contacts who send spam messages.You can block anyone in WhatsApp and unblock them when you want easily.When you block someone in WhatsApp both of you can’t see your last seen,profile picture and other updates and prevent them from sending message and calls to you.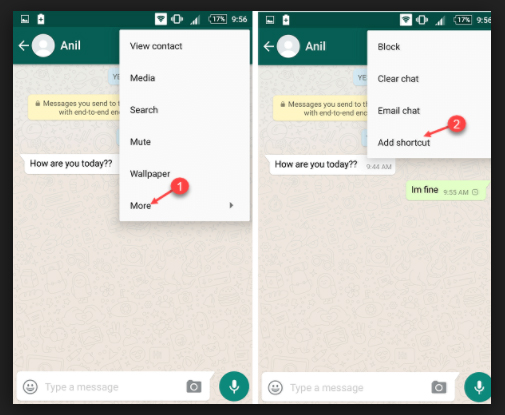
- Go to WhatsAp.
- Open the chat thread of the person you want to block.
- Tap on menu
- Click ‘more’
- Select block
- Do this again you can find ‘unblock’ click on that to unblock the person .
36. Archive Chats
If you want to hide chat threads from chat screen instead of deleting it you can archive chats in WhatsApp by selecting the chat and click on the archive symbol.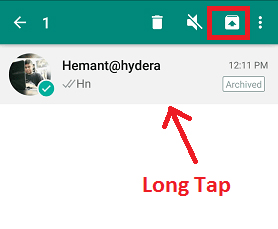
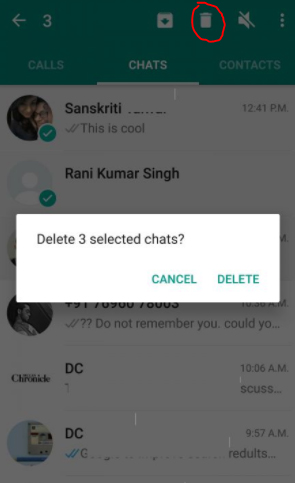
37. Delete Multiple Chats
You can delete multiple WhatsApp chats in one go .All you have to do is long press to select the chats you want to delete or even the chat threads . Now when the chats to delete are selected at the top find a trash bin . Just click on that and confirm deleting to delete multiple chats at a time.
38. Mark as unread
You can mark a message you read i WhatsApp as unread easily.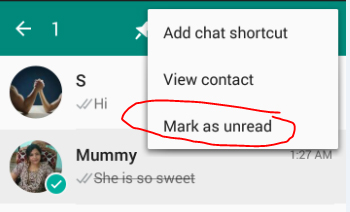
- Go to WhatsApp chat screen.
- Tap and select the chat you want to mark as unread.
- Now click on the vertical three dots.
- Click on Mark as unread
- You are done
39. Reply directly from the notification bar
If you have enabled your notifications on WhatsApp then you can reply chats from WhatsApp notification bar itself .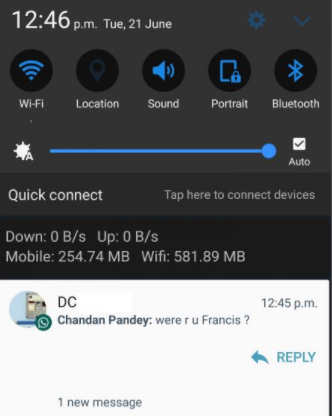
- Drag down the notification bar.
- Hit reply button .
- Enter your reply and send from notification bar
40. Backup to Google drive
You can get WhatsApp Chat Backup to google drive where you can save all your chats and media files shared. This will help you against the loss of data and also in case if your phone got any issues the backup can be restored after you fix the phone issue.
To get WhatsApp chat chat backup on google drive all you have to do is –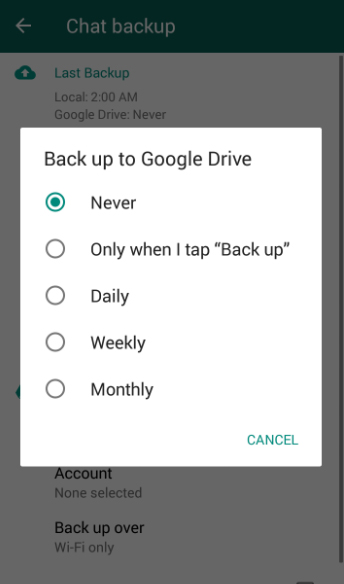
- Go to WhatsApp settings< Chats
- Choose Chat backup.
- Click choose to backup to Google drive
- Now select the frequency of backup.
This way you can backup your chat to google drive.
41. Change wallpaper
You can change Wallpaper on WhatsApp for all your chats by choosing a wallpaper of your choice as the chat background.If you want to change Wallpaper on WhatsApp follow these steps.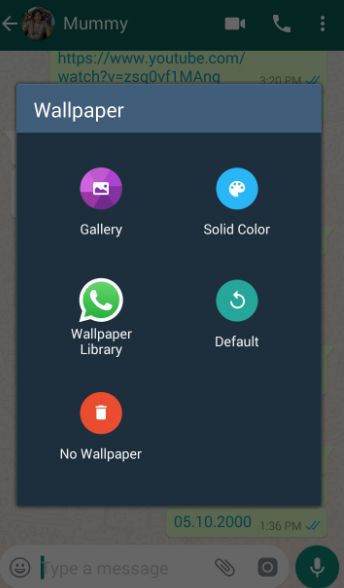
- Go to WhatsApp.
- Open a Chat thread
- Go to menu in that chat thread.
- Now find the Wallpaper option select that.
- Now find the different ways to add Wallpaper .
- Choose your preferred option that’s it.
- Now you can find your default Wallpaper is changed to your choice of Wallpaper on WhatsApp.
42. Use different languages
You can use WhatsApp in different language as your preference by following these steps-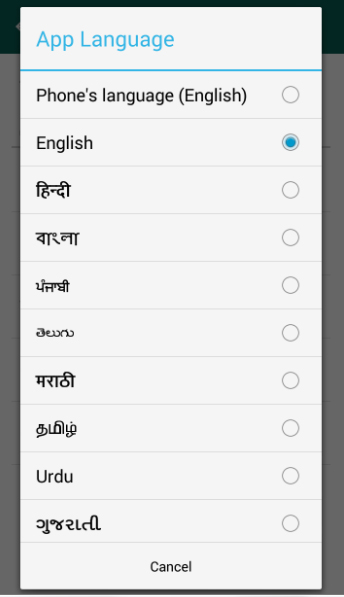
- Go to WhatsApp settings < Chats
- Click on App language.
- Now you can find so many language .
- Select the language of your preference.
43. Search messages
If you want to sort out any particular message you sent long ago in WhatsApp then you can easily find out by Search message in WhatsApp .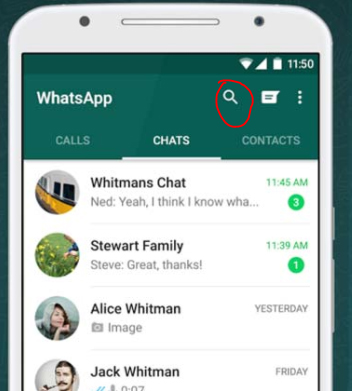
- On the top of the Chat screen there is a search icon.
- Click on that .
- Now type any fragment of words you remember about that message .
- You will get all the matching results from which you can sort it down easily.
44.Get early updates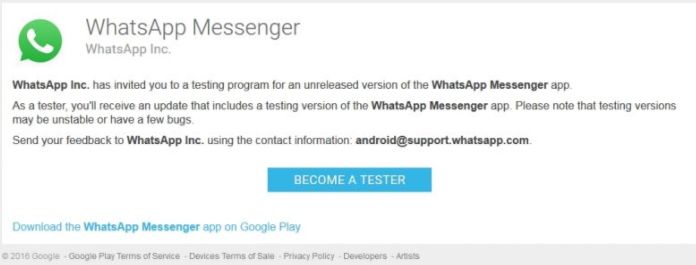
WhatsApp comes up with new updates every time as an user if you want to get updates early then one option is to have a keen eye on the Tech news updates but still its a boring thing. To stay updated become a WhatsApp beta user. You can register online to become a beta user in WhatsApp.
45.Know who has read your messages in a group
If it is an individual message sent in WhatsApp you can confirm that the person read the message it it shows double blue tick but kindly note that even in individual messages if the person have turned off Read receipts then you can’t find the blue tick confirmation.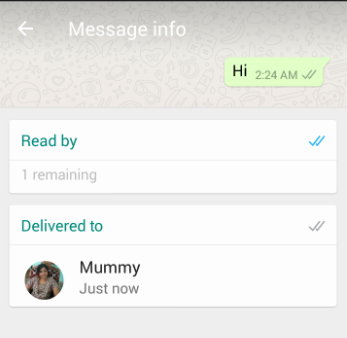
In a group chat there are so many people so if you want to check who has read your WhatsApp message in group then follow these steps.
- Go to the group chat.
- Select your message
- On the top there is symbol to get information with a small i.
- Click on that it will give you the details about who has read your message in WhatsApp group.
46.Send your location with maps
You can share your real time location with your contacts in WhatsApp from google maps. To share your location in WhatsApp follow these steps-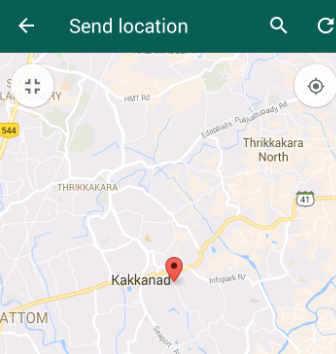
- Go the chat
- Now find the paper clip symbol.
- Click on that .
- Select ‘Location’
- Now the google map will identify your location and click to send.
You can find this as a useful feature as it shows accurate location so when if you are going anywhere out and want to share your real location with your close ones you can use this.
47.Send and receive money with FreeCharge
If you use WhatsApp on android device then now you can send and receive money using WhatsApp. You can use the new feature of FreeCharge on WhatsApp . In this you can simply make transactions possible .
So to know how to Transfer FreeCharge Money via WhatsApp read through the below steps carefully.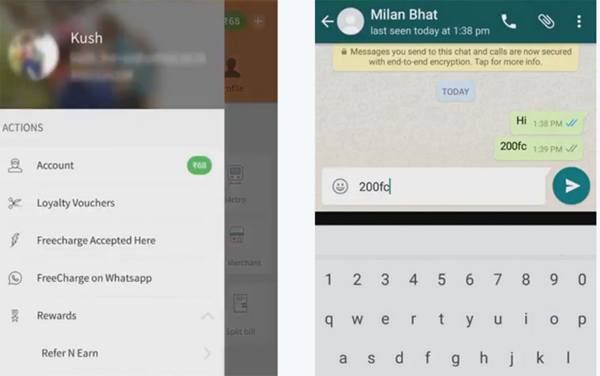
Step 1: From Freecharge’s menu launch to Freecharge on WhatsApp.
Step 2: Tap enable so that the FreeCharge app gets permission to access.
Step 3: Now to the one you want to send money open their WhatsApp chat window .
Step 4: Enter the amount you want to exchange and it should be followed by FC, eg. 100FC
Step 5: Now a pop-up will appear asking you confirmation whetehr you want to send or request money. Enter the appropriate option then you are done with the process.
This is a feather among the WhatsApp Features.
48.Share contacts
Unlike the traditional way of sharing phone contact by typing the number without a mistake is outdated . You can easily share contacts using whatsapp without any pain and effort.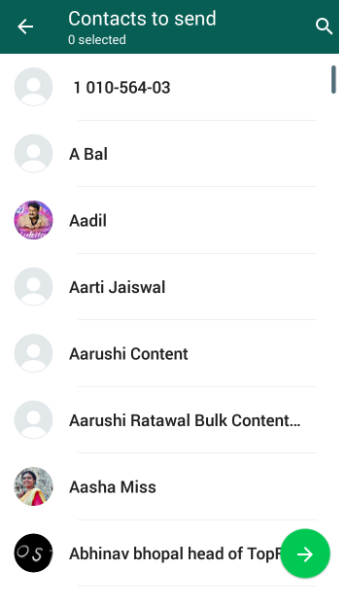
- Click on the individual chat of the person to whom you want to share the contact . Their chats will be on your screen .
- Now click on the attachments .
- Find < Contact.
- So you will find the list of contact , either scroll down and select it or manually type the contact name and select it.
- Click the green arrow.
- And send it you are done.
This is one among the WhatsApp features that makes things easily from traditional method .
49. Send Live Location & Set Frequency
You might always have one special person atleast who always has one repeated question that is to know where are you ? So in case you find it annoying to always give them answer just go to the chat with that person and click the pin icon of attachment . Now click on Location sharing and select Share Live location and then set time interval . Thus your live location is shared everytime .
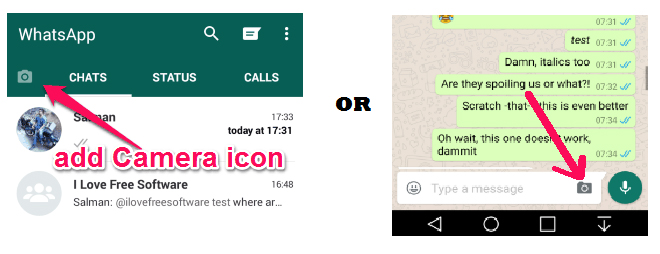
50.Send Images from the gallery using camera icon
You all know the common way of sending images using the attachment option in WhatsApp . Now there is a latest feature where using the camera icon you can select the images from the gallery and send it to your friends.
To send images in whatsapp using camera icon find these images . You can try out both ways of sending images using camera icon feature.
51.Pull back your accidentally sent messages
Suppose you send a message to someone by mistake and you don’t want them to read it . There is a small chance to pull back or prevent the other person from reading the message. So follow these ways to pull back or recall a WhatsApp message . This is just a trick not any official way to do it so .
Trick 1 : Block the user immediately for 30 days .
Trick 2 : Turn off your internet before the message shows double tick and delete it . Bt this way to recall accidentally sent whatsapp message will work only if your internet connection is really a slow one . Guys trust me sometimes a slow internet connection can save you from your tech mistakes .
Trick 3 : Bit crazy way but something you can do for sure . Send them a new message with 2000 words in special character before they read the accidentally send message .This will force them to delete your conversation to use their whatsapp back as normal . Because this special character message of 2000 words will crash their WhatsApp.
One most searched topic related to WhatsApp features will be to pull back the messages which you already sent.
52.Multiple Video or Image status for 24 hrs
This is also a new feature of the WhatsApp which is now the rising trend and a good competitive feature to snapchat . On its 8th birthday WhatsApp launched this feature where users can upload images or write text or post a video of 30 seconds as their status .
- Here you can simply take a photo using camera or choose one from gallery , use GIF , video of 30 secs as your status for 24hours . After 1 day the status will be automatically vanished .
- You can write , scribble add smileys on the photo status that you are uploading.
- You can hide the status from particular people , that means you can restrict the visitor for that status.
- You can add multiple number of status in a day.
- You can delete the status before the 24hours time also.
- You can see who viewed your status and when they viewed it.
How to hide your photo/video status in WhatsApp
You can hide WhatsApp status by following these simple steps –
- Go to WhatsApp Settings.
- Now tap on Account< privacy
- Click on Status
- Here there is 3 status privacy option – my contacts, my contacts except and only share with.
- If you select my contacts your new photo or video status in WhatsApp will be visible to all your contacts in WhatsApp.
- If you want to block certain people from that click on ‘my contacts except’ and search the name of contacts and add them . So they wont be able to view your whatsapp status update.
- To add more privacy suppose only those whom you really know the status update should see it not all , then add them alone to view your status update by selecting the third option.
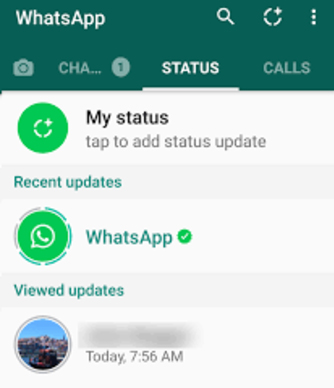
How to know who viewed your photo/video status in WhatsApp
You can add as many photo or video status in WhatsApp which you can custom privacy to ensure whom you want to share this status visibiliy. You can find out who viewed your WhatsApp status by following this steps.
- Go to Status.
- Tap on your status
- Below that you can find an eye symbol click on that there you can view the contacts who have seen your WhatsApp status.
How to delete your photo/video status in WhatsApp
If you want to delete any of your WhatsApp status there is still provision for doing that by following these steps.
- Go to Status.
- Now Tap on the status you want to delete.
- Below that click on the eye symbol now it will show you who viewed the status along with that there is a symbol of bin . If you click on the bin it will ask you whether you want to delete the status so it will get deleted .
How to forward your photo/video status in WhatsApp
You can simply forward your WhatsApp status to anyone you want by following these steps –
- Go to the status on WhatsApp.
- Now click on the status and eye symbol.
- There near to the bin there is a forward arrow click on that.
- Now you get list of contacts available in WhatsApp so you can choose them as individual or select multiple persons and send it .
- Hence your WhatsApp status is forwarded.
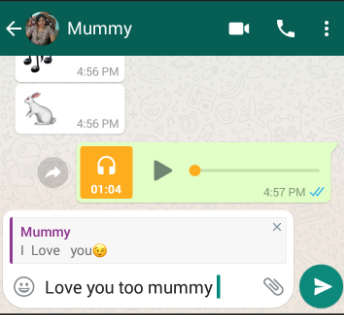
How to reply to your friend’s photo/video status in WhatsApp
You can reply to other’s WhatsApp status by sending text on it or with images or even as audio .
- Click on the status you can find you contacts’ recent status update below your own status.
- Now click on the status on which you want to reply .
- Now you can find a text cursor , smiley , camera , audio near to it .
- Click on the smiley to add smiley to your reply and type text if you want . Even if you want to reply it with a image you can click that and take it from camera or gallery or if you want to reply it with voice press the speak button and talk and leave your fingers so it will sent.
This is a trending among WhatsApp Features.
53. Pin Feature
This is a new feature , to say an upcoming feature for all whatsapp users . This will help you to get rid of scrolling thousands of messages to find your favourite one . You can now simply make the most important individual’s chat as priority by using WhatsApp Pin Feature .
You can only pin three chats with this feature . By pinning those chats will appear in the top regardless how long its been you haven’t communicated with them .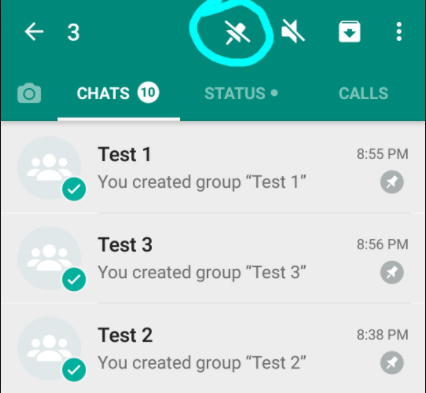
How to Pin Chats in WhatsApp ?
- Download WhatsApp Beta 2.17.162 or 2.17.163
- Tap and hold the chat you want to pin , when you are holding it you can find delete , mute , archive and then a pin option on the top.
- Click on the pin , here it is . You are done with it now this chat appear on the top even if you didn’t had conversation in recent .
- You can unpin anyone and add new one as pinned chat because only three can be pinned .
54 . Delete for everyone
This allows to delete the message for both the sender and receiver .
55. Disappearing messages
This is an exciting feature in whatsapp latest , this allows you to select individuals with whom you want the messages to self destruct within 7 days . But remember the person can still save your messages in the form of screen shot etc or even screen recording facility is now available .
How to enable disappearing messages on whatsapp ?
- go to whatsapp
- select the person for whom you want to disappear messages automatically in whatsapp
- there you can find the option disappearing messages .
- click it and turn it on
anytime you want you can turn off too .
When you turn on this option this will give notification to the other person that you have toggled on whatsapp disappearing messages for the person.
So here we have given you a detailed guide on the 50 exciting WhatsApp Features also find the ways to protect your WhatsApp data .
One exciting feature that is not detailed is WhatsApp web which will be detailed as a new topic soon.