Tag: Android

  • Ultimate Ways to Connect Android with Car Stereo

    Ultimate Ways to Connect Android with Car Stereo

    Here we are discussing about the Ultimate 5 Ways to Connect Android with Car Stereo which will make your journey musical .

    All the unaware Android phone owner might incorrectly feel neglected and confused by the lack of Android specific solutions for connecting their android with car stereo specifically for listening to music while driving and traveling to workplace or places.

    How to Connect Android with Car Stereo

    Well, worry not because we have got you the best few different ways through which you can connect your Android device to your car stereo successfully.

    There are a few different ways through which you can connect your Android device to your car stereo successfully.

    1 . Auxiliary Jack

    First method to Connect Android with Car Stereo is via Auxiliary jack

    • Auxiliary jack is one of the ways to connect your android phone with your car stereo and listen to your favourite songs also take calls and listen clearly.
    • Various car models like Nissan Micra, Renault Duster, Volkswagen polo, Maruti Swift dzire etc come with an auxiliary audio jack feature available.
    • You may be able to find the audio jack on or near the stereo in your car.
    • Incase of Honda CRV car you may find audio jack in the centre in between the front right and left seats in the car.
    • 5MM cable will help you to connect your Android phone to the car.
    • Furthermore, select the stereo to the AUX setting and select then you may select your favourite song that you would like to play.
    • If you have Toyota car model then you would find a “secret” audio jack located behind the stereo in the car.
    • This may involve removing the stereo and other practical work to connect your android with your car stereo.

    Read Also : Luxurious SUVs for Sport Maniacs – Latest Update

    Read Also : Top Luxurious Cars in the world and their specifications

    2 . USB Port

    Now let us take a look at the next method to Connect Android with Car Stereo that is via USB Port . I’m sure your car has an USB Port.

    • If your car has a USB port, then you don’t have to worry as the stereo will play the music you select through the USB port.
    • You can frequently store your favourite music on your Android phone or flash drive which is another USB device.
    • Connect your android once you copy your favourite music files in it to your car stereo using the USB cable provided with your device, and select the music files from the device to play successfully.

    Flaws in this method of Connecting Android with Car Stereo via USB Port are –

    • Unfortunately, you would find it difficult as this method generally does not work if your music is connected via the Internet as only those files would play which are stored on your Android phone.
    • It also doesn’t generally work for attempting phone calls.

    Read Also : Best Car Gadgets and Accessories for an Ideal Car

    3 . Bluetooth

    • Enable Bluetooth on your Android phone if your car stereo supports Bluetooth connection by going to Settings option and then go to network connections .
    • Now simply make your Android  visible by selecting anyone.
    • Furthermore, set your car stereo to find the device, and then you would be asked to enter a PIN.
    • You can simply enjoy playing all of your favourite music and also making phone calls wirelessly once your android gets connected to Bluetooth in your car.

    This is a relaxed method for Bluetooth connectivity to Connect Android with Car Stereo .

    Read Also : Top Satellite Car Radio Installation and specification guide

    Read Also : Best Green Cars For Known To Be The Most Eco Friendly

    4 . FM Transmitter

    • If you don’t have any of the above options in you’re to connect your android with your car stereo then you’ll need to spend a bit more cash for an FM Transmitter.
    • Price range for such devices can range from $15 to $100.
    • Once you have got your FM Transmitter, all you need to do is to now find the best radio station to use in your area and set it to that station.
    • Now you’re all set to listen to some Android songs, place calls and clearly through your car speakers.

    Read Also : Used Car buyer’s checklist -Exclusive guide for buying used cars

    5 . Cassette Tape Deck Adapter

    This is a way to connect Android with Car Stereo on old car models .

    • If your car is old enough and contains a cassette tape deck, you can use a Cassette Tape Adapter to play audio through your stereo in your car.
    • Slide the adapter into the cassette deck.
    • Now connect it to the audio jack on your Android.

    So we hope this information and steps will serve best to help you to Android with Car Stereo .

  • Pokemon Go Earning methods works for Pokemon Lets Go

    Pokemon Go Earning methods works for Pokemon Lets Go

    Damn sure that there is no such innovation like Pokemon Go !!! Now Pokemon Lets Go … So lets discover Pokemon Go Earning methods that really works for Pokemon Lets Go

    Pokemon Go have hit a change in the market trend and social trend all together.Pokemon Go , an augmented reality game . This is a recent trendsetter of this century. Niantic has released this Pokemon Go very recently on July 2016 . Surprisingly within the short period the game became viral enough. Hard to believe , but its true even Pokemon Go has reached a high number of users than Twitter or Facebook also.Pokemon Go is now officially available in some countries and consistently available in other countries. You can download Pokemon Go on any android mobile and iPhone .

    Now the upcoming on Pokemon series is Pokemon Let’s Go, Pikachu ! and Let’s Go, Eevee !

    This game can be played as both Single user and Multiple user.

    Pokemon Go AR + will be a better treat experience for all Android users now . Thus making Pokemon Gen 4 a better game experience to all the Pokemon lovers around globe . Now you can set the eye on not only to catch Pokemon Go shinies . You have something better to catch now , Meltan , the new Pokemon monster that is trending . But if you want to catch Meltan you must first discover the mystery box , if you haven’t find mystery box you would not see the Meltan .

    Android users who wanna experience the actual size of Pokemon creatures and monsters , download the latest Pokemon Go AR+

    Pokemon Go Earning Methods works for Pokemon Lets Go

    When the craze of Pokemon Go is high among people now its scope in economic way is equally increasing. Some people are getting benefited with Pokemon Go commercially. Pokemon Go is a game that have attracted every section of the society. This made everyone to run around the streets to hunt the monsters. It’s all crazy but it also opened up a new business market for many .Now Pokemon Go make money easily .

    Here we tell you How does Pokemon Go make money  –

    Pokemon Go is not all about fun !!!  It is a mixed platform where you get fun, you earn playing Pokemon Go , you buy services to play Pokemon Go and you sell services related to Pokemon Go .

    1. Boost your local Business / a new start up with Pokemon Go

    If you are a new local start up or a local business person looking to attract more customers. Now you can do it with Pokemon Go to increase your revenue. It’s a best way to make money with Pokemon Go .

    pokeman go for business

    Many restaurants, bars, family now make money with Pokemon Go by attracting people by placing a lure near any PokeStop . People now want to get a refreshment center where there is entertainment. So using Pokemon Go to attract is one way to earn money using Pokemon Go.

    1. Start a Recharging Station in PokeStop Parks

    People on their craze to hunt monsters come to parks to find the monsters and their phone battery will drop out with their great time of playing .Here it is a chance to make your business . Go to such PokeStops and place a table and start renting Portable chargers to Pokemon Go players.

    1. Start a Refreshment centre in PokeStop Parks

    POKESTOP REFRESHMENT

    Recharge the Pokemon Go players with your refreshment centre. Offer water bottles, soft drink cans, snacks. For sure this will not give you over stock if you place it on a good PokeStop and to avoid further complications check the terms of license at your place to set up your refreshment centre. This is a way to earn money using Pokemon Go .

    1. Sell your Pokemon Go account on High rates

    You have a Pokemon Go account with crossing about 15 to 20 levels then you are sure you can win it again. But some crazy Pokemon Go lovers want to play the game without touching fingers till the main levels. So you can sell your top account for a good amount of money.This is a way to make money by playing Pokemon Go.

    Note – According to Pokemon Go’s Terms and conditions selling your account is banned. So try to rent it. Why you kill a golden duck in one stab!!!

    1. Claim the best gigs

    TaskRabbit & Mechanical Turk are now your place to earn some extra money with Pokemon Go .Here you have to find out the high paying gigs.

    1. Drive With a Pokemon Go Player and earn

    pokeman go bus

    The 24/7 Pokemon Go bus is now hitting the business in Newyork and in every part of the country we can find freelance drivers who take the Pokemon Go players around for drive to help them find the monsters around the streets .It is a brilliant way to earn more money with Pokemon Go.

    1. Become a pet/kid caretaker

    Lovers of the game now look for a pet/kid caretaker as they need to make their time with their favorite game to hunt monsters. Irrespective of your educational background here a new world of opportunity is opened before you to earn more money with Pokemon Go.

    1. Be a Pokemon Go adviser to earn with Pokemon Go

    Help Pokemon Go lovers by giving them guidance to install, tips on playing Pokemon Go  and to find the monsters. You can earn by this and also by giving advice to new start up to use your idea of boosting their business with Pokemon Go & tell them how does Pokemon Go make money.

    1. Advertise your PokeStop and earn

    Advertise your PokeStop and get players gather there which will eventually give a market for your business. One multinational trick used by an American mobile company was brilliant to give free data plan on Pokemon Go app to attract more customers. So it’s equally a working plan for the small, big to Multinational companies to earn money with Pokemon Go.

    1. Sell rare Pokemon

    Again we remind you selling is banned but still you can rent your Pokemon Go account . In  case you are not willing to play much but you have the rare Pokemon captured then your account is still worth. It doesn’t matters how many levels you crossed . All that matters is how many rare Pokemon you have captured in the game.

    1. Become an egg hatcher to earn Playing Pokemon Go

    Those who are lazy to walk and run but curious to play the game look for someone who can walk for them and find the rare Pokemon Go Egg and hatch it for them. For this service you can charge well. It’s an easy way to earn playing Pokemon Go .

    These are the all possible ways to earn money with Pokemon Go .These are the  guidelines to reap money with your service , efficiency and how you can get benefit from a PokeStop . Near the PokeStop lucky you are to earn more.

    Earn with Fun & Pay for Fun !!!

  • Android boot Fix – Steps to Try When Your Android Won’t Boot

    Android boot Fix – Steps to Try When Your Android Won’t Boot

    Android boot fix steps to try when your android won’t boot

    This article we will focus on the steps to fix android when it is not able to boot , so you can read step by step to do Android boot Fix

    If your favorite android device decided to take a vacation and  android not boot properly then this condition is not acceptable and the idea of troubleshooting it is in itself haunting. The solution to this puzzle could be related to either an errant app or a corrupted Android OS or in worst case bad hardware.

    Android boot Fix steps

    Here are the steps you can take if your Android won’t boot.

    1) Soft Reset Android boot Fix

    • Your android phone might need a soft reset to boot. On majority of the devices you can press and hold the Power button for about 15 seconds to soft reset/boot. This way you can do Android boot Fix.

    Read Also : Enable / Disable JavaScript : Mozilla Firefox Hacks

    2. Pull out the battery

    • For nearly every problematic issue where an android device would not start I always suggest to pull out the battery (only if it is removable so never go to extreme lengths at start) first and leave it sunlight for time nearly about 20 seconds and then reinstall the battery and see if the issue of boot persists.  

    Read Also : How to Use Google Assistant on Android Devices (Without Root)

    This particular step could seem like it would not work but I know for sure that it has helped numerous android users.

    3. Verify for Stuck Buttons

    •  In certain case it can cause the Volume,power,home buttons to stick which prevents the start up/boot. So try to remove this case of not being able to boot.

    4. Try a Soft Reset

    • On majority android phones you can simultaneously press and hold the “Volume Down” and “Power” buttons. Keep pressing them for a time of nearly 20 seconds to soft reset/boot the phone.

    Read Also : WhatsApp Exclusive Guide – Everything about WhatsApp Features

    5. Remove Connected Hardware

    • By any chance if you have an SD card, otg-cable or any other items plugged into the device then unplug them. A bad/corrupted SD card or headset could cause issues. Though this are on rare occasions it could stop your boot.

    6. Ensure Device Has Enough Power

    • In this case your device would not turn on at all or maybe is stuck in an infinite startup loop/boot. It may not have enough power so attach the power adapter to the your phone and then plug it into a wall outlet. Remember not to use a connection to a computer or any other device because the power you would get is not suffice to power majority of android devices in the right away and could affect the boot.Another issue could be the actual battery(about which we talked earlier). To see if you can borrow a battery from a friend with a similar specification and give that a try for a boot. Though you may want to purchase a new one or maybe try a used battery out. You can also return the battery to the store if it does not help(if it is in the warranty period).

    Read Also : Improve The World With Smartphone -Top 10 Hacks

    7. Start Android in Safe Mode

    • If you have installed a particular app that either is not compatible with your device or malfunctions then it could cause the system to hang at a blank screen or continually force to close items stopping the boot process. In any case you will want to find out how to start your device or boot in Safe Mode. Safe Mode will start the device with only the basic OS required to start the device. This will usually allow you to access the android OS so that you can remove whichever app that may be causing the issue for boot.Since most devices start in safe mode by simultaneously pressing and holding the Menu or Volume Down button while you power to the device is on. If you are not confident on how to start your particular phone in Safe Mode then search the google. You can also check the documentation provided with your Android phone especially for boot.

    8. Factory Hard Reset Android

    • Alas! if you have tried every of the above steps and no option seems to work then you might want to do a factory reset operation on your phone for a boot and mind you doing so will wipe all data from the memory of the phone(usually not SD card data like music or photos).There are many different ways to perform a factory reset with a hardware button combination just before your phone’s android system loads. Look in your manual or search for what the button combination is for your particular device. They are different for almost every different phone. Only if you are not confident on how to factory reset your device. Check the documentation provided with your phone(the manual you probably never read).

    9. Repair

    • After trying everything if none of the above steps work then there may be a hardware issue that you are most likely unable to solve for yourself which is stopping your boot process. At this point I would seek help from the manufacturer or the retail store that sold you the phone. It is

    These are the steps to try when android doesn’t boot and thus will help your android to work well smoothly .

  • Connect Android to Projector via USB and Wireless

    Connect Android to Projector via USB and Wireless

    Connect Android to Projector via USB and Wireless

    Earlier, projectors were mainly used for PowerPoint presentations in organisations. It was also used to watch movies on big screens. Projectors could be could be connected to other devices via USB or through wireless media. Here we will tell you the ways to Connect Android to Projector.

    There are certain common ways to connect Android to projector.  This is a hard wired connection and is used when the wireless connectivity does not work. For this, the Android device has to support a type of wired connection. They are as follows:

    • MHL (Mobile High-definition Link) : If the Android device supports MHL, you can connect the HDMI adapter to the device and then connect the HDMI port to the projector.
    • HDMI (High-Definition Multimedia Interface) : A mini HDMI cable could be used to connect directly to the standard HDMI port on the projector.

    Assume you wish to connect Android smartphone to the projector but have no clue about how to do it. Regardless of the available options, we would have a look at how to connect Android device to the projector.  It would be rather easier to connect the Android smartphone to projector and more portable than to carry a laptop around.

    The options available depends on the projector used. Each projector has its own ports and features.

    • Wireless App

    At first, make sure there is an app associated with it. So far, this has been the most relieving solution possible.  Panasonic Projectors and other leading brand projectors have apps, which enables to connect via WiFi or Bluetooth network and get a screenshot of what is present in Android device.

    If the app is unavailable on the Google Play website, you could check the website of the company that made the projector, or the documentation.So you must make sure there is wireless app to connect android device to projector .

    • Chromecast

    This option works in most Android devices. You may wish to watch a movie or get a screenshot of Android device on the projector, Google Chromecast would be the perfect choice. Chromecast device links directly to the HDMI port on a projector where you could send from the Android device via WiFi.

    • Miracast

    You could connect Android device to projector using Miracast too. If the projector does not have Miracast support,you could use Miracast video adapter to directly connect to the HDMI port of the projector. Miracast enables in casting anything from the Android device to the projector.

    Read Also : Connect Google Pixel to TV Easily with these Exclusive Guide ( Screen Mirroring )

    We shall now have a deep look into each type of android devices and how to Connect Android to Projector based on their type.

    Connect Android Tablet to Projector

    Here we will explain the ways to Connect Android to Projector via wireless and ways to Connect Android to Projector via USB too .

    Read Also : Backup Android Device to PC or Google

    Connect Android to Projector Via USB

    When you choose for an ultra-lightweight portability of a tablet, you need not look for a powerful laptop for giving a business presentation.Connecting your tablet to projector enables to extend the tablet screen onto a big screen for clients and staff to have a clear view. Connecting these devices require an adapter cable; however this depends on your tablet and the projector. These are the steps to be followed to connect the Android (tablet) to the projector:

    1 . Turn off the tablet.

    1. Review the types of video ports available on the tablet: The USB ports would vary depending on the manufacturer and the model of the tablet. Compare the ports to the type of video input ports available on the projector to choose the type of video adapter required to connect the two devices. If the port types on your tablet are not compatible with the input ports on the projector, you require an adapter. For example, Apple’s VGA adapter can be used to connect an iPad to a VGA projector
    2. Obtain one end of the video cable to the input port on the projector and connect the other end of the cable to your tablet. If an adapter is used to make the connection, connect the video cable to the adapter and then connect the adapter to the video port on your tablet.
    3. Turn on the projector and wait till the warm-up process is completed.
    4. Turn on your tablet. The images from your tablet should be transmitted automatically. If they don’t, refer to the owner’s manual for information on how to adjust the video output settings specific to your tablet model.

    This way you can connect android tablet to projector via USB.

    Read Also : Battery Health : How to keep your phone or tablet battery healthy

    Connect Android to Projector Via Wireless

    There are two basic approaches to connect Android device to projector via wireless media.One is by Bluetooth technology; and the other is through an existing network. The tablet must have Bluetooth support, being a standard on tablets such as the Google Nexus and Samsung Galaxy but might be avoided on certain lower-cost models. Epson uses the network technique, manufacturing projectors with built-in Ethernet or wireless networking.

    Read Also : Google Pixel WiFi Calling Enable and Disable

    Connect Android Phone To Projector

    Before we saw the methods to connect android tablet to projector now will see how to connect android mobile to Projector .

    Connecting an Android phone to a projector depends on the type of projector used. Latest projectors have inbuilt apps and wireless technology that could be used to send the details from the phone to the projector. This form is a stress free; displaying any video or screenshots from the android phone.Turn on the projector and point the phone like a flashlight on the wall,and the content gets displayed on the wall with high quality. This technology enables in sharing any data on the mobile anywhere with friends or with business people. Movies too could be enjoyed.

    Read Also : Android boot Fix – Steps to Try When Your Android Won’t Boot

    A few years ago, projectors had VGA or HDMI port connection; most android phones did not support these port types. The best option to connect the android phone is to get it connected via a micro USB to HDMI port or micro-USB to VGA port.Carrying heavy laptops, CD or glass sheets have turned old fashioned and even old people started hating using them.

    The other method of connecting to projector is using the Droid@Screen app, wherein you connect your mobile phone to any computer and using this app you could screen-in your project from the computer to the projector. The projector could be connected to the computer via HDMI port or VGA port.

    Smart phones are also available with Miracast supporting the projectors. If the projector does not have Miracast  you could purchase a Miracast video adapter and connect it to the projector. This method enables to watch the content like movie or any content from the android phone. You don’t need any WiFi connections to project the movie or the presentation. If you wish to connect mobile to projector via WiFi connections then you can use Chromecast. This device is directly linked to the HDMI port of the projector and you could send movies or power point presentations or any content from your mobile to the projector through WiFi connection.

    So that’s the concluding of our write up on the different methods to connect Android to Projector .

  • iOS 11 Vs Android Oreo – Who wins gadget lover’s Heart

    iOS 11 Vs Android Oreo – Who wins gadget lover’s Heart

    If the world is growing with 2x speed then our technology is growing up with 10x speed. Whenever we think about mobile OS the first two things that come in our mind is iOS and Android. In just few days , two leading mobile OS developers of world has came up with two great launches . Firstly Google has released its Android Oreo and then Apple came up with its iOS11. Today we will compare both of them so that you all can decide which one is better for you . But for that, first I will explain both the iOS and Android concept to you . Then will see n detail the comparison between iOS 11 Vs Android Oreo .

    iOS vs Android

    Let’s take a rough look at iOS vs Android before making it precise about iOS 11 Vs Android Oreo.

    Android is a mobile operating system developed by Google and it is based on Linux kernel and is basically designed for touch screen mobile phones whereas iOS ( iPhone OS) is from brand Apple Inc. It has been used in iphone firstly in 2007 and later it has been extended to other apple touch devices like iPad etc.

    Read Also : Update to Latest Android OS : Oreo -Stay with Nougat / Marshmallow

    iOS vs Android Comparison :

    1. When we talk about the storage space in Android Vs iOS ,then android offers expandable storage with several phones by using external storage devices like sdcard etc. Whereas iOS does not support expandable storage .

    Read Also : Backup Android Device to PC or Google

    2. Higher chances of malware : In Android phones we can install third party apps which can harm our data .Whereas in iOS there is very few chances of malware as Apple optimization decreases the chances of malware.

    Read Also : Android: Prevent apps from running at startup(Stop/Disable Apps)

    3. Apple itself optimize its both hardware and software: Apple itself optimize its every iPhone hardware and software. This leads to its better quality and performance whereas in Android Support and assistance services are not good as compared to iOS due to huge number of customers . It gives patchy support.

    Read Also : Android boot Fix – Steps to Try When Your Android Won’t Boot

    4. There is a tremendous demand for Android mobile as well for android apps . One of the reason behind this is the cost comparison between iOS Vs Android . Increased number of users for android has lead to great number of developers for android applications . But in the case of iOS this is not so high so as iOS apps are also less in number .

    From the above comparisons we can find that there are several pros and cons in both Android and iOS. Now we will look about what Android Oreo and what iOS 11 offers and what is the difference between both of them. That is we will study – iOS 11 Vs Android Oreo.

    Read Also : Android Oreo Vs Android Nougat Vs Android Marshmallow Vs Lollipop

    Android Oreo 

    Android new version 8.0 named as ‘OREO’ is a mobile OS currently only available in Google pixels phones. The new version ‘Oreo’ comes up with several improvements in the market. It provides 2x boot speed and can save a huge amount of battery . It also comes up with several catching features like the picture-in-picture (PIP) mode. Oreo also has ‘per app disk space quota’ which automatically delete cached files from apps. One can also snooze notifications with Android Oreo. Oreo also offers some user friendly features like autoFill which can help you to fill form faster. There are so many New Android Oreo features to get acquainted with.

    iOS 11 

    iOS 11 is said to be the next generation version of iOS. Apple’s CEO , Tim Cook said that this update takes the best and most advanced operating system and turns it up to the 11.

    iOS 11 brings several features like ‘Subtle design changes’ which can interface elements throughout the operating system. In iOS 11 the Control center is now customizable and there are options from which we can add a wide range of settings.

    In iOS 11 3D touch integration has been expanded , so we can now do more without opening Settings. Siri has also improved with this update. Now Siri has a more natural voice and is more intelligent than ever.

    Now we have seen a brief about iOS 11 features and Android latest Version Features before going in depth a

    Then the main thing is that how to make the choice which one is better for you because both offers a lot of great features . So now we will compare both iOS 11 and Android Oreo , so that we can make our decision.

    Read Also : Factory reset iPhone without password or iTunes with data backup

    iOS 11 vs Android Oreo Comparison 

    Here we will discuss about the latest iOS & Android version by comparing iOS features and Android features by comparison of iOS 11 Vs Android Oreo .

    1. Notification : Both iOS 11 and Oreo comes up with several improvements in notification settings. In Oreo , there is a new notification channels which allow to control the same type of notifications together at a time . Whereas iOS has removed it’s old notification center completely.

    2. Autofill : Android Oreo feature autoFill which has the ability for apps to autoFill username , passwords and many more things. iOS also has this feature before , but it is restricted to fewer apps like Amazon , Flipkart etc. and all works on Safari only during web surfing.

    3. Multitasking : iOS 11 gave iPad the main priority . It has features like app-switching and split view . It also has a new doc similar to the Mac OS while in Android Oreo, there is nothing new for multitasking.

    4. Picture-in-Picture : Android Oreo has came up with this feature for YouTube , Hangout etc. While this feature has already been released by iOS in its iOS 9 .

    5. Memory Management : iOS 11 provides memory management features like new image and video formats like HEIF (Hight Efficiency File Format) and HEVF (High Efficiency Video Format). But there is no such feature in Android Oreo .

    6. Copy and Paste : We know Android was the first one to support Copy and paste . Android Oreo, makes it easier for its user to copy the text while Apple is the first one to implement user interactions but Google’s Smarter AI has taken it to another level .

    iOS vs Android which is better : iOS 11 Vs Android Oreo

    There are major differences between the two but both of them offer some quality experience to its users. You can choose between them according to your need, if you want more quality and security then according to me you can go for iOS11 but if you want more features and choices then you can opt for Android Oreo .

  • Android Oreo Vs Android Nougat Vs Android Marshmallow Vs Lollipop

    Android Oreo Vs Android Nougat Vs Android Marshmallow Vs Lollipop

    Android has won hearts of millions of people because of its salient features and new android version updates . Every time Google has something sweet as dessert when it comes to Android update . Can’t say any of the Android was a flop . Because we can still find device that are actively running on its old Android OS version . Now the latest in the Android OS release is the Android O or Android Oreo but still as i said we can find other Android OS devices. So people should still have a confusion on knowing about their Android OS . So to know better about something always a cross comparison can do a great job . So here is the cross comparison between different Android OS – Android Oreo Vs Android Nougat Vs Android Marshmallow Vs Lollipop . And much before version is Android Kitkat we think everyone has moved from that

    Android Oreo Vs Android Nougat Vs Android Marshmallow Vs Lollipop

    So let’s begin to familiarize with the different Android OS on the comparison list . So we can understand how things matches and differs with Android Oreo Vs Android Nougat Vs Android Marshmallow Vs Lollipop .

    Let’s begin with the most recent ones – Android Oreo Vs Android Nougat

    Android Oreo Vs Android Nougat

    Here is the comparison between Android O Vs Nougat.

    Android O

    Android “Oreo” (Android O) is the eighth major version of the Android mobile operating system Preceded by Android 7.1.2 “Nougat”. The name “Oreo” is a result of partnership between Google and Nabisco,the world-famous cookie producer.

    Before going to in depth comparison between android OS versions -Android Oreo Vs Android Nougat , we will see features of different android OS.

    Android Oreo has Picture-in-Picture, AutoFill, Wi-Fi Aware, multi-display support and smart disk space sharing as noteworthy features.

    Picture-in-picture (PiP) mode : This is a kind of special type multi-windows mode. PiP mode was available for Android TV but Android Oreo brings the feature available to mobile also.

    Autofill Framework : It is specially designed for filling out the forms, such as login and credit card forms, much faster and easier.

    Wi-Fi Aware(Neighbor Awareness Networking or NAN) : Android Oreo supports the mechanism for finding other devices in close proximity and also the ability to establish a bi-directional Wi-Fi Aware network connection between them, without using a “traditional” Wi-Fi access point unlike done previously.

    Smart disk space allocation : We encounter problems of running out internal space every now and then, Android Oreo helps improve this by implementing a per app disk space quota for cached data. When the system run out of space and needs to free up some, it will start by deleting cached files from apps that have exceeded their allocated quota.

    Snooze notifications : With those many perks Android 8.0 also allows you to snooze individual notification groups for 15 minutes, 30 minutes, one hour or two hours.

    Android Oreo Vs iOS 11 is the rising trend on the market . So if anyone reading this has  a love for Apple iPhone latest OS then wait till the release date of new iOS (iOS 11) . Before that you can get familiarize with the exclusive features of Android Oreo .

    Android Nougat

    Android “Nougat” ( Android N ) is the seventh major version of the Android operating system Preceded by Android 6.0.1 “Marshmallow”.

    Android Nougat is the version in the android series developed by the giant Google this has excellent features that can make one to forget the previous marshmallow and also it contains extended features.

    Read Also : Android boot Fix – Steps to Try When Your Android Won’t Boot

    Nougat introduces change including the split-screen view  to display multiple apps on-screen together,support for inline replies to notifications, and an expanded “Doze” power-saving mode that restricts device functionality once the screen has been off to optimize battery performance.

    Night Light mode on Android Nougat turns your display an amber color,
    it does cause less eye strain in dimly lit environments.

    Most Android have had the feature to set one image as a lock screen wallpaper and another as your home screen wallpaper long ago, but Google annexed this feature in Nougat.

    Read Also : Android Vs iOS – Pros & Cons of Buying Android Vs iOS

    Night Light mode on Android Nougat turns your display an amber color.
    It does cause less eye strain in dimly lit environments.

    Now we have seen the features of both now will go to the actual comparison Android Oreo Vs Android Nougat.

    Comparison Features of Android Oreo Vs Android Nougat

    Battery Life– Oreo vs Nougat

    In Lollipop, Google has tried making innovation by minimizing battery consumption. With Marshmallow they introduced Doze, which put devices in a state of deep sleep to save battery and in Nougat its further improved with Doze on the Go .

    Quick Settings – Android Oreo vs Nougat

    Among Noticeable visual changes in Oreo compared to Nougat has ,  is Quick Settings area. While Nougat had the dark and light gray combination for the Quick Settings panel, Oreo altered it out and It’s now white, compared to Nougat’s muted gray.

    Read Also : Google Traffic : How to check traffic to work or home

    Notifications – Oreo vs Nougat

    If you disable notifications for any app on earlier versions it would block all notifications from the app. Which means critical notifications  would also not come through. With Oreo, you can disable  notifications individually of any app so that you don’t get spammed but at the same time you don’t miss out on any critical notifications.

    Read Also : Battery Health : How to keep your phone or tablet battery healthy

    App Interaction – Oreo vs Nougat

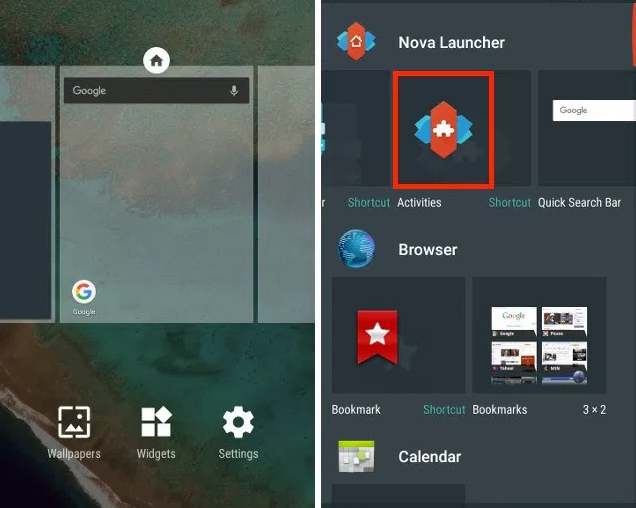
    Notification Dots which is the new way of interaction has made taking actions against app easier than ever before. You will get to interact with the app by a long press on its icon.

    It lets user to set custom importance levels for  notification groups.

    Each group has four levels of priority.

    • Urgent: sound and notification pops on the screen.
    • High:  sound and places a notification in the bar.
    • Medium: No sound, but a notification is still placed in the bar.
    • Low: No sound or visual interruption—a silent notification.

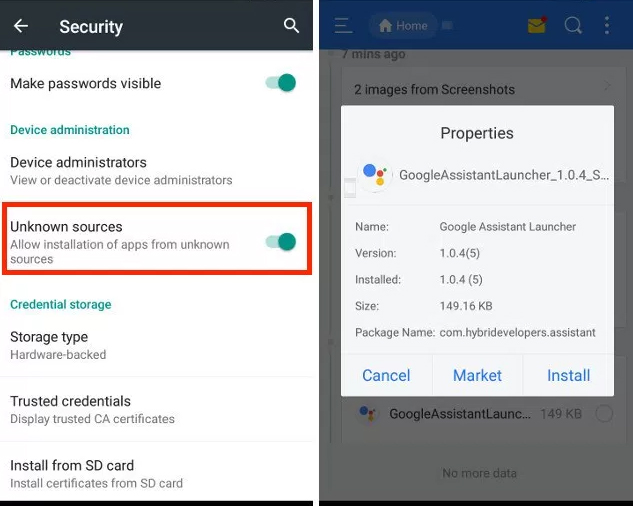
    Installing Apps from External Sources– Oreo vs Nougat

    Oreo aggravates security when it comes to downloading apps and giving free hand to them.In Android Oreo you can individually grant or deny permission to each App.

    Improvements to the Android Runtime– Oreo vs Nougat

    In Android Oreo , the runtime and app loading is faster as much as twice than it was previously in Android Nougat. Animations such as swiping down to reveal the notification appear to have been tightened up, which gives the impression of speed ,however there’s not much difference in other aspects such as switching between applications etc.

    Read Also : Backup Android Device to PC or Google

    App Shortcuts vs Notifications Dots– Oreo vs Nougat

    Notification Dots makes interaction with apps  way more easier. Whenever you get a notification from an app it will be shown by a dot , you need to long press the icon  to see the exact contents and perform actions you wish against that.

    We have seen about the comparison between Android Oreo Vs Android Nougat.

    Android Nougat Vs Android Marshmallow

    Let’s rake up and see what Google added to the repertory of Nougat and where it scored more than its predecessor.

    Battery performance —Nougat vs Marshmallow

    The most annoying thing for Android users has always been battery drain but Google didn’t disappoint in dealing with this problem and has shown its allegiance to Android users. It has added a Doze Off feature which saves your battery whilst the phone is not in use. You no longer have to bother about closing the apps that keeps running if you have forgotten to do so since this feature takes good care of it.

    Read Also : Fix “Voice search has been turned off” error for google now

    This battery saving feature was introduced in Marshmallow and is refined in Nougat.

    In Android 6.0 Marshmallow , Doze activates if the phone has been stationary for a while. Unwanted features like searching WiFi In this state are disabled. For example, instead of Facebook Messenger keeping your phone active all day, it will be forced to perform in intermittent manner.

    Whereas in Android 7.0 Nougat Google refined this feature and it will activate itself if your phone’s screen is off. In this mode, wakelocks are still allowed, and the phone will still search for GPS or Wi-Fi signals, but cell network access will be disabled. This will give your battery a pretty big bump over time.

    Multi Window support or Split screen—Nougat vs Marshmallow

    This is the noteworthy aesthetic change that makes Nougat standout. Since now the people are preferring bigger screens and plenty of apps in their mobile phones , this is a sagacious move from Google. You can operate on different apps without switching from one to another as the apps can be snapped to occupy halves of the screen. This takes multitasking to another level and gives completely different feel but Google bought it no sooner than Nougat.

    Other Aesthetic changes,

    1 the keyboard that can change color , you can also embed an image of your choice in the background of it.

    2 RGB settings to adjust the tint on the screen.Screen Tint Adjustment can be used  to adjust screen with color tints.

    3 dpi setting adjustment to expand or compress texts and icons as preferred.

    Read Also : Google Pixel WiFi Calling Enable and Disable

    Notification Panel—Nougat vs Marshmallow

    Badly needed feature and fulsome thanks to Google for neatify popping notifications.This will allow users to view notifications from different apps in a sorted manner.This means notifications from same app will be bundled together just like an unshuffled deck of cards.You can reply to  those email, message notifications  separately and expand notifications to the least like never before.

    Android Marshmallow Vs Lollipop

    Lollipop features a redesigned user interface built around a responsive design language referred to as “material design”. Other changes include improvements to the notifications, which can be accessed from the lock screen and displayed within applications as top-of-the-screen banners.

    Now you can flick up notifications to place them back to the Notification drawer without dismissing them entirely.

    In Android Marshmallow, you can select a bluetooth profile or a wireless network  from the drop-down panel itself.

    Android Runtime (ART) replaced Dalvik for improved performance of applications.

    Read Also : Google Pixel Haptic Feedback / Vibration Mode Enable or Disable

    Security — Marshmallow vs Lollipop

    Android 6.0 has also come up with “Biometric Fingerprint support”.If a user wants then device can only be unlocked by fingerprints. Whereas this option is not available in Android Lollipop.

    Android 6.0 has user defined control over some app permissions. This means users are in control of whether or not an app has access to something such as their microphone or camera.

    Read Also : How to Use Google Assistant on Android Devices (Without Root)

    Status Bar — Marshmallow vs Lollipop

    Users can remove any unnecessary icons from status bar through system tuner in Marshmallow as in Android Lollipop there were icons that remain active in the notification bar all the time which irritated the users.

    Ram ManagerAndroid — Marshmallow vs Lollipop

    Android Marshmallow has brought a change in RAM manager now users can see which app is deteriorating the device performance and which app is using minimum and maximum amount of RAM.

    Volume Controls — Marshmallow vs Lollipop

    In Android Lollipop, users have to tap volume up and volume down to alter the volume but in Android Marshmallow there is a drop down option to let users to set the volume for notification, system volume and alarm. These volume controls will allow users to individually set the volume for apps, music and alarms.

    Read Also : Android: Prevent apps from running at startup(Stop/Disable Apps)

    Each  Android release bought something new to its users because it’s obvious that we expect something better from earlier versions. Each of them might have lacked some virtues but neither of them can be termed as a flop as there are still huge number of devices that are still running on older versions.

    Android Oreo seems scoring Home-Run over other versions when it comes to being handy, nimble ,secure and is the best among others served to us at least by now , but nothing lasts forever and there’s always a possibility of improving otherwise Google would have ceased releasing Android versions long ago if any of them had reached perfection.

    Read Also : Google Pixel Dictionary – Add words / Phrases to Dictionary

    So far Google is successful in living up to the expectations as Android is still the blood and bone of majority of devices and it’s no bad reason for taking proud.

    There are plenty of reasons that Android would be surging in future, But “Perfection” is subjective and  spec and feature list is not enough to make an idea of how good an Android really is or is it the best to each minuscule trait it has got.

    So hope you have got a clear comparison idea about the different Android OS – Android Oreo Vs Android Nougat Vs Android Marshmallow Vs Lollipop .

  • Update Latest Android OS – Top reasons to upgrade Mobile OS

    Update Latest Android OS – Top reasons to upgrade Mobile OS

    Android has come up with even the most recent OS , it is like latest Android OS is the trend everyone look for . This version provides several good and catchy features to Android users and which have attracted many users towards it . We can find the constant demand of android users to Update Latest Android OS

    From multi-window support to improved battery life with Doze, a smarter settings menu, instant apps and many more things attracted every marshmallow user to it. Android releases another version 8.0 named as ‘Oreo‘ which have provided several features better than Nougat. This version provides 2X Android boot speed. It has also improved the problem of operating system update tackles with pesky background activities that drain a huge amount of battery. These things make ‘Oreo’ different from Android ‘Nougat’ and any other previous versions and that’s why every Android user wants to update to Android Oreo .

    Now many of us has a question that why to update to latest Android OS . What’s the need ?. The answer is simple, as the rule says , if you want to be successful , you need to be updated with the world. Every version is the best and it has overcome and fix all the bugs of previous versions. Now with these updates almost every year , we need to be updated and aware of these updates . But for this , firstly we need to learn how to update to latest Android OS. There are several mobile phones which automatically give this update and some don’t give updates as the new Android versions are currently not available for that device  .

    Read Also : Android Oreo Vs Android Nougat Vs Android Marshmallow Vs Lollipop

    Read Also : Convert 3G Phone to 4G Phone to support 4G Sim in 3G Mobile

    Why you Can’t Update Some phones to Latest OS ?

    A device manufacturer writes Android device drives for their hardware to make Android work on their hardware . These are closed-source and the device manufacturer have to himself update them.  It is not possible for Google to release a new version which works on all devices. Some Android versions comes with increased hardware requirements . That’s why sometimes you can’t get update to latest Android OS.

    So now the question is that , what do do with those mobile phones which doesn’t give the latest updates . 

    Today we will show you several methods to update your phone to latest android OS, so that you can easily update your android OS by yourself by following some simple steps .

    Method 1: Updating your Android OS using WiFi ( Update Latest Android OS )

    Step 1: Make sure your device has been connected to a working WiFi network .

    Step 2: Open your device settings.

    Step 3. In settlings , find About device and tap that to open it .

    Step 4: You will find an ‘Update’ option there. Tap it .

    Step 5: Now tap ‘Check for updates’ . Now your device will search for avialable updates.

    Step 6: If there is an update available an ‘Update’ option appears on the screen . Tap on it your update download will start .

    Step 7: Now an ‘Install’ button will appear on the screen . Install the update the device will be rebooted and after successful rebooting you will get updated OS in your device .

    Read Also : Android Vs iOS – Pros & Cons of Buying Android Vs iOS

    Read Also : iOS 11 Vs Android Oreo – Who wins gadget lover’s Heart

    Method 2: Updating using a Computer( Update Latest Android OS )

    Step 1: In desktop browser, open device manufacture’s official website .

    Step 2: Select your device there and download and install device management software .

    Step 3: Now return to the device manufacturer’s website and search for available updates .

    Step 4: Connect your device to the computer using USB cable.

    Step 5: Now open device management application .

    Step 6: Locate the update command . In Samsung phones , you will find this under ‘Tools’ drop down menu .

    Step 7: Click on the update command. After clicking , the update process will start .

    Method 3: Update using a rooted ROM ( Update Latest Android OS )

    Step 1: Firstly download a rooting software and install it in your computer .

    Step 2: Connect your device to your computer using an USB cable .

    Step 3: Open the rooting software in your computer .

    Step 4: Follow the on screen prompts and start the rooting process .

    Step 5: Now restart your device .

    Step 6: Install any Android version you want to use in your device .

    Step 7: Restart your device . Now your device will run on the Android version you have installed .

    Before doing the Method 3 , For precaution I will suggest you all to backup all your data as we know rooting can prove sometime dangerous for your device . It can harm your device and data. So , it will be better if we will backup our data to some USB or hard disk before updating to other android version.

    By using above simple methods and steps you can update any android device to latest android OS to use the more advanced and catchy features of these newer versions. But I will suggest you to first try Method 1 , as it is the safest and natural way to update you device and it will not cause any harm to your device . Method 2 and Method 3 are forcefully methods to Update Latest Android OS which can harm your android device and can lead to data loss . But if the Method 1 fails and you can’t restrict yourself from those catchy features of latest android OS then you can simply opt for Method 2 and 3 .

  • Android: Prevent apps from running at startup(Stop/Disable Apps)

    Android: Prevent apps from running at startup(Stop/Disable Apps)

    Android: Prevent apps from running at startup(Stop/Disable Apps)

    I have been installing too many apps on my Android device(after all what’s the point of having an android if you don’t have all the apps you might need). The device performance became slow and choppy(which make’s me mad occasionally and some days frequently). Digging deep I realized there were tons of android apps(out of a millions i installed) loading at startup and most of them had no setting to prevent apps from running at startup.

    Android OS is cool enough to kill all your low priority background apps and free up your device’s precious memory. Though there is no built in feature to control this there are some solutions that would help you to control or disable already running apps if necessary(“necessary” that is basically the reason you are reading this).

    Luckily there are some good and effective solutions to permanently prevent apps from running at startup.

    Now there are 2 ways for this:

    1) The boring technical ways(for technology enthusiasts)
    2) Completely Automated(install an app for preventing apps to load startup)

    1) The normal unanimous boring technical method(for technology enthusiasts)

    Lets begin the little boring technical way itself . After all a technology related problem should be given a technical solution .

    1st Method: Dynamically Freeze Apps

    There are some Android devices that specially provide a way for you to Freeze apps which is also known as Disabling app though this feature is useful for those apps that came with your device and cannot be uninstalled(if you still remember them).

    You can generally freeze an app with these simple journey of steps:

    i) Open Settings > Applications > Application Manager.
    ii) Choose the app you wish to freeze.
    iii)Select either “Turn off” or “Disable” depending on your priorities.

    Important Note: Options can(will definitely) vary depending on the device you own and version of the Android OS you are running.

    2nd Method: Startup Cleaner

    Again some Android phones have this special feature. The app comes pre-installed. The app runs dynamically when you click on it and prevents selected apps from running when you boot your Android device. Follow these simple steps:

    1) You can find it by searching in your Android phone for startup.
    2) Launch the app and tap the minus (–) symbol next to all the apps you do not want to run at your startup.

    If android failed to boot you can also fix it easily.

    Important Note: You would just want to disable items listed under the User tab. Be sure you know what you are doing if you disable items under System but since you got here I expect you to be with some technical background.

    That is all my friends and Now the selected apps would not run whenever you restart/boot/root.

    Read Also : Best Apple Watch Alternatives-Affordable Gadgets

    Read Also : Best Truecaller Alternatives to find Caller Identity

    Read Also : Best free calling Apps for all Smartphones

    2) Almost Intelligent Apps(Not as much as us Obviously)

    A well designed/developed task manager can easily list all the running tasks on your phone even if they are in background. This includes system process and tasks and foreground running apps(basically everything).

    I personally picked a special list(Just for you my friends) of apps from our beloved Google Play Store which are capable to accomplish this task for you. These apps can control all your running android apps and can even stop or pause current running apps or system apps including process and manage background apps intelligently (Just like your Smartphone).

    Read Also : WhatsApp Exclusive Guide – Everything about WhatsApp Features

    My First Favorite App: Advanced Task Manager

    Advanced Task Manager is special task manager designed to kill tasks(murder them), free memory which speeds up your phone saving battery life and offer just one tap to boost your phone.

    Advanced Task Manager’s BoostIt can kill selected tasks while monitoring CPU lagging apps also optimizing your Android apps. It auto kill’s tasks on almost every screen off. All this while showing battery life and cleaning & boost device memory.

    Read Also : Safeguard Facebook Pictures-Prevent profile picture downloading

    My Second Favorite App: All-In-One Toolbox (Cleaner)

    All-In-One Toolbox is a special Android cleaner and memory optimizer app equipped with as many as 29 Android system tools. It is designed to clean up junk files and boost memory, protect private info and speedup your Android with just a one tap on cleaning and process killing.

    It can help you to disable running apps from system boot making your system run fast and boost speed up. All this by killing running tasks whenever device slows down or freezes(so it itself run’s in start up). It can disable unwanted startup apps from system boot and keep Android device running at optimum speed.

    Read Also : Improve The World With Smartphone -Top 10 Hacks

    My Third Favorite App: Smart Task Manager

    Smart Task Manager is an all in one system app which can manage many different Android tasks, Application, SD card, Device and System Information in one single shot. 
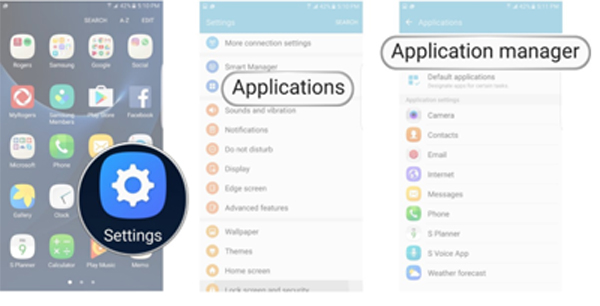
This app can display list of service, background, empty applications and service process and this application show’s you the detailed information of any particular apps like restricting process, boot, delete and some more detailed information including execution of application, update, data usage, evaluation and other details.

    Read Also : 10+ Best Alternatives to Whatsapp you will love this year

    My Fourth Favorite App: Startup Manager

    Startup Manager basically aims at either disabling or enabling startup items from system boot. Android devices which includes most smartphones and tablets can be utilized to see all the system processes that start with main Version of boot from system tabs(better try not to mess with them since it could be potentially harmful). Some processes may not seem necessary to start due to our normal natural using habits and preferences.

    You can simply check and uncheck the processes if and only if you know well about the after effects of disabling them because this app can analyze and monitor all android services (containing many of the user applications along with android processes) in the foreground and can easily stop any apps from getting auto started at your device’s boot.

    So concluding all these researched pieces of precious information and all the required information given above I would like you to have the required details. Once you’re done, then experiment any of the apps since they all pretty much do the same things in this case. Though do not mistake to take apps for granted since they could cause some serious damage to your phone. So be wise and keep sharing.

  • How to Use Google Assistant on Android Devices (Without Root)

    How to Use Google Assistant on Android Devices (Without Root)

    Google Assistant is the latest iteration of Google which is just considered as an upgrade or extension of Google which is designed to be personal as well as an expression of google’s existing  “OK Google” voice controls. Using Google Assistant on Android Devices will make you learn that the Google Now features smartly pull out relevant information for you. The Google assistant knows where you work, knows your meeting locations. travel plans of yours, a sports team you like, and what interests you. This whole data is being presented to you in the cards and through the reminders on the Android devices.So most of them prefer to use Google Assistant

    This article will mainly focus on the different methods to get Google Assistant on Android Devices (Without Root).

    Best Things Google Assistant can do:

    The Google Assistant is getting smarter than the Google Now. It not only supports more than one language but it also will soon feature more robust third party integration, which can help you to control your digital life thoroughly not just of your Google life! Assistant is just similar to the Google now and in this, you can ask the questions and answers. The Google assistant works on the wide range of Android devices which runs on Android  6.0 Marshmallow and 5.0 Lollipop.

    Unlock your Pixel: The Google assistant responds to your voice when the screen of your device is off, but if have put PIN or Fingerprint to unlock, then firstly you need to unlock the device. Use the Google Assistant’s voice command to unlock your device. Just go into the Google Assistant settings, select OK Google Detection followed by trusted voice.

    Open apps with your voice: If you want to see your latest Google+ notifications while eating. You can just say, “OK Google, open Google”, and you can see Google+ opened. Now you can use this command only to open other apps or any third party apps.

    Image Search on Google:  If you had a hard day at work than what’s better that pictures of the baby animals to boost your courage. You can ask your google assistant to perform Google image search of baby animals and hence you will feel better within some time.

    Gives advice where to Eat, Drink, Dance or shop: Suppose, it’s Friday night and you are even out with your friends but clueless where to go for dinner or dancing. For this Google Assistant can help: with the help of its nearby feature, you can easily find out the places. The Google Assistant also offers the list of the restaurant names with its star ratings, and you can tap on listing to get the address and directions.

    Read Also : Best Apple Watch Alternatives-Affordable Gadgets

    Cue your favorite Netflix shows and movies: If you want to enjoy a new movie or just an old TV show with your family, you can just ask Google Assistant to start streaming your show.

    Read the news for you: Delivering the favorite news on daily basis is one thing but, the Google Assistant read the news for you each morning. For this only tap up the software button and then, the popup came with the question “How may I help you?” say, “Good morning.” It will reply with personalisation “Good morning” and just give you the weather in your city, as well as latest as reading latest news from customized news sources.

    Tell about the daily emails and appointments: The Google Assistant can easily draw the information from another application and services such as Keep, Calendar, and Gmail so as to provide the information at a moment’s notice. If you are being scared that you have missed yesterday emails, you can ask Google Assistant “Did I Miss any emails from yesterday?” and moreover the assistant will pull up the emails unopened.

    Jog Your Memory: Sometimes it happens with us that we forget little things such as the place where the car is parked, or where left car keys or wallet. But for the Google Assistant, it is very easy and you can take the benefit of the digital helper’s ability and set reminders. For this just say “OK Google, remind me that my car keys are in the kitchen on the counter,” and thus it will help you to recall when you ask again.

    The Google Assistant is the best voice assistant available in today’s time. This has been better than other voice assistants such as Siri and Hound. It has the capability to carry out the long conversational dialogues. Today with this article I am going to share how you can install and use Google Assistant on your Android devices without rooting your device.

    That’s about how google assistant is really an assistant for your day to day life . Now moving to the main section of the article and Here will discuss the methods to use Google assistant for lollipop , Marshmallow and Nougat without rooting.

    Read Also : Record iPhone iPad Screen on Windows & Mac

    Google Assistant on Android device without rooting on Lollipop:

    For the Lollipop device, I will discuss different methods which you can use to install Google Assistant on your device. The methods which, I am going to discuss will work without rooting the device.

    Here we will discuss ways to use Google Assistant on Android Devices (Without Root)

    Read Also : Kindle Fire Silk Browser Alternatives

    Get Google Assistant Via APK File:

    Here is the way to  use Google Assistant on Android Devices via APK file this is for your Android lollipop device to access google assistant.

    1. Download Google Assistant APK and ensure that you have allowed installation of the apps from unknown sources by going to Settings>Security.
    2. Launch the app and go to “Your Stuff” and click on Add Reminder. (Note: Just make sure that your Google is updated to the latest version)
    3. Make Google Assistant your default voice input method. For this, go to Settings- Language & Input>Voice Input >Enhanced Google Services
    4. Back to the home screen and long press the home button and make Google Assistant default voice method and enjoy the things provided by it.

    Read Also : uBlock Origin Replaces Adblock plus(Best Adblock Plus Alternative)

    Get Google Assistant Via Nova Launcher

    If you find that APK file method is not so soothing then you can use Google Assistant on Android Devices via Nova Launcher . This is also the best method to get Google assistant on Android without rooting.

    1. Install Nova launcher on your device and add activity shortcut on the home screen and just set it as your default home screen. Now install the Google Assistant APK  by following the steps given above in APK file previous method.
    2. Long press on home screen and just open widgets panel and add activities in Nova Widgets.
    3. The page of activity afterward will be opened, you can scroll down and find Google Assistant Launcher, just click on it and then you will get two option, select the one with Assist in subtext.
    4. Once the shortcut creates, you can click on it to launch Google Assistant app and add a reminder by making Google Assistant your default voice input.
    5. For making the Google Assistant your default voice assistant long press home button.

    Get Google Assistant Via Activity Launcher:

    1. Download and open the Activity launcher app
    2. Click on the recent activities in the Header section and select all activities by opening the app. Wait till all the activities are loaded
    3. Scroll down on all activities and search for Google App. Click on Google app and expand all activities available
    4. Click on it & expand it, and then select com.google.android.apps.gsa.staticplugins.opa.hq.OpaHqActivity.
    5. You will get the Google Assistant explore screen where various actions are available such as Search, Ask me Buddy, Song Explorer, etc.
    6. Now tap on your stuff in the Header
    7. Then, click on Add Reminder to Open Google Assistant
    8. Lastly, complete the hotword setup process. Teach it to recognize your voice, and you’re done! Access the Google Assistant now by saying “OK Google”.

    This way you can get Google Assistant on Android Devices on lollipop without rooting .

    Read Also :The ultimate guide to make Windows run faster (Boost Computer Speed)

    Google Assistant on Android device without rooting for Marshmallow and Nougat:

    You can get Google Assistant on Android Devices like Marshmallow and Nougat without rooting by simply following these steps.

    1. Download latest Google APK from any website
    2. Download latest Google Play Services
    3. Enable to install the applications from unknown sources by going to Settings
    4. Install both APK’s you have already downloaded
    5. Visit settings>apps>Google App> storage> manage space >clear all data then, go back and clear the cache from device
    6. Restart the device
    7. Launch Google app from app drawer by long pressing home button
    8. Follow on-screen instructions
    9. Swipe left-hand menu in Google app and click on settings
    10. Then, tap on the Google Assistant settings and enable Assistant.

    This way Google Assistant on Android Devices like Lollipop , Marshmallow and Nougat without rooting is done easily .


  • Kindle Fire Silk Browser Alternatives

    Kindle Fire Silk Browser Alternatives

    The advancement in the computer technology has changed the way of the individuals interact with others. Computers are much powerful with different functionalities but they offer convenience in our daily life. Let’s take an example earlier the individuals who enjoyed reading just has a limited resource of book or newspaper but nowadays individuals get various options for reading through the online version such as magazine, book, newspaper, and much more. These all online version can be read using a computer or electronic reader such as Kindle Fire Silk browser or Apple’s iPad. Nowadays people are searching for the Kindle Fire Silk Browser Alternatives as silk browser is slow and has some security issues. Security is a big issue in this browser ass usually the individuals always interact with the Amazon clouds and never can interact directly with the secure websites.

    What is Kindle Fire?

    Kindle Fire is one of the popular tablet computer which is developed by Amazon and built with the Quanta Computer. Firstly, Kindle Fire was released in the month of November 2011, featuring a color, multi-touch display of IPS technology and running on a custom version of Google’s Android OS known as Fire OS. Next Kindle Fire HD was released in September 2012 and next Kindle fire HDX in September 2013. In the month of September 2014, the fourth generation was introduced with adjectives Kindle was dropped. In September 2015, the fifth generation Fire 7 was released with the sixth generation Fire HD 8 which released in September 2016.

    What is Silk browser and why it is slow?

    The Amazon Silk browser is the web browser which is developed by the Amazon for the kindle fire and fire phone. This browser uses a split architecture in which some of the processing is done on the Amazon server so as to nurture the web page loading performance. Basically, the architecture is based on the Open source chromium.

    Mainly the issue with the Kindle Silk browser slowness is that the default settings are attempting a desktop browser on little 7 which can not use the screen space well. Due to this, the browser is set to the desktop mode and flash is enabled by default. Also with this, the browsers shutter dies, chokes, skips, and generally a pain to deal with.

    As silk browser became slow people started looking for Kindle Fire Silk Browser Alternatives.

    Kindle Fire Silk Browser Alternatives

    As Amazon wants various users for their silk browsers so they have not made any alternative for the browser on the app store.You can just get a way to install google play to take advantage of more browser options. But if you are not technically skilled you cannot go with such a process to install the browser.

    The alternative apps in the list features following:

    • No need of rooting
    • Does not require any additional software
    • Available as an APK file to download from developer official website

    Below are some steps which allow installation of the apps from unknown sources:

    • “Settings” > “Security” > “Apps from Unknown Sources” > “On“
    • “Apps” > “Settings” > “Applications” > “Apps From Unknown Sources” > “On“
    • “Settings” > “More” > “Device” > “Allow Installation of Applications” > “On“

    Here are the Kindle Fire Silk Browser Alternatives and their installation procedures.

    1.Firefox mobile:

    This browser is available as a simple APK which can be download from your kindle fire or any other Android device. This app contains lots of bells and whistles and supports add-ons such as Adobe Flash and ad blocker.

    Some steps to install Firefox:

    • Open silk browser and search for Mozilla FTP
    • Select file which ends with extension of .apk
    • Notification will appear than which says downloading, tap the notification and downloading will gets started.
    • Tap download complete and select install

    This is an all time favourite browser which is truly the best Kindle Fire Silk Browser Alternatives .

    2.Naked Browser:

    This browser is very basic, speedy, and easy to be used to on the Kindle Fire.

    Steps for installing naked browser:

    • Open silk browser and search for the naked browser android
    • Select the link which has a .apk file
    • Notification will then be appeared of downloading, tap on the notification browser will start downloading
    • Select install

    3.UC Browser:

    This is a browser which adapts speed of your connection. this browser usually trim down the web page if a connection is not strong.

    Steps for installing UC browser:

    • Open the silk browser and search for the UC browser
    • You will get the .apk file of UC browser select it.
    • Notification will appear than on top of screen which says downloading tap on it download will be started
    • Select install

    4.Maxthon Cloud Browser:

    This is one of the most powerful browser which you can get on the android device. Most of the users consider this browser fast. This Browser contains all the features which an individual need in a browser.

    Steps for installing the Maxthon browser:

    • Get started with silk web browser and visit www.maxthon.com
    • Then select the link of android and select .apk file
    • You will then receive a notification on top which says downloading tap and gets started with downloading
    • Select install

    Google Chrome:

    This is one of the best browsers for all OS Windows, Mac, or Android. With your Google passwords, you can sync your bookmark tabs, password, recent research, and history on your history. Also, you can use the ignition window if you do not want the browser to record what you browse or what you download. With this browser, Voice search is also available.

    Steps for installing Google Chrome:

    • Open the Silk web browser and search fo the google chrome
    • You will get the .apk file tap on it
    • You will then receive a notification on top which says downloading tap and gets started with downloading
    • Select install

    Dolphin:

    This is the popular browser among all the users of Android. This browser provides free, full featured internet browsing. this browser interface is intuitive and enables a user to sync bookmark, tabs, history & passwords across devices. Thus Dolphin browser is a best Kindle Fire Silk Browser Alternatives .

    Steps for installing Dolphin

    • Open the Silk web browser and search for the Dolphin
    • You will get the .apk file tap on it
    • You will then receive a notification on top which says downloading tap angel set started with downloading
    • Select install
    • Now you have successfully installed Dolphin browser .

    Opera Browser:

    This is a well established third party browser for PC as well as MAC. This browser is being used as the best Kindle Fire Silk Browser Alternatives and its latest version has featured news which notices the content you like and offer more related news. This browser allows a feature of speed dial shortcut, bookmarks, and tabs.

    Steps for installing Opera:

    • Open the Silk web browser and search fo the Opera
    • You will get the .apk file tap on it
    • You will then receive a notification on top which says downloading tap and gets started with downloading
    • Select install

    Top Kindle Fire Silk Browser FAQ:

    Here is the top Kindle fire Silk Browser FAQ to clear many of your buzzing quest.

    How to get an update of these apps?

    If you are installing the app from the app store, you will receive the notification of update but installing outside from app store you will not get any kind of update notification. For this, you need to visit the developer website and check for the latest update.

    Do I need to uninstall the previous version before installing a newer version?

    If you have downloaded the APK file, then you do not have to uninstall the previous version as it can automatically replace the previous version simultaneously.

    Do all these options work on all versions of Kindle Fire?

    Yes, they work on all the versions of Kindle Fire Silk browser which includes Kindle Fire, HD, and HDX.

    I am getting an error while installing via APK file?

    Just make sure that you have installed the correct APK file according to your processor as some are 32 bit while others are 64 bit.

    Read Also : Record iPhone iPad Screen on Windows & Mac

    How to speed up Kindle Fire Silk browser?

    Still you don’t want to switch to any Kindle Fire Silk Browser Alternatives and you just want to speed up your silk browser then have a look at this section –

    Usually to speed up the browsers we just disable the flash. While disabling the flash we also disable the page “accelerate” feature and then just change the browser to Mobile mode. Well, there is just no reason to access the sites on the little 7 screen and end up trying to zoom each and every single page.

    Here are some useful points which can actually speed up Kindle Silk Browser:

    • Open the Kindle fire Silk web browser
    • Click the menu button at bottom of screen
    • Click on the setting button
    • Disable the plugins
    • Uncheck the accelerated page loading
    • Click on mobile view

    It is not necessary to change the browser into the mobile view, it is just recommended. While browsing disabling of the flash and accelerate page loading can just make a big difference. Also, you can change the plugins by allowing them on demand but it actually ends up with many annoying prompts. It is advised to check the YouTube working fine while the flash is disabled.

    Making these changes in your browser will surely make your browser suddenly speedy. Also, you will see the mobile version of various sites which is not a bad thing since everything will be much fast.

    Read Also : Best Apple Watch Alternatives-Affordable Gadgets

    Conclusion:

    If you do not know which browser is best for you, then just try to download all Kindle Fire Silk Browser Alternatives and give them a try. Through this article, you can get the top list of browsers, if you know any other browser just share it in comments so that individuals can be aware and give a try.

    Guess this helped everyone in finding the best alternative to Kindle Fire Silk Browser.