Tag: windows

  • Best Web browsers for Computer & Smartphone

    Best Web browsers for Computer & Smartphone

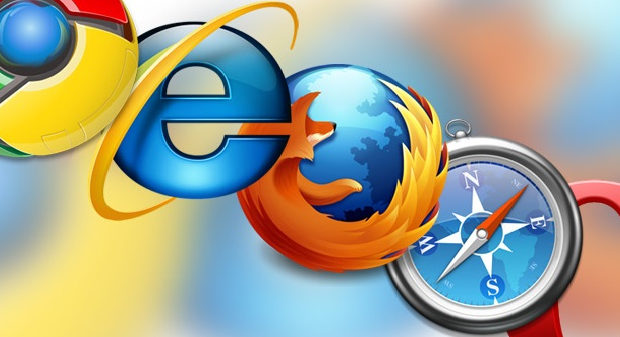
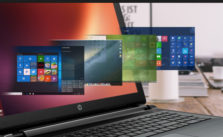
    Best web browsers are need of the hour for every internet users . Web browsers are used these days in both computers , tablets and smart phones. With the web browsers, the users can collect any data by simply browsing. You can take any details from the web browsers very quickly. Web Browsers help people to easily collect any information required, by just typing in the tab what they are looking for. Let it be any subjects related to your studies, games, music, and art, movies etc, all you have to do is just type and enter what you are looking for. You will get all the necessary information about any topics using the web browsers. But what are the most reliable web browsers or the best web browsers any idea ? 2020 onwards we see rise of AI-powered browsers . To stretch more about it in 2024 we could see the user has wise choice to choose among the Fastest AI-powered browsers . With AI coming into the segment the entire browsing experience has been taken to a new level. 

    Web browser is nothing much just a software that we can download and with an active internet connection this software helps you to browse anything and everything.

    It is always important to choose the right web browser for your computer or smart phone to work efficiently. It is not just the features that you have to look for when selecting a web browser. You should also check browser speed (Browser speed test can help with it) and compatibility before your download the software.

    Best Web browsers for Computer & Smartphone

    Here are some of the best web browsers you can install in your computers and smart phones. You should also test these browsers to understand how it works and to check if it is user-friendly. Read the features of each and pick the right one for you. Let us see what are the best Web browsers are available for us to use.

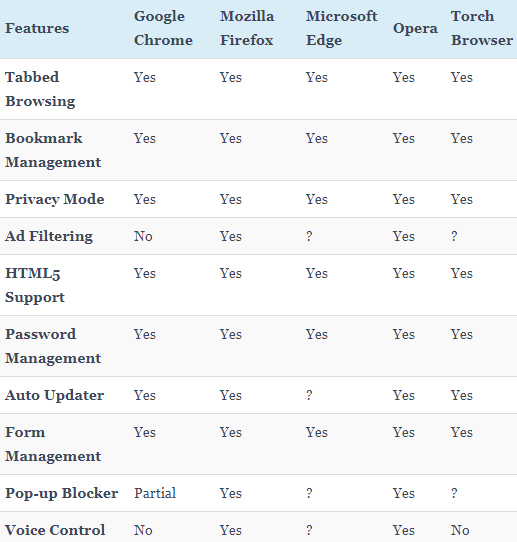
    Best Web browsers for Windows

    Given below table compares most of the features of the given list of best web browsers for Windows .

    So the best web browser for Windows are –

    1. Google Chrome
    2. Mozilla Firefox
    3. Microsoft Edge
    4. Opera Browser
    5. Torch Browser

    Best Web Browsers for Mac

    Here is the best sorted list of the best web browsers for Mac Computers that is being preferred by most of the people.

    1. Google Chrome
    2. Mozilla Firefox
    3. Internet Explorer
    4. Opera browser
    5. Maxthon
    6. Yandex
    7. Safari

    Best Web browsers for Android

    Here is the list of the some of the most popular and best web browsers for Android mobile Phone that is being preferred by most of the people.

    1. Chrome
    2. Opera Mini
    3. Firefox Focus
    4. Firefox
    5. Puffin
    6. Dolphin
    7. UC browser

    Read Also : Kindle Fire Silk Browser Alternatives

    Best Web browsers for iPhone

    Here is the list of the top rated best web browsers for iPhone that is being preferred by most of the people.

    1. Safari
    2. Chrome
    3. Puffin browser
    4. Opera Mini
    5. Dolphin Browser
    6. Ghostery
    7. Firefox focus
    8. Adblock Browser

    Read Also : uBlock Origin Replaces Adblock plus(Best Adblock Plus Alternative)

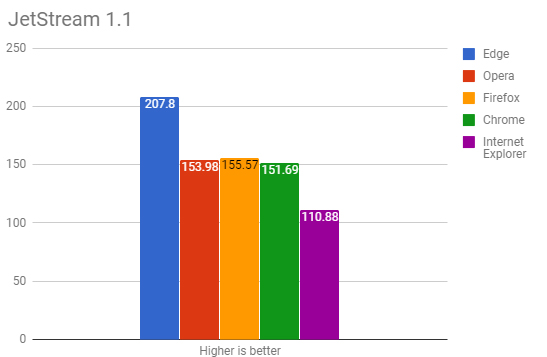
    Most Fastest Web browsers

    When considering browsing the speed is a factor of browsing . So here is the list of fastest web browsers.

    If you are using Windows , then the fastest browser for windows includes –

    • Microsoft Edge Browser
    • Opera
    • Chrome
    • Firefox Quantum
    • Internet Explorer

    Read Also : Best Laptops of the Year – Buy the Right Laptop for You

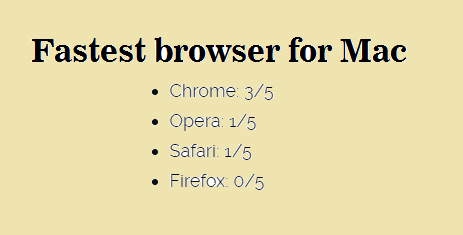
    If you are using Mac , then the fastest browser for Mac includes –

    • Google Chrome ( This is the best on different browser speed test for Mac)
    • Opera
    • Safari
    • Firefox

    If you are using Android , then the fastest browser for Android includes
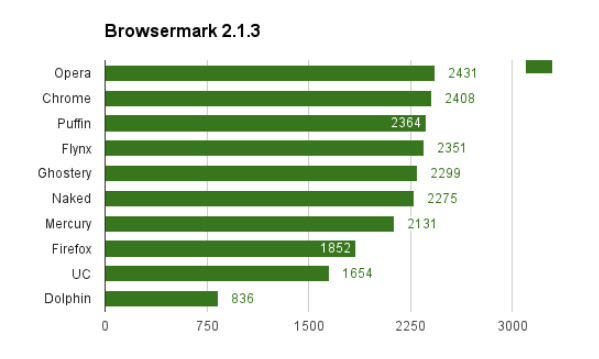
    • Puffin
    • Opera
    • Chrome
    • UC browser
    • Flynx
    • Naked
    • Mercury
    • Firefox
    • Dolphin browser

    Read Also : Best Note taking apps for PC & Smartphone

    If you are using iPhone , then the fastest browser for iPhone includes

    • Safari
    • Chrome
    • Puffin browser
    • Opera Mini
    • Dolphin Browser

    Best Web browsers for Computer & Smartphone

    Here we details the best web browser for computers and smartphone that fits as the fastest browser , safest web browser and low memory consuming browser .

    1)      Google Chrome

    One of the most user-friendly browsers that a lot many people use these days is Google Chrome. This browser is compatible with both computers and smart phones and it has an app size of 182.0 MB and 59.4 MB (IOS). When you normally get computer or a smart phone, Google Chrome will be already set since it is very friendly to the users and is also compatible with computers and android phones. Google chrome saves the history, you can give bookmarks etc.

    Moreover, Google Chrome also has the translator icon on tab which can be used to translate any language to English. Recently in some android phones, Google brought a new app that can detect your voice. If you want to set an alarm, you just have to say “OK Google” – then this app opens up and you can ask to set an alarm for you. OK Google will set the alarm and let you know that it is done. Isn’t this amazing? You do not have to type, our set an alarm by selecting the clock.

    Read Also : Best free office software for Computer & Smartphone

    2)      Mozilla Firefox

    Compatible with both computers and smart phones, Mozilla Firefox is an alternative to Google Chrome. This web browser has the same cross-platform that syncs just like the Google Chrome. One of the attractive features of Firefox is that it has a toggle switch to stop a video. Apart from this, Mozilla Firefox has a lot of extensions that can be added to your mobile. This can be done using the ad blockers to plug–ins by changing the feel of the web.

    The visual aesthetics of Mozilla Firefox is extremely good and customizability also can be done easily. This may be one reason that users choose Mozilla. This web browser works perfectly well in computers, but in android phones it does not work efficiently as Google Chrome.

    Read Also : Enable or Disable Superfetch for Windows

    3)      Opera and Opera Mini

    Opera is one of the web browsers, that are compatible with Android, iOS, Windows, Mac Os etc. The iOS users only get the light weight and data compressing Opera Mini to call, whereas the full opera on Android has a Google Now-Esque news feed. This news feed can be disabled if the user does not need it.   It also has a speed dial in which you can select your favorite sites quickly without searching much.

    Opera and Opera Mini offers a slick and clean browsing and searching for the users. You also get the option to create an Opera account through which you can sync the bookmarks and the history of the browsing with various devices. Data saving option is also possible with the main Opera App and it also supports compressing sites visa Opera’s servers. In Opera Min, the speed and data compression are the most attractive features that the users note. Like the main Opera, Opera Mini also includes ad blocking, offline pages, news feed etc.

    Read Also : Perfect Guide to Know All About Web server

    4)      Apple Safari

    Well, this browser will be familiar with all the users of Apple iPhone. Apple tries to add more features to this browser to make it easier for the users to get their work done. Some of the most recent add-on to it is – ad blocking and tighter Siri integration. The users can sync a lot of their work with other using the Apple Safari. When it comes to syncing the files, the users prefer Safari than Google Chrome.

    Apple Safari is compatible with iOS and is a favourite browser for all iPhone users. Unlike Google, Apple Safar shows no interest in tracking your browsing history which I find a good thing to do. Why do you need to get all your browsing history? Wait and watch to see more of their attractive features.

    Read Also : Best VPN For the Future

    5)      Puffin

    With 32.6MB (Android) of app size and 41.9MB (iOS), this web browser is compatible with computers and smart phones. But majority of the people might not even have heard about this browser. The main attraction of using Puffin is the speed. In just one click the page will open up and you can even see all the elements popping out quickly right in front of your eyes.

    This web browser is good for surfing in your computers since it is very fast. But it has problems in connecting with android phones. The disadvantage of Puffin is this – it struggles to cope with the newer technologies. One the other side, Puffin comes with features like gamepad overlay which helps in web gaming and it also has the advanced data saving tool with settings for image and video excellence. So if you want excellent speed to load pages, then Puffin is a good option.

    6)      Microsoft Edge

    Compatible with both computers and smart phones, Microsoft Edge is a very new web browser that has launched in beta form with App size of 66.9MB (iOS). You can test this web browser by signing up with then necessary details required. All you need to do is, install Test Flight on iOS. If you want it in your android phones, then join the waiting list of Microsoft Edge.

    Since this is a very newly launched web browser, you can expect change and added features by Microsoft. The major attracting of Edge is that it syncs with the desktop easily. Soon, you will be able to get access to Microsoft Edge in you androids and computers with efficient features.

    So, these are some of the web browsers that are compatible with both computers and smart phones. Every user would want different features to complete their work. While choosing an option from these web browsers, check the features and efficiency to meet your needs. Make your work easier by picking the right web browser and save your valuable time with these technologies.

  • Best Note taking apps for PC & Smartphone

    Best Note taking apps for PC & Smartphone

    Bored of note taking in traditional way , so here you can take a look at the latest note -taking method . Here we list out the Best Note taking apps for PC and Smartphone .

    At work, you will surely need to note down bullet points or you will need to note important tasks and other activities to be done. Since these days everyone uses computers and android phones, use of pen and paper has been reduced. So, in these computers and smart phones, where can you note down your important work easily? I am sure that you all might have come across various note-taking apps for computers and smart phones. These apps make it easier for you to remember your tasks and responsibilities.

    Best Note taking apps of the year

    You will never miss out to complete any work if you have noted all the points in your phone or computer. Now let us see what all note-taking apps are available these days to use in computers and smart phones. The note-taking apps mentioned below are some of the best cross-platform apps that make your work quick.

    Now of you ever want to note down anything you don’t have to look for pen and paper use these Best Note-taking apps for Android , iPhone and PC to take easy notes .

    Best Note taking apps for Windows

    If you want to make quick notes in your windows system you can now do it with the comfort of windows note taking apps .

    1. Quip
    2. Cortana
    3. Simple Note
    4. Microsoft OneNote
    5. Evernote
    6. Sticky Notes
    7. Notepad
    8. Scrble

    Read Also : Best free office software for Computer & Smartphone

    Best Note taking apps for Mac

    Below given is the list of best note taking apps for Mac .

    1. Evernote
    2. Microsoft OneNote
    3. Simple Note
    4. Bear
    5. Google Keep
    6. Zoho

    Read Also : Best VPN For the Future

    Best Note taking apps for iPhone / iPad – iOS note taking apps

    Like the above seen note taking softwares for windows and Mac , here is the list of note taking apps for iOS users .

    1. Apple Notes
    2. Bear
    3. Simple Note

    Best Note taking apps for Android

    1. ColorNote
    2. OneNote
    3. Google Keep
    4. EverNote
    5. SimpleNote
    6. LectureNotes
    7. Omni Notes

    Finally given above is the exclusive list of note taking apps for  Android users .

    Read Also : Enable or Disable Superfetch for Windows

    Best Note taking apps for Windows , Mac , Android & iPhone / iPad

    1)     OneNote

    OneNote is one of the best note taking apps with a number of features and majority of them are for free. Since OneNote comes from Microsoft, it integrates with Office tools like Ms Word, Excel etc. Thus, the tool becomes more powerful for you to use. In this note-taking app, you can write, type and draw images related to the notes in your own way.

    Another advantage of using OneNote is that, you can easily capture an image to add in the notes. You will not have to crop the image and waste your valuable time. OneNote will automatically crop the image you have selected to fit in the notes. Moreover, you can easily take the notes and refer for your future use. OneNote is compatible with both computers and smartphones.

    2)     EverNote

    This is the next note-taking app for your computers and android phones which is very powerful. EverNote can organize all your notes very efficientlyand it has a cloud storage space of 60MB to store your data online. Like OneNote App, you can add images to this note as well. But an extra feature of attaching the pages of a website is also available with EverNote App.

    This note-taking app is perfect for students since it can store any kind of data with any size and content. EverNote App is free for anyone to use but it only has a few features and it only provides a few of them to the user.

    Read Also : Must Have Smartwatch apps for Android and Apple watches

    3)     WorkFlowy

    Workflowy note-taking app works fully offline and it is also fast.  It also gives an instant access to the notes you have saved without searching for it from a number o tabs in your browser. This app is very simple and it only has a very minimal interface.  When you are creating a note and if you want to highlight or mark any points that are really important, you can do so with the help of hash tags.

    You can zoom in or zoom out the notes to read and also navigating this app is very easy. You can just use the mouse pointer to zoom in and zoom out the notes you have added. With this Workflowy App, you can share the notes with others at your office. You also have the option of hiding the notes and add to archive with just one click.

    4)     Google Keep

    With features like location reminder, alerts on pre-select times, Google Keep is our next choice of note-taking app which is hooked up to Google services. This app is compatible with IOS, Web, Android, Windows and Mac and has card based notes. Like Evernote and Onenote, you can add images along with the notes you jot down.

    Google Keep App can transcribe the notes you type or write. It has the feature to record even your handwriting. The notes you type will be recorded in the form of messages with its memo feature. You can also synchronize your notes from one device to another with the help of nifty OCR in Google Keep. Apart from these features, you get access to colour codes and attributes to make your notes look unique from the rest.

    Read Also : Google Datally App to Control Mobile Data & WiFi Finder

    5)     Standard Notes

    You can access this note-taking app online with widget support and it comes with 100% privacy and AES  – 265 encryption. The best highlight of using Standard Note is that you can access the notes you have created 5 years back. Isn’t that great? You can recheck all the important notes again if you require.  Standard Notes app is the only one note-taking app which has an end to end privacy. Thus, this app sounds suitable for both office and personal work. Standard notes App is compatible with iOS, Android, Windows, Web and Mac.

    To make your notes look more attractive, you get access to different themes that are changeable and it also allows you to add power extensions. You will never have to worry about losing any notes you have made in Standard Notes. This app is encryption protected with a secret key and no one can decrypt the notes. Only thing you have to remember always is the secret key. Without this, no one can retrieve the data.

    6) Dropbox Paper

    This app is a product of Dropbox in which you can work with your team. Dropbox Paper is another note-taking app that supports themes and is integrated to Dropbox. It also offers great collaboration tools. Usually, everyone uses Dropbox to save files in the cloud storage. The main advantage of using Dropbox Paper is, it gives a flexible workspace for the user to make notes easily.

    This app is very simple since it has a very minimal design aids. You can type your data or copy and paste the link of YouTube or you can even tweet using this Dropbox Paper note-taking app. If you are working in Dropbox as a team or with any of your team member, you can easily make notes with them, share comments and even embed images. For any kind of creative work, this app is one of the best choices.  This note-taking app called Dropbox Paper is free to use if you are an account holder of Dropbox.

    All these above mentioned note-taking apps are compatible with both computers and smart phones. You can use it from anywhere you want. Anybody can use these apps in their computers or in android phones. Read about each app and learn the advantages and disadvantages and choose the best app that suits your need. So, do not wait. Make use of these amazing note-taking apps to make your work easier and hassle-free.

  • Enable or Disable Superfetch for Windows

    Enable or Disable Superfetch for Windows

    Well some of you who launched to read this may have fairly an idea about super fetch in windows. Due to some reasons most of you would be looking out for how to enable or Disable Superfetch for Windows . If yes, then this is exclusively written to assist you. First of all for some of the non tech people let me introduce this term elaborately. Those who know please skip to next subheading don’t mind my lecture.

    What is super fetch ?

    Well superfetch technology is part of Window OS right from its vista version. It’s not a big deal to say that superfetch technology is one of the parts in windows memory manager.

    Read Also : The ultimate guide to make Windows run faster (Boost Computer Speed)

    Why Superfetch – Enable superfetch for windows

    Know what ? You should Enable Superfetch for Windows for particular reasons like these we gonna discuss .

    Basically Superfetch has two aims firstly it reduce boot time and secondly to makes sure that the applications that you use the most loads fast and more efficiently. Superfetch adapts your usage patterns.

    Let’s elaborate the first goal that is decreasing boot times. All through the Windows boot process, the same files need to be access at various different period of time. Superfetch also track record on which data along with files need to be accessed and when. It also stores all the track record data inside a trace file. During following boot, this information is used and helps to make the loading data/files faster and well-organized.

    Superfetch performs more tasks to make the boot process more efficient. It also helps to increase the access speed by rearranging the files stored on the disk in order to occupy the contiguous storage locations during the boot process. Basically it performs this as a schedule task on all three day and the some of the specific file layout gets stored in the Windows/Prefetch/Layout.ini.

    Read Also : Record iPhone iPad Screen on Windows & Mac

    Let’s elaborate the second goal that is to make applications open or load faster. Superfetch simply does this by pre-loading the applications that are used mostly by you in your main memory, based on not only the usage patterns but also when one access or use it. For example, if you have the same daily routine of opening the chrome – gmail, SuperFetch will pre-load these into memory in the morning and help to load fast.

    Superfetch for applications basically operates similarly as the boot variant does like, it traces what files are opened by an application during the first ten seconds that the application start up. It helps to load the proper data in memory at right times.

    Read Also : Best Garage Band Alternatives for Windows and Mac

    Superfetch & RAM

    Superfetch really serves great to make you use fullest capacity of your RAM. The high you’re RAM the more you reap super fetch benefit. Superfetch helps in maintains and improves system performance overtime. Superfetch is actually a feature introduced back on the windows vista and it will constantly analyze & adapt the RAM usage pattern and apps you run most often. Superfetch is something that every operating system must have.

    Enable or Disable Superfetch for Windows

    Now lets see the methods to Enable or Disable Superfetch for Windows step by step .

    Enable or Disable Superfetch in Services

    1. Press the Win+R keys to open Run, type services.msc into Run, and click/tap on OK to open Services.
    2. Double click/tap on the Superfetch service.

    Read Also : Create Virtual Desktop without Upgrading to Latest Windows OS

    Now to Enable Superfetch then

    • Firstly click to Change the Start-up type to Automatic.
    • Now click on the Start button and tap ok.
    • And now simply close services.

    One strong reason to disable superfetch for windows is that people experience enormous disk usage due to superfetch so if you want To Disable Superfetch then

    • Click and tap on the stop button appearing on your screen.
    • Now simply click on to Change the Start-up type to Disabled and after that click on
    • And now you can simply close Services.

    Read Also : Best Baby Monitor systems – WiFi & Night Vision Video Monitors

    How to turn on/off Superfetch in Windows 10 ?

    For latest Windows turn on/off superfetch with these steps

    1. Click on Run msc to open the Services Manager.
    2. Now simply Scroll down to Superfetch service.
    3. After that double tap on super fetch service to open Properties box.
    4. Now Click on Stop so as to end the process.
    5. Now simply make the start-up type Disabled by simply clicking on Apply.
    6. You can exit the Services Manager once you click to ok.
    7. You may have to restart your Windows 10 PC to end the process

    So we hope you guys found it useful either to enable windows superfetch or to disable windows superfetch technology .

  • Create Virtual Desktop without Upgrading to Latest Windows OS

    Create Virtual Desktop without Upgrading to Latest Windows OS

    This will help all to Create Virtual Desktop without Upgrading to Latest Windows OS . If you use Windows 7 or Windows 8 but need Windows 10 Virtual desktop Feature on Windows 7/8 then you can get the multiple desktop feature without upgrading to Latest Windows OS .

    Its a known fact that Mac & Linux had the virtual desktop feature from long . Microsoft has launched this officially through Windows 10 .

    Create Virtual Desktop without Upgrading to Latest Windows OS

    But do you guys know that Windows already has this Virtual desktop feature but its not enabled in our PC by default.

    So In this article we will guide you to Create Virtual Desktop on Windows 7 & Windows 8 without updating to latest Windows OS.

    Read Also : Use Multiple Desktops in Windows ( Virtual Desktop Feature )

    These days multi tasking has become the need of the hour . So when you are not having multiple monitor then this feature of multiple desktop function is really helpful . This helps you to use multiple virtual desktops on one PC.

    1. Go to Microsoft TechNet site – ( Find link here – https://technet.microsoft.com/en-in ) .
    2. Now from Download you have to download a freeware : Desktops v2.0 Windows Sysinternals.
    3. You can get it downloaded into your PC as a ZIP File.
    4. Now extract the EXE file by opening the ZIP folder.
    5. Now somewhere in your PC on a accessible location like in document stash the EXE file
    6. Now fire up program by double clicking it.
    7. Now run the installation on your Windows.
    8. At program startup set hotkeys.

    That’s it , the process of installation is done. You can use this on Windows XP higher versions to use virtual desktops.

    Read Also : Alt + Tab Windows Virtual Desktops / Multiple Desktop Function

    Now you can use virtual desktops in Windows without upgrading to new OS. The entire process of switching between the virtual desktops seems to be slow . But this gives you provision for creating four virtual desktops.

    If you look for some other alternative to Desktops v2.0 Windows Sysinternals then the recommendation is Dexpot . Because Dexpot allows to use multiple desktop function with more added features than Desktops v2.0 .

    Note – Windows Sysinternals is from Microsoft while Dexpot is just a third party app . If you are not using the licensed Windows OS then don’t try to use these methods to use virtual desktops .

    So this will help all the Windows XP higher version users to  Create Virtual Desktop without upgrading to latest Windows OS.

  • Enable / Disable Windows File Protection & Fix Windows File errors

    Enable / Disable Windows File Protection & Fix Windows File errors

    Enable / Disable Windows File Protection & Fix Windows File errors

    Today due to many kind of virus attacks and hacking we all are quite concerned about our data safety so here is the guide to Enable / Disable Windows File Protection  and also to end the frustrating problem associated with the file protection in windows .So here you can also find the ways to fix Windows File Protection errors.

    What is Windows File Protection ?

    The window file protection(WFP)  is a feature in Microsoft window that uses to prevent files that are required for window to run properly. To maintain system stability windows must restore the original version of these files. It is the system that helps you to retain or reserve your computer files, programs and operating system. Windows file protection is the security for Microsoft operating system(computer) to delete the files that has no file lock to prevent it from any defective cause. Windows file protection helps you to cover all files which the operating system installs, protect them   from deletion or from replacement by older or other version. It prevents critical system files and folders that are installed as a part of windows for example:- files, data, extension and some true type fonts.If a program or system  uses a different method to replace protected files, WFP restores the original files.

    Read Also : Top Satellite Car Radio Installation and specification guide

    Read Also : Best iTunes Cleanup Software for better iTunes experience

    Windows File Protection VS Windows Resource Protection

    We have already talked about windows file protection now we will see the work of windows resource protection or how windows resource different from windows file protection?? Windows Resource Protection (WRP) is also a system in Microsoft windows that prevents registered and essential system files, keys, folders as well as critical system files.

    If we see both WFP and WRP  have the same work to do i.e,to protect the files and folders system in the computer or Microsoft operating system. So, it can be said that Windows Resource Protection is the new name for windows file protection.

    Windows Resource Protection Vs. Windows file protection

    Windows Resource Protection is the new version of Windows File Protection but there are many difference between them as you can see given below:-

    1. WRP can also prevents several critical folders or files which includes extended registry values.
    2. WRP copies only those files that are needed to restart windows which is directly located at backup unlike Windows File Protection(WFP).
    3. The third difference between WRP and WFP is that windows resource protection applies strictly measure to protect files by setting.
    4. WRP also protects all its keys and sub-keys that can be used to check the files and folders.

    There are some other difference between them as well that WFP can do and WRP can’t like WFP can scan all the files at the next boot or immediately, can return to default setting and many more unlike WRP.

    Read Also : Connect dual displays / monitors to one computer on Windows & MAC

    Read Also : Factory reset iPhone without password or iTunes with data backup

    How to Enable / Disable Windows File Protection?

    To protect your device from being overwritten or automatic installation you need to Enable / Disable Windows File Protection . Windows file protection can be enabled by default in all version of Microsoft windows, You need to follow just few steps to Enable / Disable Windows File Protection:-

    1. First hold the windows key and press “R” to conduct the Run dialogue box.
    2. Now type “Regedit“, then select “OK” button.
    3. Registry Editor will open, and Navigate to the following registry keys:-                                                                            1)HKEY_LOCAL_MACHINE   2)SOFTWARE   3)MICROSOFT   4)WINDOWS NT   5)CURRENT VERSION   6)WINLOGON
    4. Now search the key “SFCDisable” and double click on it. You can also create it by  right_clicking the “winlogon” folder and choose “new” } D WORD.
    5. After that you can select the value to one of the following:-
    • 1- for Disable first, prompt at boot to enable it.
    • 2- for  Disable next boot, but no prompt to enable
    • 4- for Enabled, with popups disabled
    • ffffff9d- for completely disable
    • 0 – for enable

    6. You will receive a message of restart windows that says-Windows file protection is not active on this system. So would you like to enable your windows file now? And this will enable windows file protection until the next system restarts. Choose “YES’ to restart windows file protection.

    Read Also : The ultimate guide to make Windows run faster (Boost Computer Speed)

    FIX WINDOWS FILE PROTECTION ERROR!

    To maintain the files and windows you need to take care of your computer from any harm or virus. Windows File Protection this message will appear on your screen for those files that are required to run properly but by default replaced by some unorganized version.

    It is simply the Windows File Protection error that disable the windows update and for that Microsoft offers a fix. You can also SCAN your computer or windows. By following given steps you can also fix error:-

    1. First start your computer in safe mode, you can also press F8 repeatedly as you turn it on.
    2. Now turn on or run an anti virus program. Windows comes with a tool known as malicious software removal tool, which you can start } Run and type “MRT”. This will work to fix error.
    3. Finally Restart your computer normally. Go to menu and start Run dialogue. Type “regsvr32 initpki.dll”(*no quote) and press “OK”. This will restart the registry files affected by the  unexpected defect or bug. Now you can restart your computer again.

    Although it is not tough to fix error or prevent your computer from any harm or virus but you only required is to maintain your windows from any misused or misplaced because sometimes it happens that windows automatically install (May be including virus also) any application in your computer that straightly affect your system and can defect it.

  • Connect dual displays / monitors to one computer on Windows & MAC

    Connect dual displays / monitors to one computer on Windows & MAC

    Connect dual displays/monitors to one computer

    A much more screen space is provided by dual displays/monitors to one computer and it can be very useful for increasing efficiency and productivity. The two monitors can be easily configured to show either the same image or give you a much larger screen. Follow this article to get your monitors set up right the first time.Here will discuss methods to connect dual displays

    Method One of Two to connect dual displays:Windows

    Here is the first method by which you can connect dual displays or monitor in one computer where here the step by step guide for connecting dual system to one windows computer.

    For Windows Users to connect dual displays

    1)

    First step to connect dual displays is that you need to check your ports and also you will need two video out connections on the back of your computer one for each monitor.

    Basically there are mainly four types of connections which are listed here from oldest to newest: VGA, DVI, HDMI and Display Port. So for the best results we can use two of the same connectors to connect dual displays.

    The monitors are directly connected to the motherboard or the graphics card and most graphic cards support two or more monitor connections. Although most motherboards support one and sometimes two if you have a monitor with a VGA cable and if your port is DVI then you can purchase an adapter that will connect to your VGA connector and allow you to hook it up to a DVI port.

    Though the ability to connect dual displays depends completely on the power of your graphics card and CPU, running a second monitor puts more strain on your system. A more capable graphics card means the display has more pixels which makes a connect to dual displays possible and this ends your first step to connect dual displays on your computer.

    Read Also : The ultimate guide to make Windows run faster (Boost Computer Speed)

    2)

    Now for the second step to connect dual displays you can connect the 2nd monitor to the open port on your computer and in most cases the Windows OS will intrinsically detect the new monitor but if it does not restart the computer then to connect a another monitor there is only one port on your motherboard or graphics card. You will need to install a brand new and latest graphics card in order to attach the secondary monitor. Whatever monitor you wish to choose has no compulsion to be from the same vendor or the same size but for a reasonable viewing both the monitors should be of the same size so that your desktop stays consistent and this ends the second step to connect dual displays on your computer.

    3)

    Now in the third step to connect dual displays you need to follow the monitor setup wizard. In majority of the cases this will automatically start when a new monitor is plugged in and you will be given options to either mirror or extend your desktop depending on your wish. The option of mirroring mirror’s what is shown on your original monitor and this is most useful for giving seminars,presentations etc wherever your machine may be connected either to a projector or a TV.

    The protraction makes the secondary monitor another screen for your desktop allowing you to drag and drop different windows and icons onto the other monitor which would give you more space to multitask.You can even set the second monitor as your primary desktop monitor and this is really useful if you attach a monitor to a laptop and want to use it instead of your laptop’s display so this ends your third step to connect dual displays on your computer.

    Read Also : uBlock Origin Replaces Adblock plus(Best Adblock Plus Alternative)

    4)

    This is the last step to connect dual displays manually. If either your monitor wizard does not automatically start or you want to change the settings for yourself you can use the display Settings tool. The procedure is to right-click the desktop and then select Properties or Personalize. You then decide to click on display settings from the list of available options and now you would see icons with various different numbers representing your attached monitors but if by any chance, if one is not working then that would look grayish in color. Now you can select the second monitor and choose to protract your desktop or replicate your desktop. Your options may rely on the graphics card that you have installed and you may need to make these changes from within your nVidia or ATI control panels. If you have these already installed then they can be found in your start up menu and this ends your final step to connect dual displays on windows .

    Method Two of Two to connect dual displays:MAC

    Here is the second method by which you can connect dual monitor in one computer where here the step by step guide for connecting dual system to one MAC computer.

    For Mac OS X Users to connect dual displays

    1)

    The first step to connect dual displays for the Mac users is that your Mac must have available video connectors to attach a second monitor. Since each display will need its own video cable, so to facilitate it there are several types of connectors that you may come across. Depending on the age of your Mac:

    VGA – This is one of the the oldest analog standard and most monitors support being connected via VGA cables and DVI – This is a core step up from VGA in quality. Although it is being replaced by HDMI and display port there are very few MacBooks that use the Mini-DVI which requires an additional adapter to connect to a standard DVI cable.
    Display port or Thunderbolt – This is one of the most common connectors found on newer Macs because Thunderbolt is the newer version of Display port and can carry both audio and video signals . By any chance if your monitor only supports HDMI then you will need a Thunderbolt-to-HDMI adapter.

    HDMI – This is the standard for all digital display devices and majority of every new display manufactured in the last few years supports HDMI connections because HDMI can carry both audio as well as video signal.
    All the above given information was necessary for upcoming steps to connect dual displays on your computer.

    Read Also : Kindle Fire Silk Browser Alternatives

    2)

    The second step to connect dual displays is similar as of windows because most displays will be recognized automatically and you will be prompted to choose your choice of settings and if you choose to mirror then the same image will be shown on both monitors. If you decide to choose extend then your desktop will stretch across both monitors but if the display is not recognized then open the Displays preferences and click Detect Displays and this ends your second step to connect dual displays on MAC.

    Read Also : Record iPhone iPad Screen on Windows & Mac

    3)

    The third step to connect dual displays requires you to adjust your settings manually. If you would like to change the settings yourself then you can do so through the display’s preferences menu. Now get there and click on the the Apple menu and select System Preferences and open the Displays tool. Now to extend the desktop you can click on Arrangement and then follow the simple instructions on the screen. Now to mirror the image you have to set both your displays to the same resolution. Now finally click on Arrangement and then click on Mirror Displays and this ends your final step to connect dual displays on your computer.

    These are the ways to connect dual displays on both Windows and MAC computers.

  • The ultimate guide to make Windows run faster (Boost Computer Speed)

    The ultimate guide to make Windows run faster (Boost Computer Speed)

    When you buy a new laptop or a PC, it seems to start up quickly in the beginning. But after some time when, you install it with some games or apps and fill the hard drive with music, documents, photos, it slows down and takes minutes to start up. There are various things which can easily make the Windows slow, but you should be aware of restoring with most of its original speed without spending any money. Here we will discuss the ways to make Windows run faster.

    The ultimate guide to make Windows run faster (Boost Computer Speed)

    If you had a laptop which has traditional hard drive rather than the modern SSD, then it can be well worth spending some time as well as money for buying SSD. It is the single and most effective performance upgrade or most people.

    Not considering the computer hardware, there are many things which you can easily do to speed up windows of your laptop or computer.

    If your computer is running slow, you don’t need to just spend thousand dollars to a technician to fix it, with this ultimate guide you can get some tips to make your computer run faster. This guide is for the ones who look out for the option for running their computers faster. Through this guide, I will explain you step by step for the Windows 7, 8, 8.1 and Windows 10.

    Some steps for Windows 7 to Run it Faster:

    Here is the guide to make Windows run faster especially for your Windows 7

    • Uninstall unwanted programs and services from startup:

    To remove the unwanted programs just type misconfig in the run window, then go to the Startup tab and uncheck the programs as well as services which you did not require during the startup. Do not remove any necessary startup program. This will make Windows run faster .

    • Disable Aero Experience:

    If you want to just improve the performance of your desktop not the appearance than disabling experience in your Windows 7. Disabling it will definitely affect the performance of your PC and you can gain some physical memory.

    Read Also : uBlock Origin Replaces Adblock plus(Best Adblock Plus Alternative)

    • Increase virtual memory:

    The Windows 7 consumes much memory than Windows XP and lesser than Windows Vista. If you are a heavy computer user who used to open many programs as well as windows then you can easily increase your virtual memory of your desktop. Hard disk space will be used as the virtual memory so as to keep the temporary information which is much rarely used by the programs or OS. While increasing the virtual memory of your desktop just make sure that OS is working smoothly.This will speed up Windows 7 Computer . For this step just right click on My Computer, select the properties options, then go to advanced tab and click on setting button which is under performance.

    Afterward go to advanced tab in next window, press change button under the virtual memory

    By going here you will see the current virtual memory size. Virtual memory is also known as page filing. Next, you can make the screen under custom size and enter the size you want to allocate for virtual memory. The size depends on the hard disk size and virtual memory. Just make sure that it is not less than the recommended size of system

    • Disable Visual Effects

    Disabling the visual effects will help you in reducing the load on RAM and VGA. Just go to advanced option again by right click and go to the option of setting the here click on Visual effect and then set it as adjust the best performance. This will bring all visual effects to a standard level and also help to make Windows run faster.

    • Disk Clean Up:

    Just remove the unwanted and temporary files from the disk of your Windows 7. This will further reduce the access time on the system and your files to make Windows 7 run faster.

    For this step, you need to go on each disk and then right click on it where you will get the option of properties and then click on the disk cleanup button.

    • Defragment disks:

    The defragmentation helps in improving the access time of all the files by managing free space and arranging the locations of the files on the disks. It is generally advised to run the defragment tool frequently when you have a lot of data on your computer. For defragmentation step, you need to go to properties, of each disk and then select the defragmentation under each tool and start. The defragmentation runs according to to the size of partition and data and make Windows run faster.

    • Run error check on the disks:

    Another method to improve the performance of the disk this will check and correct any system file or physical disk error on Windows 7 computer.

    For this step select the error check under the tools in each of the disk with both options selected. If a partition is system then boot or paging file then error check will get started at next boot.

    • Disable side bar:

    If you are not using the sidebar and gadgets in your desktop then remove them as this will help to gain some resources on RAM.This will make Windows run faster.

    • Disable windows defender:

    If you are using third party protection software such as Norton, AVG, MacAfee, etc then just disable windows defender ass it does the same work. So, it is not necessary to use two similar programs same time as it can make system load much. For disabling windows defender visit control panel.One thing you can do to make Windows run faster.

    • Disable user access control:

    User Access Control(UAC) is a window pop up for the administrative tasks that require actions. In windows, 7 UAC does not hamper you such as in Windows Vista but still, to run faster you can disable it.

    • Compatibility of drivers and programs:

    Just make sure that the drivers you are installing have compatibility with your windows. Installing the non compatible driver in your desktop can cause issues with the system performance and sometimes crash your system.

    • Disable Indexing:

    The indexing helps in improving the speed of the Windows search as when you search a file or folder on the Windows, and if that file or folder is already indexed by indexing service results will instantly appear from the indexed cache.  But if you are using the third party indexing search program such ass the Ava Finder or other then disable indexing service. Indexing can be found in the control panel>Indexing>Modify button.

    • Eliminate the applications and utilities running automatically:

    Each program or app you install nowadays has some part of it which runs in the background as well who runs and take up the precious resources that causes speed issues on windows system.

    There are various things which can be managed through the AutoRun, but with this guide, i will explain you some tabs only.

    • Services: Do check out this tab and uncheck each thing which references the software that is not in use. Also, you see some services which are related to the old printer or smartphone you had used once. Just be careful and err on the side of caution and don’t uncheck anything unless you are sure completely that is not in use.
    • Scheduled tasks: This tab shows the program which is scheduled to be run at some specific time. Also, it definitely has some utilities which check for software updates.
    • Internet Explorer: Use this tab if you use the internet on this browser. Remove the plugins from here usually some malware bytes clean this butt you will find some browser bars and other utilities left.

    Read Also : Kindle Fire Silk Browser Alternatives

    Some steps for Windows 8 and 8.1 to Run it Faster:

    If you are worried about the Windows 8 performance or windows 8.1 speed then here is the guide to increase windows 8 speed effectively.

    Remove the junk and duplicate files:

    If an individual is using his laptop for several years then surely it gets filled up with the data in hard drive which results in decreasing its performance. The performance decreases because now your laptop needs to go through all the unnecessary junk file in order to get the required file. The best solution for it is to download the software known ass Easy Duplicate Finder which is much easy to install and work. This software searches all the duplicate files on Windows 8 and 8.1.

    Uninstall programs, not in use:

    Just make sure to uninstall all the programs which you think are not in the use anymore as it might happen that they are running in the background. Don’t worry for this you do not need to download or install much software simply search uninstall on the windows search and select under settings. Afterward, you will see the list of the programs and its sizes. Just scroll down the list and uninstall the program which is not in use.

    Defragmentation:

    The good news is that in Windows 8 and 8.1, you do not need to worry about the defragment as the defragmentation takes place once in a week. If you want to check that defragmentation is taking place automatically in your laptop then, search defragment by tapping on windows button and then click on Defragment and optimize your drives.This helps to make Windows run faster.

    Remove unwanted programs from launch:

    There are various programs which start up when the laptop is being started and the user does not need it. For getting rid of the issue a user needs to press Ctrl+Alt+Delete simultaneously and the select Task Manager. After visiting the task manager go to the start up the menu within task manager where you can see the list of the programs which are being launched during the startup disable the programs which you think are not to be used during startup.This will make Windows run faster.

    Note: You can also try all the steps which are used for Windows 7 and try them as well for the Windows 8 and 8.1 to keep your laptop faster and smoother.

    Read Also : Record iPhone iPad Screen on Windows & Mac

    Some steps for Windows 10 to Run it Faster:

    Here are the tips to run your Windows 10 faster . So this will help to boost windows 10 performance easily.

    Disable program run on startup:

    If you are feeling that your windows id much sluggish them, surely your window is running with various programs to be run in the background which is not in use or been used rarely.

    Adjust Performance Options:

    If you do not care about the look of the windows and want to improve its performance then you can change some settings to adjust for best performance. For this go to control panel and then click on the system and security then click on a system than on advanced system settings then select advanced and finally select settings in the performance option.

    From this performance option, you can easily select and adjust for the best performance to get the most performance. Else you can select the Custom and check fancy windows stuff you like.

    Scan for malware:

    Usually, malware is one of the main reason for the less performance issue in the Windows. there are three tools which can be used to check this issue such as Malwarebytes, Spybot, and Microsoft security essentials, All the tools used for the malware are free to be used and they are best for finding the malware on your computer system.

    Scan for Virus:

    if you have a trustworthy anti-virus package such as Symantec, McAfee, or Kaspersky then just ensure that it is activated as well as updated. if no antivirus is present then install a free AVG anti-virus and scan with it.

    Read Also : WhatsApp Exclusive Guide – Everything about WhatsApp Features

    Conclusion:

    With this guide, you will get the steps for making the performance faster of the computer.This will help you to Boost speed and performance for Windows 7,8,8.1, or 10. You do not need to spend any amount on the technician to speed up your computer now.

  • Best Garage Band Alternatives for Windows and Mac

    Best Garage Band Alternatives for Windows and Mac

    ­In this reforming & evolving world,almost everything can be accomplished with few computer clicks. This article will be on the Best Garage Band Alternatives.

    You can do video calling,audio calling via internet,can do online chatting ,photo editing,paying bills online,transferring Money online,filling FIR online ,booking hotels or cabs online too,even shopping all the groceries online too.

    Similarly , Garage Band is one of the professional & popular software manufactured by Apple to record audio,edit music etc

    What is a GarageBand?

    GarageBand is a line of apple’s digital audio workstations for mac OS & iOS. It includes a full fledged sound library that involves instruments,presets for guitar & voice & so on. It enables users to create audio files via instruments,podcasts & many more. It assists & works well on Apple devices such as ,mac,macbooks,iPads & iPhones . Although an apple device does not contain incorporated GarageBand & hence can be downloaded from the app store.

    So,let us frame a list of some of the Best Garage Band Alternatives both for devices which supports GarageBand and not.

    In the techno era of advancement,when every single pupil desires to become technically /digitally superior.

    Who don’t want to try anything new ?

    Practicing anything new gives you a great deal of amusement,deed & evidently makes us do better judgement among all obtainable software /gadgets & if you’re missing your garage band & still want to amend than here’s a list of some astounding ,foremost suited Best Garage Band Alternatives for you to choose:

    Read Also : Best iTunes Cleanup Software for better iTunes experience

    Best garage band alternatives for Mac:

    Although GarageBand is a colossal tool to create audio files on your Mac. Its perfect for a fresher since it provides straightforward to use interface & the best part is its completely free.

    But if you wanna try out something new then there are huge number of best alternatives to garage band for Mac –

    1. Audacity:

    • Its paid.
    • Can be downloaded from Audacity

      Attributes:

    • Its an open source project raised & perpetuated by volunteers.For the freshers,it might look like a basic ,no ruffle product,but in fact, Audacity is a very competent system that can attain efficient outcomes.
    • Besides the widespread recording & editing functions,there are also the options to record multiple channels at once,add cross fades & even overdubs a stirring track- for clever vocal harmonies or so.
    • You can also exert filters to a track after you vanished background hums using noise ejection feature.It might not eradicate everything , but its still a great amendment.
    • It also holds the ability to advancing the pitch of a track without altering the tempo & vice versa,in addition,a reasonable  amount of built in effects that can be applied to recordings    

    Accessibility :

    • Although ,its dynamic ,but it assuredly isn’t pretty. It has not a majestic user interface,whereas garage band offers neat,study user interface & supports a modern design.
    • Menus & buttons are somewhat colorless,enforcing an initial impression that can be a bit menacing.

    Supported formats:

    • WAV,AIFF,AU,FLAC & Ogg vorbis,mp3,AC3,AAC & mp4 are also available via free downloads.

    Supported 3rd party hardware:

    • No official list,but many USB devices & microphones are compatible with it.LogicPro X:
    • Its a paid service.
    • Can be downloaded from mac app store

    Read Also : Top Satellite Car Radio Installation and specification guide


    2. Logic Pro X:

    • Its paid.
    • Can be downloaded from Mac App store

      Attributes:

    • Its the premier music suite available.
    • Its a full fledge executive level software studio.
    • Its lodged with quality implicit appliances -a huge library of loops,synthesisers & other audio tools .
    • It has a prodigious physical modelling synth ,ultrabeat drum synth & sequencer.
    • Plus it incorporates EXS 24 sampler which is particularly splendid .
    • It has an aptness of recording up to an utmost of 255 tracks in all,for each composition with ability to lay down multiple tracks at once.
    • It propounds complex & dynamic editing features ,offering you control over MIDI patterns,audio tracks ,in addition you can automate changes on the fly.
    • You can also correct any erring vocalists or dawdling guitar solo through a sort of a tone,Flex pitch.
    • It also authorizes you to switch between playlists & editing on any track making it uncomplicated to paddle with imaginative ideas.

    Accessability:

    • It offers a graceful layout ,uncomplicated comprehend & operate  some hidden advanced controls which can be unhidden with simple steps.
    • Recently, apple presented the option for ipad & iPhone users to upload logic files to icloud.

    Supported formats :

    • AAF,OMF,open TL,XML(final cut pro) projects. Plus AIFF,WAV,CAF,SDII,mp3,mp4 & MIDI output options.

    Supported third party hardware:

    • Core audio device are compatible

    Read Also : Best Apple Watch Alternatives-Affordable Gadgets


    3. Ableton live 9:

    • Its paid
    • Avaibale at Ableton

      Attributes:

    • DAWS(digital audio workstations )
    • Its quite distinctive ,usually you’ll useca music program to record & dispose parts sequentially in a timeline .
    • It also contains a mode called session which permits you to create shorter clips of music that are held in banks
    • You can also demonstrate with creating textures & riffs
    • If you’re satisfied with the various elements you then press a global record button & trigger the clips alive,generally via a MIDI controller.

    Accessibility:

    • The erudition curve it proffers ,can be a little abrupt. You cab be required to invest in some sirf of control device as well but a computer keyboard can be portrayed to trigger various clips.
    • It possesses a wealth of sound creation modules & sample libraries, plus unconventional editing controls that are executed in real time . After mastering the controls,you’ll find it an easy to use program.

    Supported formats:

    • WAV,AIFF,mp3,Ogg,Vorbis,FLAC

    Supported 3rd party hardware:

    • Various MIDI controller,plus a bespoke Ableton control surface(push 2) that is paid.

    4.Reason Essentials 9:

    • Its paid.
    • Can be downloaded from reason essentials 9

      Attributes:

    • Its one of the most favoured music creation platform around. Its one of the best paid alternative to Garageband .
    • It involves standout features which is generally of the nature of exceptional synthesisers ,sound modules & virtual instruments .
    • Each one comes complete  with dials & sliders that look emphatically analogous in nature .
    • It is boosted with glorious effects that can create sonic landscapes ,mangle audio into enchanting new textures & authorizes one to build detailed & stomping drum motifs .

    Accessability:

    • User need to learn firstly, how to operate ,however its almost analogous to Ableton live.
    • Users finds it exciting to experiment with due to high calibre sounds .

    Supported formats:

    • AIFF,WAV,REX

    Supported 3rd party hardware :

    • Pretty much any media controller .
    • You can check out other astonishing  garage band alternatives too like-
    • Cubase elements 9(paid )
    • Reaper 5 (paid)
    • MuLab 7(free or paid both)
    • Ardour (free )
    • Ohm studio (free for 1st 10 projects)

    Best garage band alternatives for Window

    Now ,look at best garage band alternatives for your windows users :

    1. Audio tool:

    • Its a web browser based tool that authorizes you to incorporate music online & it also unites some dynamic attributes.

      Attributes:

    • Its a web browser based tool that authorizes you to incorporate music online & it also unites some dynamic attributes.
    • It allows you to store all your sample tracks in the cloud ,so that one can retrieve it from any where when necessary.
    • It requests no singular software to be installed ,you can instantly work upon it .
    • The final product can be dispensed  on social media like Fb,YouTube etc
    • Its an ideal tool for alliance & it works with a diversity of applications & devices.
    • It also grants you to remix all downloadable sample tracks available.
    • It is built with numerous musical instruments,mixing options,effects & many more.

    2. Mixcraft 7:

    • Its paid with free trial.
    • Like garage band ,it proffers a use friendly interface & a boundless hub of loops that could help you to create music in an attainable manner.
    • Its an easy to use tool,that permits one to consolidate down the tracks.
    • Even a fresher, who don’t have any idea or experience  of using any such software can assimilate  very easily. All you are entailed to do,is to drag & drop the loops to start petitioning them.
    • It also sanctions you to edit videos as well & it comes with a great assortment of plugins that authorizes you to add astounding effects .

    Other best garage band alternatives for window users are-

    • Soundation studio
    • Music Maker Jam(free with in app purchases)
    • FL studio 12(paid)
    • Reaper(paid )
    • LMMS(free,open source)
    • Stage light(paid)

    Yes, there are several Best Garage Band Alternatives that proffers an analogous set of features to GarageBand that you can install on your PC. Whether you want to work methodically instead of getting up with some loops,these apps will be a great platform for it.