This is all about Samsung Pay , here is the exclusive guide on Samsung pay with all FAQ related to Samsung Pay .
Samsung Pay Guide with Exclusive Samsung Pay FAQ
We are presently living in a ‘Digital Era’ where everything is done online. This has been one of the tremendous transformations of technology seen in recent years. We have got online shopping through sites like Amazon, Flipkart, eBay and so on. The transformation begins here. They have options to pay online through Credit or Debit Cards. Digital payment is involved here.
And now? Technology has made it more convenient and ‘Cash free’. Even in supermarkets and malls, they accept cash free payments such as Paytm, wherein a QR Code is scanned to do this task. There you go. The payment is done in a second. In other countries, PayPal is in use.
Did you know? The latest trend in the digital payment is the Samsung Pay.
Here is the Exclusive Samsung Pay Guide with Exclusive Samsung Pay FAQ that explains a lot about everything related to Samsung pay service.
Let’s begin the Samsung Pay Guide by knowing about what exactly is this novel way of making payment “Samsung Pay “.
What is Samsung Pay ?
Samsung Pay is a payment via mobile, as well as a digital wallet service designed by Samsung Electronics, enabling the users to make payments using compatible smartphones and other Samsung devices. This service has a good support for contactless payments; i.e. payments through debit or credit cards or other devices via Near-Field Communication (NFC); along with Magnetic Secure Transmission which also enables Contactless payments via magnetic stripe and usual contactless cards.
This payment service was designed from the creative asset of LoopPay, group funded startup company bought by Samsung.
Samsung Pay Compatibility
Here is the list of devices that supports Samsung Pay .
Top-listed smartphones that supports Samsung pay
Galaxy S
# Samsung Galaxy S6 (includes S6 Edge, Active & Edge+)
# Samsung Galaxy S7 (includes S7 Edge & Active)
# Samsung Galaxy S8 (S8+ & Active)
Galaxy Note
# Samsung Galaxy Note 5
# Samsung Galaxy Note 7 (*discontinued*)
# Samsung Galaxy Note FE
#Samsung Galaxy Note 8
Other Smartphones supporting Samsung Pay
# Samsung Galaxy A5 (2016)
# Samsung Galaxy A7 (2016)
# Samsung Galaxy A8 (2016) -accessible to Samsung Pay users in South Korea
# Samsung Galaxy A9 (2016) -Samsung Pay users in Brazil & China
# Samsung Galaxy A9 Pro (2016) -Samsung Pay users in Brazil, China, India & South East Asia
# Samsung Galaxy A3 (2017) -accessible to most of the countries except Europe
# Samsung Galaxy A5 (2017)
# Samsung Galaxy A7 (2017)
Smartwatches supporting Samsung Pay
# Samsung Gear S2 (NFC access only)
# Samsung Gear S3 (MFS & NFC)
Here is the devices and smartwatches & smartphones supporting Samsung Pay.
How Samsung Pay Works ?
As you know that Samsung Pay is already in great demand and in use in India, it is high time you get to know how it really works. Samsung Pay can be accessed only by those having the latest version of Samsung smartphones; the Samsung A series, and a few versions of Galaxy S6 & Galaxy S7.
Here we will discuss on the working of Samsung Pay app , i mean how Samsung Pay works.
At first, look out for the Samsung Pay app on your phone. Set up the app for payments. To let the app that you are using it, it is important that you either user the fingerprint or a PIN. Obviously, it is the fingerprint that would be the fastest to access, once the app is setup. However, if your phone or device does not respond well, it would be ideal to choose the PIN version for recognition.
Secondly, you have to connect Samsung pay app to credit card or the mobile wallet. Remember that this app does not support credit cards of all Banks, and also not all the mobile wallets. In such cases, it is ideal to use Paytm. It is quite easy to use if you link the Credit Card or the Debit card or even a particular Bank is supported. You could save an image of the credit card or enter the details manually.
Thirdly, connect the Paytm through an OTP (One Time Password), which you can get as SMS. Now, you are all set. Go shopping with your phone and you can make payments. Samsung Pay can be used anywhere, as it uses NFC and MST (Magnetic Secure Transmission); this means that he does not have to use the latest gadget to accept payments through Samsung Pay.
Hence, to make payments easier, you just have to get the Samsung Pay app and hold the phone closer to the top or side of the swiping machine. However, with the difference in each device, there might be some issues initially. Don’t get panic.
Samsung Pay Guide : How to Use Samsung Pay
Samsung Pay is the most innovative way to make cashless as well as cardless and most importantly, the ‘walletless’ payments. If you are worried that you haven’t got your credit in you wallet, don’t get panic. If you have linked your Credit card to Samsung Pay, consider your work done. All you need to do is open up the pay app, keep it close to the swipe machine; there you are , the payment is complete.
Now, let us get to know this latest app through Samsung Pay Guide.
Get Setup- Fast
Samsung Pay’s setup is a task done in a snap.
Here is the steps to setup Samsung Pay and add your card on Samsung Pay –
# Just add Debit and the Credit Cards through a few simple steps.
# You start by clicking the Samsung Pay icon on your phone or device.
# As it prompts, open the camera app to scan the credit card information and save the account with fingerprint or PIN.
Read Also : PayPal Vs Venmo : Best Online Money Transfer System Compared
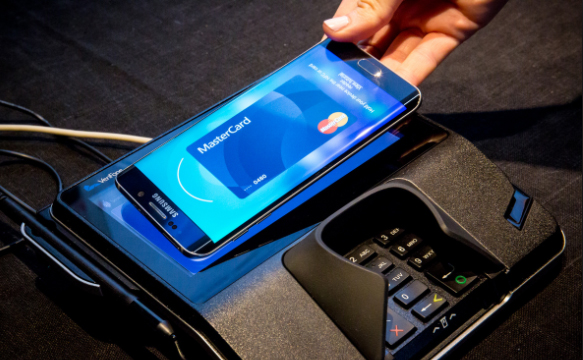
Easy like NFC or simple Swipe
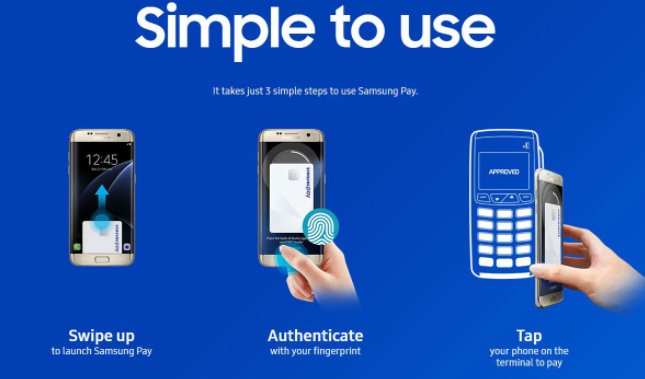
Here is the simple steps on how to use Samsung Pay app to make payments –
# As the credit card and debit card information are loaded, all you need to do is swipe the lock-screen up from the bottom of the screen display so as to start the Samsung Pay app.
# If the terminal of the retailer has a support for NFC, just keep the phone near the NFC receiving area.
# For a normal card swipe machine, keep the phone vertically over the slot until you get a vibration for the payment confirmation.
Samsung Pay’s licensed technology has ensured the compatibility with both, magnetic stripe card readers or the MTS and the NFC depots; hence proving the virtual acceptance anywhere when swiped or the card being tapped.
Read Also : Safe Online transactions Tips & top 12 safe online transactions methods
- Safe & Secure
Is it Samsung Pay really safe method to pay ?
Approved by Samsung KNOX security program, Samsung Pay is a very safe technique of making payments. These transactions would be approved only after the fingerprint or the PIN is configured to verify your identity, hence card is displayed for representation instead of showing the card number. The retailer does not have to verify your credit card number or any personal information since only a code is shared through this transaction process.
Read Also : Pros and cons of credit cards – All the Hidden Facts on Credit cards
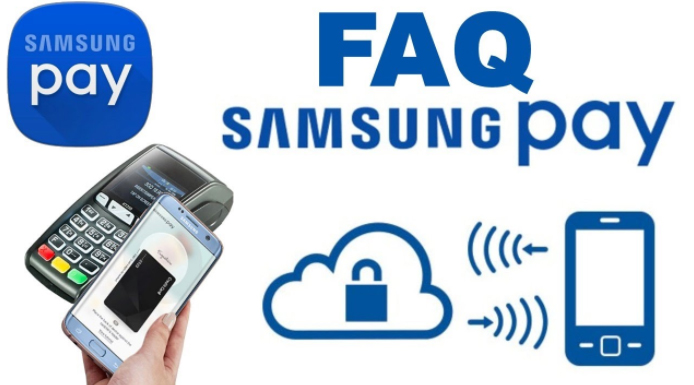
Samsung Pay FAQ
Samsung Pay is all set to take a permanent space as the most innovative way in making payments and ‘swipe’ away the regular plastic cards from the wallet. This app works almost everywhere and even on the conventional magnetic POS machines.
The Samsung Pay FAQs are here to answer your queries about all that you need to know about this latest app.
Let’s begin:
Where is Samsung Pay Available ( Countries supporting Samsung Pay )
Presently, this app is accessible in the U.S, the U.K, South Korea, China, Australia, Brazil, Canada, Singapore, Spain, India, HongKong, Malaysia, Puerto Rico, Russia, Sweden, Switzerland, Thailand and the UAE.
What device/bank/card/Carrier do I have to use for Samsung Pay
Devices supporting Samsung Pay : Samsung Pay app works with the Galaxy S8, S8 Plus, S7, S7 Edge, S6 Edge+, S6, S6 Edge, S6 Active, & Galaxy Note 5. You can also access on Gear S2 (to use only on NFC depot) & Gear S3.
Carriers supporting Samsung Pay : Most carriers in the U.S has a great support for Samsung Pay- AT&T, MetroPCS, Sprint, Verizon & US Cellular.
Cards supporting Samsung pay : The most compatible cards for Samsung Pay are Visa, MasterCard, Discover or American Express.
Where can I use Samsung Pay
Samsung is content about the fact that its app Samsung Pay works in almost all the POS (Point Of Sale) machines- NFC, MTS or the Magnetic Secure Transmission and the EMV (Europay, Mastercard & Visa) depot for the chip-based cards. However, this app does not work on those traditional card readers that we see at gas stations and ATMs.
One of the POS system where the Samsung Pay app does not work is the iPad based payment depot named Shopkeep. Though it finds that you were to make a payment, yet, it would show that Samsung Pay is not a valid credit card.
Read Also : Venmo User Guide for Safe Transactions – Venmo payment
Read Also : Credit Card Debt Pay Off- 5 Things to Consider About Debt Pay Off
Read Also : Pros and cons of credit cards – All the Hidden Facts on Credit cards
What does the Samsung Pay setup process involve
After the installation of Samsung Pay app, you have to register your fingerprint if not done already. The camera app will be open to scan the debit or credit card. It is important to double check if the number, name on the card and expiry date are all correct. And finally, the app verifies the card by sending SMS from the corresponding bank.
How many cards Samsung Pay supports
Samsung Pay app can hold upto 10 cards.
How does Samsung Pay work
Samsung pay uses NFC (Near Field Communication) technique to process the payments at certain ‘tap and pay’ depots. The app works in all the conventional magnetic stripe depots too. These older versions are used in most of the retail stores in the U.S. Samsung Pay uses MST as the phone is kept near these machines. This is how Samsung pay works .
How to make payments with Samsung Pay
Follow these simple steps to pay using Samsung Pay app –
@ Swipe up the lock screen from the Samsung Pay bar above the Home button.
@ Select the card to make the payment, keep the finger on Home button to verify the fingerprint.
@ Back side of the phone should be placed against the terminal for payment.
Read Also : How to secure bank account from hackers
How Samsung Pay is different from Android Pay & Apple Pay
The important factor that makes Samsung Pay differ from Apple Pay is that Samsung Pay can be used at almost all the retail stores accepting debit and credit cards, besides the tap-to-pay NFC depots. This chart depicts how Samsung Pay is unique when compared to Android Pay as well as Apple Pay.
So here is the comparison between Samsung Pay Vs Apple Pay Vs Android Pay .
| Samsung Pay | Apple Pay | Android Pay |
| Devices supporting Samsung Pay app includes- Samsung Galaxy S8, S8 Plus, S7, S7 Edge, S6 Edge+, Galaxy Note 5, Galaxy S6 and S6 Edge, Gear S2 and S3 | Devices supporting Apple Pay app includes – Apple iPhone 7/7Plus, 6/6 Plus, 6S/6S Plus, SE, Apple Watch, MacBook Pro with TouchID, iPad 5th generation, iPad Air 2, iPad Pro and iPad Mini 3 and 4 | Devices supporting Android Pay app includes – Android phones with NFC and HCE support running KitKat (4.4) or higher |
| Countries using Samsung Pay app – US, UK, Australia, South Korea, China, Brazil, Singapore, India, Hong Kong, Malaysia, Puerto Rico, Russia, Spain, Sweden, Switzerland, Thailand, UAE | Countries using Apple Pay app US, UK, Australia, Canada, China, France, Hong Kong, Ireland, Isle of Man, Italy, Japan, New Zealand, Russia, Singapore, Spain, Switzerland, Taiwan | Countries using Android Pay app US, UK, Australia, Canada, New Zealand, Ireland, Poland, Singapore, Hong Kong, Taiwan, Belgium, Japan, Russia |
| Fingerprint or PIN authentication | Fingerprint (TouchID) authentication | Fingerprint authentication on supported phones, otherwise PIN |
| Works with NFC, magnetic stripe or EMV terminals, in-app purchases | Works with NFC terminals, in-app purchases and web purchases in Safari | Works with NFC terminals and in-app purchases |
| Credit, debit, loyalty and gift cards | Credit, debit, loyalty cards | Credit, debit, loyalty and gift cards |
| Wide variety of banks | Wide variety of banks | Wide variety of banks |
Is it Samsung Pay Secure
The account details or the credit card number is not stored on the device by Samsung Pay. Transactions are processed through tokens. Whenever you make a purchase, the device having Samsung Pay send two sets of data to the payment device. First set of data holds a digit token depicting the credit or debit card number and the latter represents one-time code or the code generated by the phone’s symbolic key.
What do I do if I lose my phone when it has Samsung Pay app
You cannot make any payments from the phone unless the PIN or fingerprint is authorized during the setup process. In case you have registered on Samsung’s Find My Mobile service, relevant information related to cards stored in Samsung Pay can be erased remotely.
So if you lose your phone or mobile gets stolen , don’t worry about phone lost with Samsung pay app . It is safe than your thoughts.
Can I use Samsung Pay even without a WiFi/cellular connection
Yes, It is possible, though only 10 payments can be done through Samsung Pay without connecting to WiFi or mobile data. There should be an active internet connection so as to add a card and access the transaction history.
Can Samsung Pay be used overseas
Taking into account the U.S customers, if a card can be used overseas, it is obvious that Samsung Pay can also be accessed. The limitation is that if you wish to add a card while traveling outside the country, you will need to contact the respective bank.
Does Samsung Pay also work for returns
Yes. In such situations, the retailers or merchants would ask you to keep the phone against the payment device, just the way you do when making a payment, so as to avail the return. Besides, you need to match the payment information on the receipt that has the last 4 digits of the ‘virtual’ card number. This can be done using Samsung Pay app.
Review
Samsung Pay will be completely taking over the physical wallet completely and make the pockets free.
In this article, we have come across what is Samsung Pay. The setup process, how it works and how to use Samsung Pay is explained through Samsung Pay Guide. We have also covered a topic – Samsung Pay FAQ, where all the queries related to this app hasd been answered. Hope this article has been helpful to you.
GO CASHLESS…. CARDLESS….. WALLETLESS!!! Enjoy Samsung Pay TENSION ‘LESS’ to make your payments!!